|
|

This chapter describes component removal and replacement, ranging from a single card to a complete node.
The requirements for moving a node depend on the distance involved. In all cases, disconnecting the node must include the following steps:
The remainder of the task is the physical move of the cabinet. The original packing, skid, and box should be used when the node is moved a long distance. For a shorter move, the cabinet wheels should suffice transport.
The removal and/or replacement of a node uses the same procedures as listed in section 4.1 and the procedures covered in the installation section of this manual.
The MUXBUS of an IPX16 or IPX 32 may be replaced in the field. The IPX 8 MUXBUS is not field replaceable, so the entire IPX 8 must return to the factory for MUXBUS replacement. The utility buses and the MUXBUS backplane (Figure 4-1) are the least likely parts to need replacement.
 | Warning Dangerous high voltages and currents are present within the IPX. Be extremely careful when working within reach of equipment to which electric power is applied. |
The IPX does not need to be powered-down before the following parts are replaced:
The IPX must be powered down before any of the following parts are replaced:
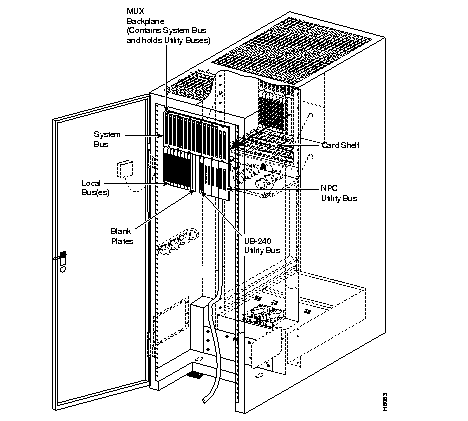
The MUXBUS backplane runs the full length of a card shelf and provides connections between the front and rear cards.
 | Caution Ground yourself before handling IPX cards by putting on a wrist strap and clipping the wrist strap lead to the enclosure. |
To remove a MUXBUS backplane, do the following:
Step 1 From the front of the cabinet, remove all front cards from the shelf.
Step 2 From the rear of the cabinet, disconnect all connections to the SDI and LDI cards and BC-E1 or BC-T1 faceplate. Be sure to label all connections for proper reconnection.
Step 3 Remove all back cards and blank faceplates.
Step 4 On an IPX 16, remove the SCC. On an IPX 32, remove the SCC, LEC, and system bus expansion cables together.
Step 5 Note location of and remove all utility buses.
| Warning Only qualified personnel should remove the MUXBUS backplane. The DC voltage buses are high current buses and can cause injury if crow-barred. Observe standard safety precautions: IPX power must first be turned off. |
Step 6 From the rear of the cabinet, disconnect the power wiring as follows:
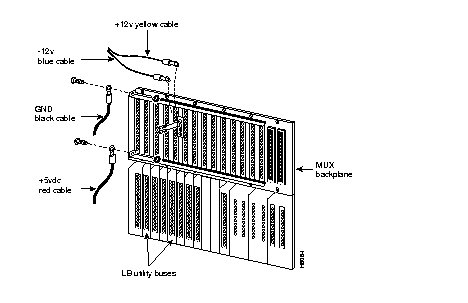
Step 7 Remove and save all 12 mounting screws and lock washers from the backplane. Do not unscrew the +5 VDC and GND bus bars from MUXBUS backplane.
Step 8 Remove the MUXBUS backplane.
To install a MUXBUS backplane, do the following:
Step 1 At the rear of the cabinet, position the new MUXBUS backplane with the corner notch facing top-left.
Step 2 With the MUXBUS backplane over the mounting holes, insert 12 mounting screws with lock washers and tighten them so that the panel remains adjustable.
Step 3 Replace the appropriate utility buses in the first, last, and one of the middle slots. Tighten the mounting screws only enough to hold the utility bus loosely.
Step 4 Install the front cards in the slots that the were equipped with utility busses in the previous step. Use care when plugging in the front cards, and make sure they are completely seated in the connectors.
Step 5 Tighten all the mounting screws on the MUXBUS backplane and the utility buses installed in step 3. This insures proper alignment of the backplane.
Step 6 From the rear of the cabinet, connect the power wiring as follows:
Step 7 Return the remaining utility buses to the locations from which they were removed.
Step 8 On an IPX 16, replace the SCC. On an IPX 32, replace the SCC, LEC, and system bus expansion cable together.
Step 9 Re-install all back cards and any blank faceplates.
Step 10 Reconnect all connections to all the back cards.
Step 11 Re-install all the front cards.
Step 12 Bring up the IPX.
The two types of NPC utility buses are the one-slot bus and the two-slot bus. The procedure for replacing these buses is identical. On the top shelf, the NPC utility bus connects a front NPC card to a rear SCC card. On an IPX 16, the two-slot bus may contain two NPCs for redundancy. On the bottom shelf of an IPX 32, the NPC utility bus connects a front NPC card to a rear LEC card. Also, on an IPX 32, the system buses on the top and bottom shelves are connected together with the system expansion cable that connects the SCC and LEC.
| Caution Ground yourself before handling IPX cards by putting on a wrist strap and clipping the wrist strap lead to the enclosure. |
To remove a NPC utility bus, do the following:
Step 1 From the front of the enclosure, unlatch and remove the NPC card(s) from the NPC utility bus. On a two-slot bus, be sure to remove the cards from both slots.
Step 2 From the rear of the cabinet, disconnect the power supply monitor cable, temperature monitor cable, and any peripheral equipment such as printers, control terminals, or modems from the SCC. Be sure to label each connection, so they can be properly reconnected.
Step 3 On an IPX 16, remove the SCC. On an IPX 32, remove the SCC or LEC, and system bus expansion cable together.
Step 4 Remove the four mounting screws from the NPC utility bus, then carefully remove the utility bus.
To install a NPC utility bus, do the following:
Step 1 At the rear of the cabinet, position the new utility bus with the corner notch facing top-left.
Step 2 Position the NPC utility bus over the mounting holes, then insert the four mounting screws and tighten them so that the panel is still adjustable.
Step 3 Install the NPC card(s). Align the NPC utility bus panel in the correct relationship to the MUXBUS panel above it, then tighten the four mounting screws.
Step 4 On an IPX 16, install the new SCC back card. On an IPX 32, install the SCC, LEC, and system expansion and interconnect cables.
Step 5 Connect the power supply monitor, temperature monitor, and peripherals to the SCC.
Installation of the NPC and SCC-B cards is straight forward. However, a separate upgrade procedure is used for an NPC by itself and an NPC with an SCC-B
| Caution To prevent damage to IPX cards, ground yourself before handling IPX cards by clipping on a wrist strap and clipping the wrist strap lead to the enclosure. |
Two utility buses can be used with the SDP card. These are the SDP-UB and the UB-240, and either is appropriate. The SDP-UB utility bus connects a front SDP card to a rear SDI card (V.11, V.35, V.24). The SDP-UB utility bus is a single connector utility bus. One is required for each SDP card. The UB-240 can be used in place of the SDP utility bus and is backward compatible with the SDP utility bus.
| Caution Ground yourself before handling IPX cards by placing a wrist strap on your wrist and clipping the wrist strap lead to the enclosure. |
To remove an SDP-UB utility bus, do the following:
Step 1 From the front of the cabinet, remove the SDP card located in the slot number of the defective SDP utility bus.
Step 2 From the rear of the cabinet, disconnect all data connections to the SDI in the corresponding slot number of the defective SDP utility bus. Be sure to label each connection with its port number so you can reconnect them.
Step 3 Remove the SDI card(s).
Step 4 Remove the two mounting screws from the SDP utility bus, then carefully remove the utility bus.
To install an SDP utility bus, do the following:
Step 1 At the rear of the cabinet, orient the new SDP utility bus with the corner notch facing top-left.
Step 2 Position the SDP utility bus over the mounting holes, then insert two mounting screws and tighten them so that the panel is still adjustable.
Step 3 At the front of the cabinet, install the SDP card so as to align the SDP utility bus panel in correct relation to the MUXBUS panel above it, then tighten the four mounting screws.
Step 4 At the rear of the cabinet, return any other SDI cards or faceplates.
Step 5 Re-install the data connections on the SDI card(s) so they match the cabling before the cables were removed.
For a CEPT (E1) system, the LB00 utility bus connects a front card (CDP, NTC, LDP, or CIP (upgraded systems)) to a rear card (LDI and BC-E1). The LB utility bus is a single connector utility bus with one required for each card (CDP, LDP, NTC or CIP (upgraded systems)) mounted in the front of the cabinet to a corresponding card (LDI and BC-E1) mounted at the rear of the cabinet.
For a T1 system, the LB00 utility bus connects front LDP cards to rear LDI cards (four-port RS-232C/D and eight-port RS-232C/D). The LB utility bus is a single-connector utility bus. One bus is required for each LDP and LDI card pair.
| Caution Ground yourself before handling IPX cards by putting on a wrist strap and clipping the wrist strap lead to the enclosure. |
To remove an LB utility bus, do the following:
Step 1 From the front of the cabinet, remove the card (CDP (upgraded systems), NTC, CIP, LDP) located in the slot number of the defective LB utility bus.
Step 2 From the rear of the cabinet, disconnect all data trunk or circuit connections to the back card (LDI and BC-E1 or BC-T1) in the corresponding slot number of the defective LB utility bus. Be sure to label each connection with its port number, so they can be correctly reconnected.
Step 3 Remove the back card.
Step 4 Remove two mounting screws from the LB utility bus, and carefully remove the utility bus.
To install an LB utility bus, do the following:
Step 1 At the rear of the cabinet, position the new LB utility bus with the corner notch facing top-left.
Step 2 Position the LB utility bus over the mounting holes, then insert two mounting screws and tighten them so that the panel is still adjustable.
Step 3 Install the front card so as to align the LB utility bus panel in correct relation to the MUXBUS panel above it, then tighten the four mounting screws.
Step 4 Replace the back cards or faceplates that were removed.
Step 5 Connect all the data circuit or trunk connections to the back card (LDI and BC-E1 or BC-T1) in the configuration they had before removal.
The following procedures must be followed to upgrade a node to an NPC controller card with or without the SCC-B card (with Ethernet port).
This procedure is for upgrading a network node to use an NPC. This procedure is non-disruptive for nodes equipped with redundant PCCs. For nodes that utilize a single PCC, a short service interruption occurs. Since this procedure involves the use of some commands that are above privilege level 1, it should be performed by or under the supervision of Cisco Customer Service or other support personnel. This procedure is a broad outline: not every step is detailed. The following procedure disrupts service and should be performed during low traffic periods.
Step 1 Enter any command and observe the release number at the top of the display, otherwise use the dsprevs command.
Step 2 IPX nodes must not have a secondary revision configured. Use the loadrev command to load the software image as the primary revision.
Step 3 Make sure at least one node to be upgraded is connected to a StrataView Plus workstation.
Step 4 For nodes with redundant controllers: In all nodes to be upgraded, remove each standby PCC, and replace it with an NPC as in step 5. The nodes run with no backup protection during this operation.
Step 5 Remove the standby PCC by operating its extractor handles and pulling it toward the front of the cabinet.
Step 6 For nodes with a single controller: In the node connected to the SV+ only, remove the PCC by operating its extractor handles and pulling the card toward the front of the cabinet. Replace it with an NPC. The node is now out of service.
Step 7 Issue a loadrev command at the node connected to the SV+ terminal to download the software to the NPCs in the network. You have to wait for 20-30 minutes after system software download is complete for the node configuration data to be transferred from the PCC.
Step 8 Once the NPC on the first node has completed its download, it is used as the source for downloading other nodes. Depending on network size, the maximum number of hops for download requests may need to be increased if all nodes are not being upgraded. Use the SuperUser command cnfdlparm to change the number of hops.
Step 9 For nodes with redundant controllers: After all NPCs have been downloaded and are in standby state (observable with the dspcd command), enter a switchpcc command for each node with a standby NPC. This causes the NPC to become active and the PCC to go into a LOCKED state. Remove all PCCs from nodes equipped with NPCs and replace with NPCs. The newly installed NPC is automatically downloaded from the active NPC. Once all secondary NPCs are in a standby state, backup protection is restored, and the upgrade procedure is done.
Step 10 Issue a dspnds command to see if any node has an alarm after the switch over. This completes the procedure for nodes with single controllers.
If a StrataView Plus workstation is to be connected to an IPX node, the SCC-B is required as this is a LAN connection.
The NPC card has the Ethernet port electronics. The Ethernet connector is on the SCC-B card. Therefore, the SCC-B must work with the NPC to have Ethernet service. Earlier versions of the IPX 8 and IPX 16 may require replacement of the PCC/NPC utility bus when an SCC-B card is used with an NPC. (Check with Cisco Customer Service). This bus adds several traces to route the Ethernet connection between the NPC and SCC-B. For redundant NPC applications, the traces carrying the Ethernet signal from the two NPC cards are bridged together on the SCC-B card to provide port redundancy for the electronics.
IPX 8 and IPX 16 systems are equipped with a single SCC-B card but use a dual utility bus called the UBS-2. This dual utility bus accommodates single as well as redundant NPCs. A single shelf node dedicates slot 1 and 2 for the controller cards and requires the UBS-2 utility bus.
The IPX 32, with an upper and a lower shelf, uses a single slot wide utility bus in both shelves. The utility bus does not require replacement in the IPX 32 nodes. The upper shelf connects to the lower shelf with a cable from the SCC-B to the LEC card to inter-connect the NPCs for redundancy in the node. See Table 4-1 for product numbers of the utility buses.
| System | Product No. | Comments |
|---|---|---|
| IPX 8 or IPX 16 | 550058 | UBS-2 Utility bus (two slots wide): Must be used when the NPC is used with the SCC-B card. |
| IPX 32 | 550059 | Utility bus (one slot wide): Existing utility bus. |
To replace the PCC and SCC with the NPC and SCC-B:
The node's configuration must be saved before replacing the controller cards in this procedure. The node's configuration is saved in the StrataView Plus workstation. For a detailed procedure, refer to the StrataView Plus Operations Guide.
| Caution Ground yourself before handling IPX cards by clipping on a wrist strap and clipping the wrist strap lead to the enclosure. |
Step 1 Save the node's configuration in the StrataView Plus workstation.
Step 2 Remove power to the node via the cabinet circuit breakers.
Step 3 Identify and mark all cables before disconnecting them from the PCCs and SCC (IPX 8 and IPX 16). On an IPX 32 the cables must also be removed from the LEC.
Step 4 Remove each NPC (front cards) by operating the extractor handles and pulling the card toward the front of the cabinet.
Step 5 Loosen the captive mounting screws on the top and bottom of the faceplate of the SCC (IPX 8 and IPX 16) and LEC (IPX 32). Operate the card extractor levers and slide the card out the rear of the cabinet. Remove the existing SCC (IPX 8 and IPX 16) and LEC (IPX 32) cards. Skip the following step (6) for the IPX 32 nodes.
Step 6 Remove as many cards as needed to have clear access for replacing the utility buses on the IPX 8 and IPX 16. Remove the screws securing the existing buses and replace the buses. Install the new utility buses using the same mounting screws. The IPX 8 and IPX 16 reserve slot 1 and slot 2 for controller cards and the UBS-2 is installed at slot 1 and 2.
Step 7 Insert the NPC, SCC-B and LEC. Do not force if resistance is encountered. Find the cause of resistance and re-insert card. Move the extractor handles to lock the card into the shelf. Install the NPCs in slot 1 and 2 (for redundancy in an IPX 8 and IPX 32), or in slots 1 and 17 of an IPX 32. The SCC-B card is installed in slot 1 from the back of the cabinet. The LEC is installed in slot 17 from the back of the cabinet of an IPX 32.
Step 8 Apply power to the node by operating the circuit breakers.
This procedure involves the use of some commands that are above privilege level 1 and should be performed by, or under the supervision, of Cisco Customer Service or other support personnel. This procedure is a broad outline and not every step is detailed.
Step 1 Make sure the node to be upgraded is connected to a StrataView Plus workstation.
Step 2 Load IPX System Software Release 7.2 or later on the StrataView Plus workstation.
Step 3 From the StrataView Plus administration window, enter the loadrev command.
Step 4 The IPX node will automatically find the software image and load it into the NPC. When one NPC is loaded it will become active and automatically load the system software into the secondary NPC.
Step 5 The node's configuration must be restored and is loaded from the StrataView Plus workstation using the loadcnf command followed by the runcnf command from the administration window.
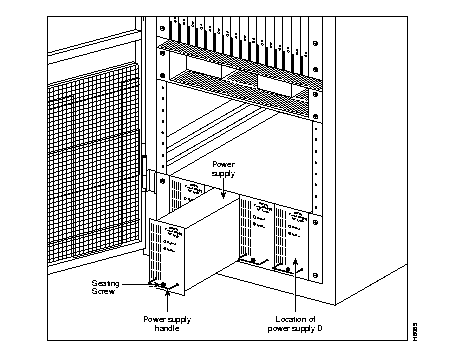
When a power supply has failed, its red FAIL light turns on. Before replacing a power supply, check to see if it only needs to be reseated. To reseat a power supply perform steps 1 through 2; and perform Step 3 to recheck the power supply. To remove a power supply, continue with Step 4:
Step 1 Slowly loosen the seating screw (CCW) at the bottom of the power supply (Figure 4-3). As the screw is loosened, the unit will begin sliding out towards you.
Step 2 After slightly loosening the seating screw, slowly tighten it up again.
Step 3 Check to see that the power supply monitor is correctly monitoring the supply by entering the command resetcd 0 at the control terminal to reset the power supply monitor on the SCC. Wait a few seconds to see if the power supply FAIL light comes on again.
Step 4 Slowly loosen the seating screw counter clock-wise (CCW) on the power supply until the unit is free to slide all the way out of the cabinet.
To install a power supply perform the following steps:
Step 1 Insert a new power supply. Slowly tighten the seating screw until the unit is securely in place.
Step 2 Check the power supply voltages.
|
|