|
|

The general description of the IPX 16/32 and IPX 8 includes a functional overview, power requirements, mechanical configuration, a circuit card and backplane description, and a description of the Alarm Relay Card (ARC) and associated backcard (ARI). For installation instructions for the IPX, refer to the IPX Installation manual.
The chapter includes the following:
The IPX is a narrowband ATM switch that accepts frame relay, digitized voice and FAX, encoded video, data streams, etc., and adapts these information streams into fixed length cells. These cells are then routed to appropriate network interfaces, either ATM or FastPacket.
The IPX consists of three different configurations. The IPX 8, the smallest configuration, provides an economical solution for smaller network locations. The IPX 16 and 32 provide traffic connections between medium and larger sites. All configurations include redundancy support with automatic diagnostics and switchover in the event of equipment failure.
The IPX supports Frame Relay to ATM Interworking and Tiered Networks.
A Port Concentrator Shelf (PCS) is available that increases port density per IPX slot from 4 frame relay connections to 44 connections for those applications requiring lower-speed frame relay connections. Refer to "Port Concentrator Shelf (PCS)" section later in Chapter 4.
TDM Transport: TDM Transport bundles DS0s to form a single, transparent connection through the network using CDP cards with Rev. C Firmware. TDM Transport is most valuable for transporting TDM data received from trunks in older TDM type WANs.
Interworking allows users to retain their existing services, and as their needs expand, migrate to the Interworking allows users to retain their existing services, and as their needs expand, migrate to the higher bandwidth capabilities provided by BPX ATM networks. Frame Relay to ATM Interworking enables frame relay traffic to be connected across high-speed ATM trunks using ATM standard Network and Service Interworking
Two types of Frame Relay to ATM interworking are supported, Network Interworking (Figure 1-1) and Service Interworking (Figure 1-2). The Network Interworking function is performed by the AIT card on the IPX, the BTM card on the IGX, and the FRSM card on the AXIS. The FRSM card on the AXIS and the UFM cards on the IGX also support Service Interworking.
The frame relay to ATM network and service interworking functions are available as follows:
Part A of Figure 1-1 shows typical frame relay to network interworking. In this example, a frame relay connection is transported across an ATM network, and the interworking function is performed by both ends of the ATM network. The following are typical configurations:
Part B of Figure 1-1 shows a form of network interworking where the interworking function is performed by only one end of the ATM network, and the CPE connected to the other end of the network must itself perform the appropriate service specific convergence sublayer function. The following are example configurations:
Network Interworking is supported by the FRP on the IPX, the FRM and UFM-C and UFM-U on the IGX, and the FRSM on the AXIS. The Frame Relay Service Specific Convergence Sublayer (FR-SSCS) of AAL5 is used to provide protocol conversion and mapping.
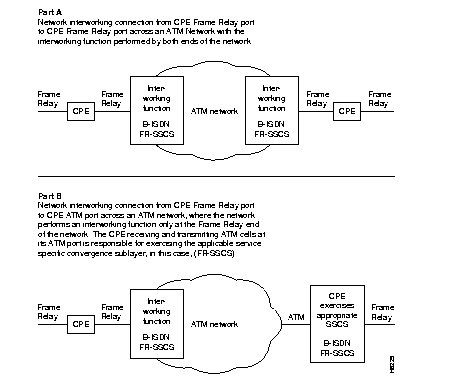
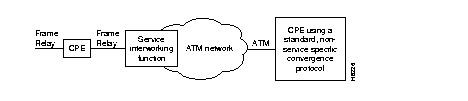
Figure 1-2 shows a typical example of Service Interworking. Service Interworking is supported by the FRSM on the AXIS and the UFM-C and UFM-U on the IGX. Translation between the Frame Relay and ATM protocols is performed in accordance with RFC 1490 and RFC 1483. The following is a typical configuration for service interworking:
For additional information about interworking, refer to the System Overview manual.
Networks may be configured as flat (all nodes perform routing and communicate fully with one another), or they may be configured as tiered. In a tiered network interface shelves are connected to routing hubs, where the interface shelves are configured as non-routing nodes.
By allowing CPE connections to connect to a non-routing node (interface shelf), a tiered network is able to grow in size beyond that which would be possible with only routing nodes comprising the network.
With Release 8.5, in addition to BPX routing hubs, tiered networks now support IGX routing hubs. Voice and data connections originating and terminating on IGX interface shelves (feeders) are routed across the routing network via their associated IGX routing hubs. Intermediate routing nodes must be IGX nodes, and IGX interface shelves are the only interface shelves that can be connected to an IGX routing hub. With this addition, a tiered network can now provide a multi-service capability (frame relay, circuit data, voice, and ATM).
In a tiered network, interface shelves at the access layer (edge) of the network are connected to routing nodes via feeder trunks (Figure 1-3). Those routing nodes with attached interface shelves are referred to as routing hubs. The interface shelves, sometimes referred to as feeders, are non-routing nodes. The routing hubs route the interface shelf connections across the core layer of the network.
The interface shelves do not need to maintain network topology nor connection routing information. This task is left to their routing hubs. This architecture provides an expanded network consisting of a number of non-routing nodes (interface shelves) at the edge of the network that are connected to the network by their routing hubs.
For detailed information about tiered networks, refer to the "Cisco StrataCom System Overview" manual.
T1/E1 Frame Relay connections originating at IPX and IGX interface shelves and T1/E1 Frame Relay, T1/E1 ATM, CES, and FUNI connections originating at AXIS interface shelves are routed across the routing network via their associated BPX routing hubs.
The following requirements apply to BPX routing hubs and their associated interface shelves:

For further information on Tiered Networks, refer to the Cisco StrataCom System Overview manual and the BPX Reference Manual.
The IPX node is enclosed in a modular cabinet that supports a variety of configurations. The cabinet is free-standing and self-contained. The shelves for plug-in system modules (cards), power supplies, and cooling are included in the cabinet. Throughout this manual, the use of the word "node" includes the cabinet.
The IPX cabinet is a free-standing, painted steel enclosure with front and rear doors. The cabinet contains all system modules, power supplies, and cooling fans. Components can be easily added, removed, maintained, and replaced. There is room in the back of the cabinet to terminate all system cabling. The front door of the cabinet provides access to front cards and other system components. The back door provides access to rear cards and cabling connections. A keyed mechanism secures both doors.
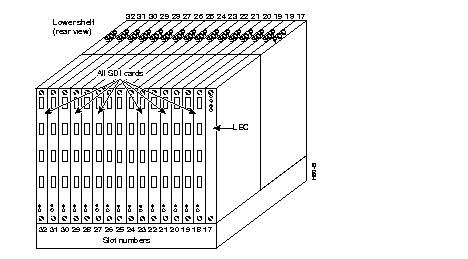
The IPX 16 cabinet contains one card shelf (with front and back slots for card access), a cooling unit, power distribution unit, and one or two power supplies. Figure 1-4 shows the position of the major components of an IPX 16.
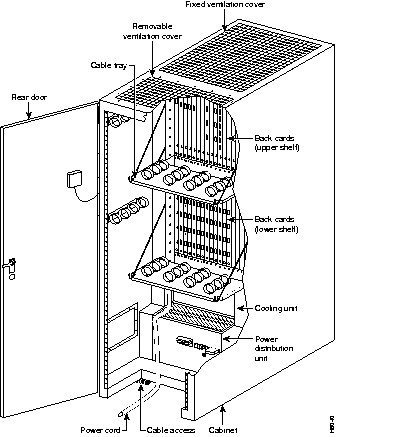
The IPX 32 cabinet contains two card shelves, a cooling unit, power distribution unit, a booster fan assembly for additional cooling, and up to four power supplies. Figure 1-5 shows the position of the major components of an IPX 32.
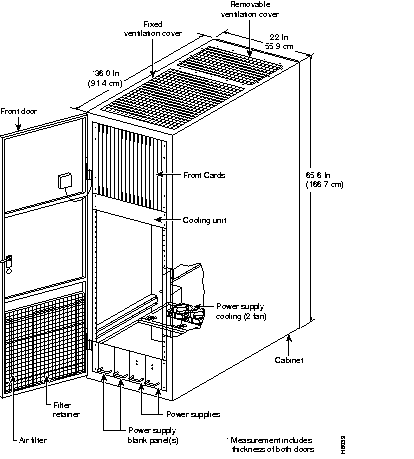
The power supplies for the IPX 16/32 reside at the bottom of the cabinet. Room exists for up to four 600-watt power supplies. Each power supply can provide up to 600 watts of +5 VDC and ±12 VDC for system use. Typically, three or fewer supplies can power an IPX 32 node. The power supplies are load-sharing and are usually configured for N+1 redundancy.
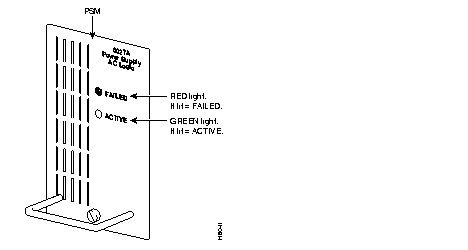
IPX nodes are factory-configured for either 208/240 VAC or -48 VDC input. The main circuit breaker is located the Power Distribution Unit at the rear of the cabinet. The front panel has two status indicators, Failed and Active (Figure 1-6).
Two fans at the rear of the PDU remove the heat dissipated by the power supplies.
Cabinets shipped prior to August 1994 have a cooling/power distribution unit, and this section applies to those cabinets.
Cooling for the IPX 16/32 cabinet is incorporated in the Power Distribution Unit (PDU). The PDU provides input power connections and fuses and/or circuit breakers for protection against electrical overload. The PDUs for the IPX 16 and IPX 32 are the same for each cabinet. They are located below the lowest shelf in either system. An additional four fan cooling assembly is provided in the IPX 32 cabinet for the additional shelf.
The PDU is located immediately underneath the card shelf on the IPX 16. Six fans draw air through the filter in the front door of the cabinet to provide airflow through the cabinet and to the upper card cage. A cooling fan mounted on the top-rear of each power supply shelf draws cooling air in near the front of the supply and vents it out the back.
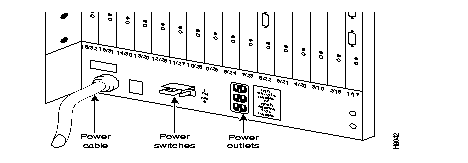
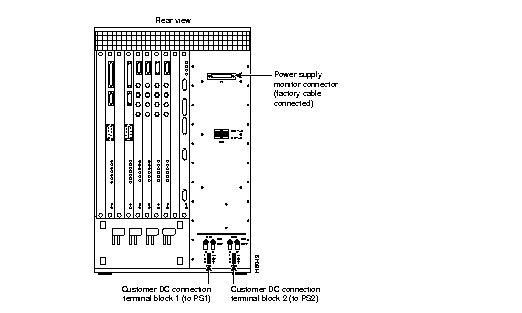
The AC PDU illustrated in Figure 1-7 terminates the AC power cable. It also mounts circuit breaker/power switches CB1 and CB2 ("Power Switches" in Figure 1-7), which are used for turning on and off the primary power to the IPX. Three AC power outlets sit to the right of the power switches for connecting test equipment or other external equipment that requires AC power (such as modems, echo cancellers, etc.). The AC outlets in the United States provide 120 VAC, and the international AC outlets provide 208 or 220 VAC.
Connector P1 carries power-sense leads to the SCC, where the voltages are monitored. This is not a customer connection. Fans that assist in cooling the power supplies sit behind the Power Distribution Unit.
On an IPX 32, the six-fan cooling assembly is located below the lower card shelf, and another four fan assembly is located between the upper and lower card cages. The upper fan assembly provides additional airflow to the front of the card shelves.
The Power Supply Monitor senses cabinet temperature and sends an alarm to the control terminal if the internal cabinet temperature reaches approximately 50× C. The cabinet temperature can be displayed on the control terminal at any time on request.
IPX 16/32 cabinets shipped after August 1994 have a reduced AC power input requirement. as a result of the elimination of the convenience outlets and their associated circuit breaker.
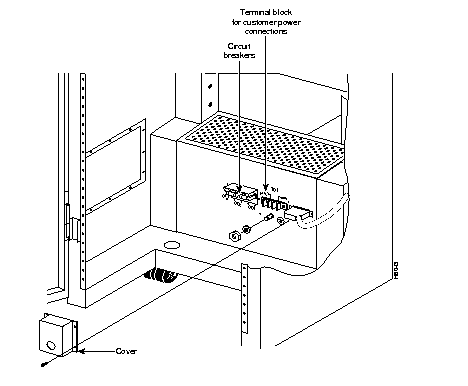
The DC PDU (Figure 1-8) is used on IPXs powered by -48 VDC. The -48 VDC is supplied by telephone central office battery supplies or wherever a battery backup is provided for the IPX when AC power is absent. Terminal block TB1 on the DC PDU terminates the input power and ground wiring. Circuit breaker/power switches CB1 and CB2 are used for turning on and off the primary power.
Connector P1 carries power-sense leads to the SCC, where the voltages are monitored. This is not a customer connection. Fans that assist in cooling the power supplies are located behind the Power Distribution Unit.
Each cabinet shelf has a double set of card slots. Each set consists of a front slot and a corresponding back slot. Located between the front and back slots is a system mid-plane (rather than a backplane) which contains circuit traces for a majority of the system electrical interconnects between various shelf connectors.
Front slots typically contain data processing cards (processors, PADs, etc.), and the back slots contain system interface cards. In many cases, a functional card set contains one or more front cards and one or more associated back cards. Both front cards and rear cards have faceplates with indicator LEDs and controls. Rear card faceplates have cable connectors in addition to indicator LEDs.
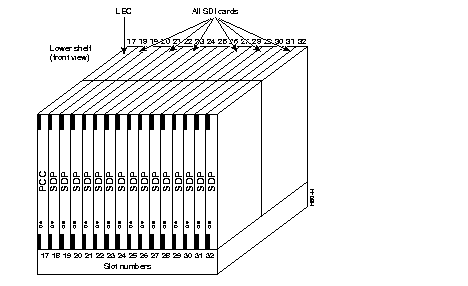
Up to 16 cards can be installed in each of the upper and lower 16-slot front card shelves. The plug-in cards in the front slots are the basic system unit cards (for example, NPC, NTC, CIP, SDP, LDP, AIT, ARC and CDP). The cards in the back slots are the network and user interface cards (for example, BC-E1, BC-T1, BC-T3 and BC-SR, the SCC, LEC, AIT-T3/E3, ARI, the SDI and LDI). Figure 1-9 and Figure 1-10 show some typical card placements. Most card types can reside within any vacant slot and appropriate utility bus. Only the controller card has specific slot assignments for primary and redundant units.
The IPX 8 provides most of the capabilities and features of the IPX 16/32 but in a smaller package which enables network designers to extend IPX networks into lower density areas. The IPX 8 features:
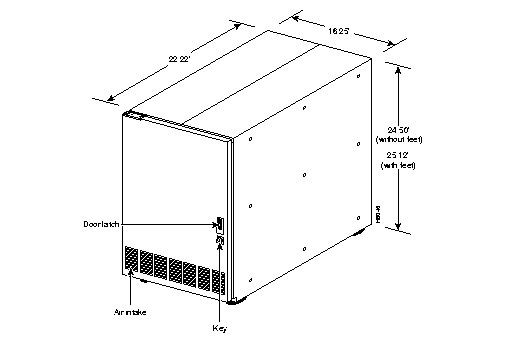
An IPX 8 node is enclosed in a modular cabinet so it can be either free-standing or rack-mounted. The cabinet is self-contained and uses forced-air circulation. It includes all shelves for plug-in system modules (cards), power supplies, and cooling.
The IPX 8 cabinet (Figure 1-11) is a painted steel enclosure with a front door. The front door provides access to the front cards, power supplies, fans, and air filter assembly (Figure 1-12). The front door is provided with a gasket for EMI shielding and is secured by a keyed latch. The cabinet can include either mounting feet or rack-mounting rails.
Cooling air enters through a vent at the bottom of the front door and through an air filter assembly at the bottom of the cabinet. This air exits at the back through a plenum mounted at the top-rear of the cabinet.
Access to back cards and cabling connections is available at the rear. A PDU is located at the rear on the right side. Velcro cable ties are provided at the rear of the cabinet to organize cables. Since there is no back door, blank filler cards must occupy empty card slots to eliminate Radio Frequency Interference (RFI) and Electro-Magnetic Interference (EMI) and to ensure proper air flow through the cabinet.
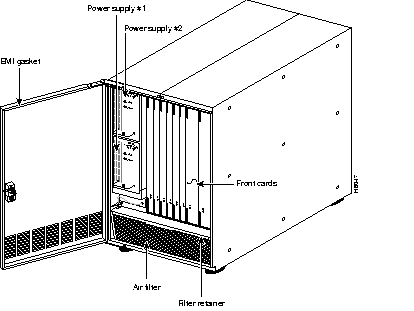
The IPX 8 power supply slots are located at the left side of the cabinet behind the front door. Space exists for two, stacked 600-watt power supplies. The bottom supply is provided as standard; the top supply is optional. In all cases, a node can be completely powered by one supply. The optional second supply provides redundancy.
Unlike power supplies in the IPX 16/32, each IPX 8 power supply has its own separate input. An IPX 8 can be configured with either 110/220 VAC (switch selectable) or -48 VDC input. The IPX 8 does not have accessory receptacles.
Power supply output voltages are monitored by the Power Supply Monitor (PSM) on the System Clock Card (SCC). The status of each power supply and the cabinet temperature is displayed on the control terminal. Each power supply has a red FAIL and a green ACTIVE indicator.
The fan assembly at the bottom-front of the cabinet provides system cooling. This assembly contains three DC-powered fans that draw air through a wire mesh filter and push the air through the cabinet. Air exits at the rear of the cabinet. The wire mesh air filter is easily removed for cleaning. Refer to preventive maintenance instructions in this manual for cleaning interval and procedures.
The Power Supply Monitor detects the cabinet temperature and sends an alarm to the control terminal if the internal cabinet temperature reaches approximately 50× C. The operator can display the cabinet temperature on the StrataView Plus terminal or any terminal attached to the system.
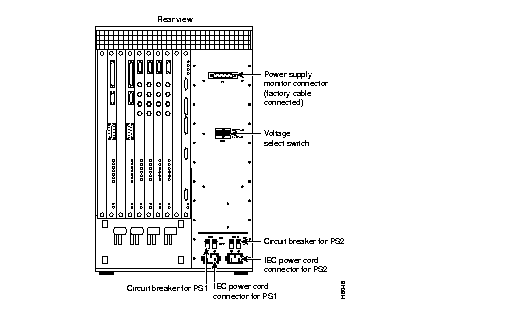
In the IPX 8 node, the PDU resides immediately behind the two power supply slots at the rear of the IPX 8 cabinet.
An AC-powered IPX 8 has two 10-Amp circuit breaker/power switches CB1 and CB2 ("Circuit Breaker for PS1" and "Circuit Breaker for PS2" in Figure 1-13). The circuit breaker on the left (viewed from the rear of the IPX 8) controls the lower power supply, and the circuit breaker on the right controls the upper power supply.
A separate power cord and circuit breaker connects each of the power supplies to a power source. Each power supply should be connected to a separately protected outlet in the facility. A cable clamp in each of the two power cord receptacles prevents the power cords from accidentally becoming disconnected. Connector P1 is used to carry power-sense leads to the SCC, where the voltages are monitored. This is not a customer connection.
A two-position sliding voltage selector in the center of the AC PDU is used to select either a 110 VAC or 220 VAC input. Each AC input has a series line filter on the back of the AC PDU to suppress AC line noise.
Two circuit breakers are provided for overload protection and for turning the input DC power on and off (Figure 1-14). DC configured IPX 8 cabinets are powered by 48 VDC from central office battery supplies or from a battery backup when necessary.
Terminal blocks TB1 and TB2 on the DC PDU (Figure 1-14) connect the input power and ground wiring. The top screw terminal connects to -48 VDC input. The bottom terminal connects to the 48 VDC return. The middle terminal connects to chassis ground.
The IPX 8 cabinet contains one card shelf with numbered front and back slots for card access (Figure 1-15). The front card slots are typically equipped with processor cards, and the back cards are used for network interfaces.
The number 1 and number 2 front slots are reserved for the primary and redundant NPC controller cards and, the accompanying SCC is factory-installed in rear slot number 1. If the system is equipped with a redundant NPC, the redundant card resides in slot number 2, and the rear slot number 2 remains empty.
Up to six other cards, such as NTC, CDP, FRP, SDP, ARC, ATM, or LDP, can reside in a front card shelf. The cards in the back slots are the network and user interface cards (for example, BC-E1, BC-T1, BC-SR, FRI, SDI, and LDI). Most card types cards may reside anywhere that a vacant slot and appropriate utility bus are available. Only the controller card and power supply have assigned slots for primary and redundant units.

For ease of ordering, the IPX 8 is offered in factory-configured assemblies. These assemblies are available in a variety of input power and trunk format configurations (Table 1-1). These assemblies are equipped with one NPC and one SCC. The remaining slots are available for additional system cards.
| Configuration | Model No. |
| T1 110 VAC | 590400 |
| T1 48 VDC | 590401 |
| E1 CEPT 240 VAC | 590402 |
| E1 CEPT 48 VDC | 590403 |
System assemblies indicated as T1 are configured with a BC-T1 back card for the associated NTC and CDP. Assemblies indicated as E1 are configured with a BC-E1 as the back card associated with the NTC and CDP. System assemblies indicated as J1 are configured with a BC-J1 as the back card associated with the NTC card and with a BC-Y1 as the back card associated with the CDP.
 | Warning To assure proper cooling airflow and EMI/ESD compliance, the IPX 8 must be configured with all of the back slots occupied by either a back card or a blank panel. |
The IPX16/32 uses the following functional card groups.
Table 1-2 lists the cards that an IPX node can support.
| Card Acronym | Card Name | Front or Back | Model |
|---|---|---|---|
| NPC | Nodal Processor Card | Front | |
| SCC | System Clock Card | Back | |
| LEC | Lower Expansion Card | Back | |
| CDP | Channelized Data PAD | Front | |
| BC-E1 | E1 Trunk Interface Card (Back Card) | Back | |
| BC-T1 | T1 Trunk Interface Card (Back Card) | Back | |
| BC-J1 | J1 Trunk Interface Card | Back | |
| BC-Y1 | Y1 Trunk Interface Card | Back | |
| BC-SR | Subrate Trunk Interface Card (Back Card) | Back | |
| FRP | Frame Relay PAD Card, V.35 | Front | |
| FRP-6 | Frame Relay PAD Card, w/6 chan. | Front | |
| FRP-31 | Frame Relay PAD Card, w/31 chan. | Front | |
| FRI | Frame Relay Interface Card; V.35, T1/E1, X.21 | Back | |
| FRP-2 | Frame Relay Pad for Port Concentrator | Front | |
| FRP-2 -X21 | Frame Relay Pad for Port Concentrator I/F | Back | |
| FTC | FastPAD Card | Front | |
| FPC | FastPAD Card | Back | |
| SDP | Synchronous Data PAD | Front | |
| AIT | ATM Interworking Trunk | Front & | |
| AIT T3 or E3 | ATM Interworking Trunk Interface Card | Back | |
| SDI | Synchronous Data Interface: RS-232C, RS-232D, RS-422/449 X.21, V.24, and V.35 | Back | |
| LDP | Low Speed Data PAD | Front | |
| ARC | Alarm Relay Card | Front | |
| ARI | Alarm Relay Interface Card | Back | |
| LDI | Low-Speed Data Interface RS-232C/D, 4-port, 8-port V.24, 4-Port, 8-Port DDS, 4-port | Back | |
| MT3 | T3 Mux/Demux Card | Front | |
| BC-T3 | T3 Trunk Interface Card (Back Card) | Back | |
| NTC | Network Trunk Card | Front |
The alarms, controls, and indicators reside on the face plates of the front and rear cards and on the power supplies. Each plug-in card has both a green ACTIVE LED and a red FAIL LED at the bottom of the front panel. In general, the meaning of each LED is indicated in Table 1-3. Some other cards have additional indicators, connectors, or controls. These are described in the specific section describing that card.
| Indicators | Status | Meaning |
|---|---|---|
| FAIL | ON Steady | Indicates that the card has failed. |
| FAIL | Blinking | On an NPC in a redundant system, this indicates the card is in an update state. |
| ACTIVE | ON steady | Indicates the card is active and carrying traffic or processing data. |
| ACTIVE | ON momentarily | Indicates that the card has undergone self-test. |
| BOTH | OFF | Indicates the card part of a redundant pair and is in the standby mode or not being used at all. |
| BOTH | ON | Indicates the card has failed but remains active because no standby card is available. For an SDP or LDP card, this could indicate that one or more of the data channels failed, but the others are still active. |
An IPX system contains several types of buses. A brief description follows for each bus. Of particular note are the utility buses because they are selected for the card configuration used in the nodes. With two exceptions, the Local Utility Bus LB00 is used between all interface cards. The exceptions are the SDP card, which uses the UB240 utility bus, and the AIT card set, which uses the Local Bus 2. The controller cards use local utility buses exclusive to the type of controller cards installed.
The 32.768 Mbps System Bus resides on the MUXBUS backplane (Figure 1-12) and consists of two major buses. These buses are the control bus and the time division multiplex (TDM) bus. The NPC uses the control bus to monitor and control the other system unit cards and to control the flow of voice and data through the system. The TDM bus, or MUXBUS, carries packets of data between various packet assembler/disassembler (PAD) cards and the interface cards.
All cards communicate with the controller card (NPC) through the IPX System Bus. As a safeguard against card driver failure or bus failure, the backplane has redundant system buses. In a two-shelf system, a cable between the SCC back card and the LEC back card extends the System Bus to the lower shelf. The cable also connects the NPC in the upper shelf to the NPC in the lower shelf if a redundant NPC is present.
One of two different utility buses work with the NPC card. The two buses are the UBE-1 and the UBS-2. The SCC card type determines which bus is used. Note that in a node with redundant processors, the buses must be the same type.
If the NPC is an upgrade for a PCC, no change of utility bus is necessary. If the NPC is used with the SCC-B card (with Ethernet capability), the utility bus must be changed. In a two-shelf node using redundant NPCs and SCC-B, the upper shelf and lower shelf use the UBE-1 utility bus (single-slot wide). In a single-shelf node using redundant NPCs and an SCC-B, the UBS-2 utility bus (two slots wide) is installed.
This section provides an overview of the Alarm Relay card. The material includes a general description, features, equipment description, installation, and the modified user commands. Alarm summary outputs are provided by the alarm relay card set consisting of the ARC and ARI. This accommodates nodes equipped with only NTC and CDP cards to support relay contact alarm outputs.
Typically, the alarm outputs connect to a telephone central office alarm system for remote alarm reporting to indicate a problem in the associated equipment.
The alarm summary feature on the Alarm Relay cards provides both a visual, front panel indication of an IPX node alarm and a set of relay outputs for indicating node and network alarm indications. A visual alarm history indication is also provided.
The visual alarm history indication is an addition to the alarm output at the node's control port, which provides a data output to a control terminal (such as the StrataView Plus Network Management Station). Table 1-4 summarizes the alarm conditions and the resulting indications.
One set of alarm relays is used to display a major alarm or minor alarm for the node. One pair of contacts on each relay is used for audible alarms. These contacts are in series with a front panel alarm cut-off (ACO) switch. The other set of relay contacts is used for visual alarms. The ACO switch does not affect these contacts.
Any time the ACO switch is operated, a front panel ACO indicator is lit to remind the operator. If the ACO switch is operated to disable the node's audible alarm output and a second alarm arrives, the audible alarm is reactivated. Two front panel LEDs provide local indication of network major or minor alarms.
| Alarm Category | Alarm Severity | Front Panel Indication | Relay Indication |
|---|---|---|---|
| Network | Major | none | Single form-C relay closure or opening. |
| Minor | none | Single form-C relay closure or opening. | |
| Node | Major | MAJOR LED (red) | Visual and audible relay closure only (normally open). |
| Minor | MINOR LED (yellow) | Visual and audible form-C relay closure or opening. | |
| Alarm Cutoff | n.a. | ACO LED (green) | Interrupts audible relay closure. |
| Alarm History | n.a. | HIST LED (green) | None. |
A second, independent set of alarm outputs exists to report network alarms. If either a major alarm or minor alarm occurs anywhere in the network, these alarm relays are activated.
Major alarm relays are normally energized (creating an open circuit), so a power failure at the node results in contact closure and a major alarm output. Minor alarms, however, are normally de-energized to conserve power, and both contact closures as well as contact openings are available for minor alarms.
When an alarm condition clears, the alarm relays return to their normal state to clear the alarm outputs. A front panel history indicator goes on whenever a node alarm occurs. The indicator remains on even though an alarm may have already cleared. The history indicator is manually cleared by pressing a front panel switch.
Two additional relays may be operated under software control to report any other condition. These are not utilized currently but may be defined in future releases.
The alarm reporting hardware and software requirements are as follows:
The alarm reporting feature requires a card set that includes an ARC front card, an ARI back card, and a UB-120 utility bus. This card set can go in any slot in the node except slot 1 (reserved for NPC). The recommended slot is slot 16 (the far right slot in the first or top shelf). Since a failure of either of these cards does not affect customer service, no provision exists for card redundancy.
The alarm relays are controlled by the system software's Control Bus commands. The ARC card has an interface with the IPX Control Bus for receiving alarm signals from the NPC or NPC processor card and for sending status signals back to the processor card. It has no connection to the MUXBUS because no customer data exists for packetization. The firmware on the ARC card is responsible for alarm decoding.
The ARC front panel contains the alarm LEDs and ACO and History Clear push buttons as well as active and fail LEDs (for status of the ARC card). See Figure 1-16 and Table 1-5. The ARC card is used in conjunction with an ARI card and communicates with it by using a UB-120 Utility Bus. Relay drive signals originate in the ARC to operate relays on the ARI.
The ARC periodically runs a background self-test to determine the health of the card. If it fails a self-test, the front panel FAIL LED turns on, and the ACTIVE LED turns off.
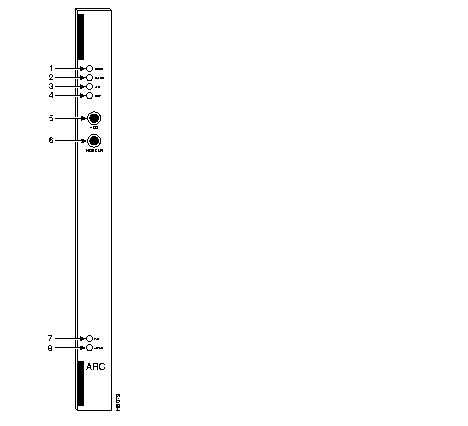
| No. | Indicator | Function |
|---|---|---|
| 1. | MINOR LED (yellow) | Indicates a failure in the local node that is not service-affecting but still should be investigated. It could indicate problems such as a loss of redundancy, a low error rate on a digital trunk (frame bit errors or bipolar errors), etc. |
| 2. | MAJOR LED (red) | Indicates a failure in the local node that is service-affecting and should be addressed immediately (an IPX card failure, for example). |
| 3. | ACO LED (white) | Indicates that a MINOR or MAJOR alarm is present, and that the alarm cutoff (ACO) button (5) was pressed to silence an accompanying audible alarm. The ACO light is turned off when the alarm condition is cleared. |
| 4. | HISTory light (green) | Indicates that an alarm has occurred sometime in the past on the node. The alarm may be current or it may have cleared. Pressing the HIST CLR button (6) turns off this light if there is no current alarm. |
| 5. | ACO button | When pressed, this button silences audible alarm (visual alarms remain on) and turns on ACO light (3). |
| 6. | HIST CLR button | When pressed, this button turns off HIST light (4) if there is no current alarm. |
| 7. | FAIL light (red) | Indicates that the card has failed self-test. |
| 8. | ACTIVE light (green) | Indicates that the card is active, has been assigned using the addalmslot command, and is functioning normally. |
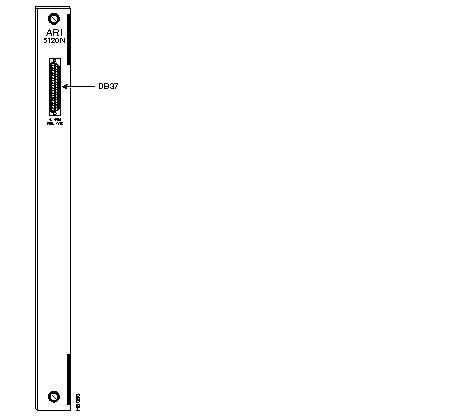
The Alarm Relay Interface (ARI) card contains the alarm relays and their associated drivers. A female DB37 connector on the faceplate provides the connection to the customer's office alarm or alarm reporting system. Refer to Figure 1-17 for an illustration of the ARI card and to Table 1-6 for the pinout of the connector. Table 1-7 lists the unassigned pins.
Alarm outputs are dry-contact closures or opening contacts from Form C relays. User-equipment must supply the voltage source to be switched by the IPX. Any source or load can be switched as long as it meets the following requirements.
| Pin # | Alarm Type | Alarm Name | Alarm Description |
|---|---|---|---|
| 1 | both | CHASSIS | Protective ground |
| 3 | Network | NWMAJA | Major--normally open contact |
| 22 | Network | Major--normally closed contact | |
| 4 | Network | NWMAJC | Major--common contact |
| 10 | Node | MNVISA | Minor Visual--normally open contact |
| 11 | Node | Minor Visual--normally closed contact | |
| 12 | Node | MNVISC | Minor Visual--common contact |
| 16 | Node | MJAUDC | Major Audible--common contact |
| 17 | Node | MJAUDA | Major Audible--normally open contact |
| 23 | Network | NWMINA | Minor--normally open contact |
| 24 | Network | Minor--normally closed contact | |
| 25 | Network | NWMINC | Minor--common contact |
| 29 | Node | NWAUDA | Minor Audible--normally open contact |
| 30 | Node | Minor Audible--normally closed contact | |
| 31 | Node | NWAUDC | Minor Audible--common contact |
| 35 | Node | MJVISC | Major Visual--common contact |
| 36 | Node | MJVISA | Major Visual--normally open contact |
| Pin # | Alarm Type | Alarm Description |
|---|---|---|
| 7 | Relay 2 | common contact |
| 8 | Relay 2 | normally closed contact |
| 9 | Relay 2 | normally open contact |
| 26 | Relay 4 | common contact |
| 27 | Relay 4 | normally closed contact |
| 28 | Relay 4 | normally open contact |
Installation of an ARC card first requires removal of the node from service.
The ARC can go in any front slot except those slots normally reserved for the node processor cards. Reserved slots are 1 and 2 for the IPX 8/IPX 16 and slots 1 and 17 for the IPX 32. For standardization, the recommended slots are slot 8 in an IPX 8 and slot 16 in an IPX 16/32. The corresponding back slot must have an ARI card and a UB-120 Utility Bus.
 | Caution To prevent damage to the cards, ground yourself before handling IPX cards by applying a wrist strap and clipping the wrist strap lead to the enclosure. |
To install an alarm card set, proceed as follows:
Step 1 Remove power from the node.
Step 2 Open the back of the IPX cabinet and identify the slot intended for the ARC card.
Step 3 Remove cards as needed to provide room for installing the UB-120 Utility Bus.
Step 4 Install a UB-120 Utility Bus in the intended slot. Use a long Phillips screwdriver.
Step 5 Install the ARC front card using the extractor handles to secure it in the slot.
Step 6 Install the ARI in the corresponding back slot using the extractor handles to secure it. Finger tighten the captive screws.
Step 7 Observe that both the FAIL LED and ACTIVE LED are off.
Step 8 Wire up a 22 or 24-gauge cable with the appropriate number of pairs (typically a 12-pair cable) with a male DB37 connector at one end. Connect this cable to the DB37 connector on the ARI card and tighten the connector captive screws.
Step 9 Apply power to the node.
This section describes the steps required to set up an alarm card set after the physical installation. This is done from the IPX control terminal or StrataView Plus workstation. For details on each command used, see the IPX/BPX Command Reference Manual.
Step 1 Verify that the node has the correct ARC front card and ARI back card by using the Display Cards (dspcds) command. This shows the slot in which they reside.
Step 2 From a control terminal or StrataView Plus NMS workstation, vt to the node.
Step 3 Enter the addalmslot command followed by the ARC's slot number. This activates alarm reporting from the card.
Step 4 Observe that the ACTIVE LED on the ARC card is on.
Testing the operation of the alarm outputs involves creating an alarm and noting the corresponding alarm output. This can be done easily on a node that is not connected to the network but not for a node that is part of a normally operating network. The best time to create a major alarm is during a low traffic period. If this is done, proceed to Step 5. Otherwise, stop here.
Step 5 Create an alarm by disconnecting a trunk cable from the connector on a BC-T1, BC-E1, or BC-SR back card.
Step 6 Observe that a MAJOR LED is lit on the front of the ARC.
Step 7 With a VOM, measure for continuity between pins 16 and 17 and between pins 35 and 36 at the DB37 connector on the ARI card.
Step 8 Reconnect the cable that was disconnected in Step 5.
Step 9 With the VOM, check that the reading between pins 16 and 17 and pins 35 and 36 shows open circuits and that the MAJOR LED is off.
The paragraphs in this section describe the maintenance and troubleshooting features associated with the ARC card set. No preventive maintenance is required.
As with all IPX cards, the ARC includes a number of internal diagnostic routines that periodically run to test the card's performance. These diagnostics automatically run in the background and do not disrupt normal traffic. If a failure occurs during self-test, the front panel red FAIL LED goes on. The control terminal operator can observe card status by using the Display Card (dspcd) command. A report of a card failure remains until cleared. The Reset Card (resetcd) command clears the failure report.
The two types of resets that can be specified to resetcd are hardware and failure history. A reset failure history clears the event log of any failure detected by the card self-test and does not disrupt operation of the card. A reset of the card firmware is done by a hardware reset. A hardware reset reboots the firmware and momentarily disables the card.
Replacing an ARI card is done the same way as replacing an SDI card.
The following three commands apply to the ARC card set:
At least one IPX node in a network has a connection to either StrataView Plus, a control terminal, or a dial-in modem. Any control terminal connected in the network can configure, manage, monitor, and diagnose the entire network. In addition, at least one IPX node in a network may have an attached printer for printing error and event reports.
The control terminal and printer connect to two RS-232 serial ports (CONTrol port and AUXiliary Port). The RS-232 ports are located on the SCC faceplate. These serial ports support all standard asynchronous data rates from 1200 through 19,200 baud. The default rate is 9600 baud. Using the IPX software, data rates and the type of equipment connected to the ports can be configured.
To allow Customer Service personnel to perform remote diagnostic tests, a direct-dial modem attached to an IPX in the network is recommended. This modem connects to the midplane at the CONT port. In addition, an auto-dial modem can connect to the AUX port connector on the SCC at any node in the network so that remote error messages and alarms can be sent to the Customer Service. The Customer Service automatically logs these messages.
Two external clock sources can connect to the SCC card through an external clock adapter cable. The external clock device can be either a 1.544 MHz or 2.048 MHz RS-422 square wave signal. The software-selectable choice depends on the primary application of the IPX. The clock stability should be at least as good as a STRATUM 3 clock source. Appendix B lists the terminals, printers, modems, and clock sources that have been tested and approved for the IPX.
|
|