
Table of Contents
Installing the Cisco 1020
Installing the Cisco 1020
This chapter provides installation instructions for the Cisco 1020. Before you install the Cisco 1020, read the chapter "Preparing for Installation." The following topics are covered in this chapter:
- Unpacking and Inspecting the Cisco 1020
- Desktop Installation Procedure
- Wall-Mounting Installation Procedure
- Front-Panel LEDs
- Rear-Panel Connectors and DIP Switches
- Connecting to the Network
Unpacking and Inspecting the Cisco 1020
Do not unpack the Cisco 1020 router until you are ready to install it. Keep the router in the shipping container to prevent accidental damage until you determine where you want to install it, then proceed with the unpacking. The router, cables, power cord, and optional equipment or publications you ordered might be shipped in more than one container. Check the packing list to ensure that you received the following items:
- Cisco 1020
- Power supply and cord
- Console cable (RJ-45 to DB-25 female)
- Warranty package
- Optional companion publications (including UniverCD) as specified on your order
- UniverCD and optional printed publications as specified in your order
Inspect all items for shipping damage. If anything appears damaged, contact a customer service representative.
Desktop Installation Procedure
To place your Cisco 1020 on a desktop, bookshelf, or other flat secure surface, perform the following steps:
Step 1 Check that the plastic feet on the bottom of your Cisco 1020 are turned so that they are completely under the unit.
Step 2 To install the cables in the ports at the rear of the Cisco 1020, set the Cisco 1020 on the designated surface, so that you have access to the rear panel.
 Caution Do not place anything on top of the Cisco 1020. Excessive weight could damage the unit.
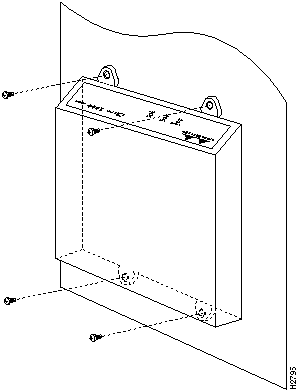
Wall-Mounting Installation Procedure
To install your Cisco 1020 on a wall, perform the following steps:
Note The Cisco 1020 should be mounted so that its LEDs are easily visible and so that the power supply does not hang from its cable. The power supply will disconnect from its cable if it is not supported on a horizontal surface. For the best support of the Cisco 1020, position the plastic feet so that the screws line up with a vertical wall stud.
Step 1 To mount the chassis, locate the plastic feet on the bottom of the unit. Swing the plastic feet out 90 degrees, so that the holes are exposed.
Step 2 Using screws and anchors that you provide, attach the Cisco 1020 to the wall. See Figure 3-1. We recommend aligning brackets with a vertical stud.
 Caution If the screws are improperly anchored, cable strain could pull the chassis from the wall.
Figure 3-1 : Wall-Mounting the Cisco 1020
Front-Panel LEDs
Figure 3-2 shows the front-panel LEDs, which are described in Table 3-1. Use the LED descriptions to verify proper operation.
Figure 3-2 : Cisco 1020---Front-Panel LEDs

Table 3-1 : Front-Panel LED Descriptions
| SYSTEM - OK
|
This LED provides three types of diagnostic information:
- During initial hardware self-test, it blinks rapidly.
- After successful completion of the power-on self-test, and while loading the operating system, it will blink at one second intervals.
- When the system is fully operational, it will remain on, blinking off once every five seconds.
|
| LINK - OK
|
This LED will be on when the system has link integrity to a 10BaseT hub.
|
| LAN - ACT
|
This LED blinks to indicate Ethernet traffic.
|
Rear-Panel Connectors and DIP Switches
The rear panel of the Cisco 1020 has an Ethernet 10BaseT port (Ether 0), two DIP switches, an EIA/TIA-232 console port (Async 1), a card slot for a PCMCIA modem (Async 2), and a DC power receptacle. See Figure 3-3.
Figure 3-3 : Cisco 1020---Rear-Panel Connectors

Note The chassis has no power ON/OFF switch. Power is applied when the power cable is connected between the Cisco 1020 and the AC source.
Ethernet 10BaseT (Ether 0)
The Ethernet port allows you to connect your Cisco 1020 to a network 10BaseT hub using a straight-through cable with RJ-45 connectors.
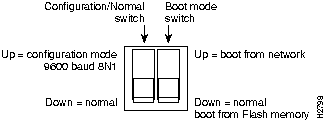
Two-Section DIP Switch
The Cisco 1020 has a two-section Dual Inline Package (DIP) switch. See Figure 3-4.
The left switch controls configuration/normal mode. When UP, the switch indicates configuration mode. Set UP to force the console (Async 1) port to settings at 9600 baud, eight data bits, no parity, and 1 stopbit (8N1). Use this setting to configure the Cisco 1020 from a PC serial port or a standard ASCII terminal. When DOWN, the switch indicates normal operation mode. The switch should be down except when performing configuration operations.
The right switch controls boot mode. When UP, the Cisco 1020 boots from the network using Reverse Address Resolution Protocol (RARP) and Trivial File Transfer Protocol (TFTP). When DOWN, the Cisco 1020 boots from internal flash memory.
Figure 3-4 : Cisco 1020---Rear-Panel DIP Switches
Console Port (Async 1)
The console port allows you to configure the Cisco 1020 from a PC serial port or standard ASCII terminal (9600 baud, 8N1). Configuration can be done through the Console port connection. See the Cisco 1020 Command Reference manual for command syntax and definitions.
PCMCIA Modem Slot (Async 2)
 Caution Remove power from the Cisco 1020 by unplugging it before inserting or removing the PCMCIA modem. The PCMCIA modem should always be installed before power is applied, to ensure trouble-free operation.
To use the PCMCIA slot, insert a Type-2 PCMCIA modem into the designated slot. The Cisco 1020 is preconfigured to accept and communicate via most Type-2 PCMCIA modems. For the list of verified PCMCIA modems see the appendix "Modems."
PCMCIA modems are physically keyed to ensure that they are installed correctly. To remove the PCMCIA modem, remove power from the Cisco 1020, then push the eject button to the left of the PCMCIA slot.
Power Receptacle
The external power supply provides +5 and -5 volts direct current (VDC) to the Cisco 1020. The power supply accepts 100 to 270 volts alternating current (VAC). To apply power, attach the power cord. To disconnect power, unplug the power cord. There is no ON/OFF switch.
Connecting to the Network
The following instructions are for connecting the Cisco 1020 to a network, a telephone jack, and a console (PC serial port, ASCII terminal, or external modem). See Figure 3-5.
Figure 3-5 : Connecting the Cisco 1020
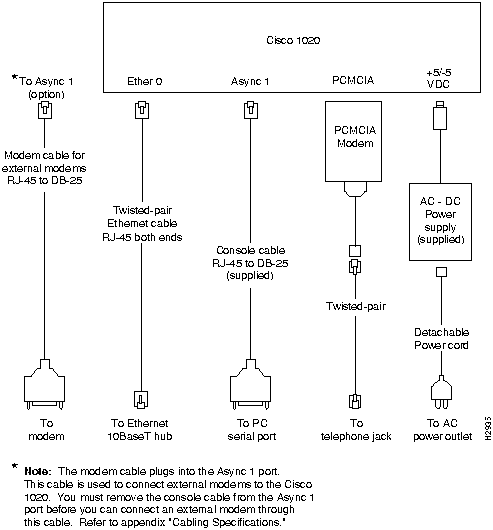
Step 1 With power not yet applied, insert the PCMCIA modem into the PCMCIA slot (Async 2). PCMCIA modems are physically keyed to ensure that they are installed correctly. To remove the PCMCIA modem, remove power from the Cisco 1020, then push the eject button to the left of the PCMCIA slot.
Step 2 Connect an RJ-45 cable to the PCMCIA modem and to the phone wall jack.
 Caution Before you apply power, inspect the Cisco 1020 thoroughly. Verify that all cables are installed correctly. Check for proper ventilation above and below, front and rear. To ensure that you use the correct power source before you connect any devices to the wall outlet or a power strip, check the power rating of your electrical outlet. Contact the facilities manager or a qualified electrician if you are not sure about the type of power supplied to your building.
Step 3 Connect the power cable from the power supply unit to the power connector on the rear panel of the Cisco 1020 router, then connect the power supply to a properly grounded electrical outlet.
Step 4 Verify that the LED labeled SYSTEM - OK is on when the router is plugged into the power source. This indicates that the router is receiving power. If not, see the section "Troubleshooting" in the chapter "Configuring the Cisco 1020."
Step 5 Use a straight-through 10BaseT cable to connect the Ethernet port (Ether 0) on the Cisco 1020 router to the corresponding port on an Ethernet hub.
Step 6 Verify that the LED labeled LINK - OK is on after the system is connected to your Ethernet network. This indicates that there is a live Ethernet connection and that you have link integrity. If not, see the section "Troubleshooting" in the chapter "Configuring the Cisco 1020."
Step 7 After connecting your router to the Ethernet network, verify that the LED labeled LAN - OK is blinking. This indicates that there is Ethernet traffic. If not, see the section "Troubleshooting" in the chapter "Configuring the Cisco 1020."
Copyright 1988-1996 © Cisco Systems Inc.