|
|

Cisco 1600 series routers can support one additional WAN port on a one-port WAN interface card that is installed in the slot provided on the router. This chapter describes the WAN interface cards supported by Cisco 1600 series routers and describes the general procedure for installing any WAN interface card into any Cisco 1600 series router.
This chapter contains the following sections:
The Cisco 1600 series routers support the following WAN interface cards:
Table 4-1 lists the features of the WAN interface card.
Table 4-1 : Features---Serial WAN Interface Card
| Feature | Description |
|---|---|
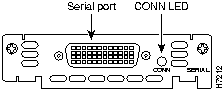
| Serial port type | DB-60 |
| Interfaces supported | EIA/TIA-232, EIA/TIA-449, V.35, X.21, NRZ/NRZI, DTE/DCE, EIA-530 DTE, G.703 |
| LED | CONN (green)
For a detailed description of the LED's function, refer to Table A-5 in the appendix "Troubleshooting." |
Figure 4-1 shows the front panel of the serial WAN interface card.
Figure 4-1 : Serial WAN Interface Card---Front Panel
ISDN BRI S/T WAN Interface Card
Table 4-2 lists the features of the ISDN BRI S/T WAN interface card.
Table 4-2 : Features---ISDN BRI S/T WAN Interface Card
| Feature | Description |
|---|---|
| ISDN BRI port type | RJ-45 |
| Interfaces supported | ISDN BRI (two 64-kbps B channels, one 16-kbps D channel) |
| LEDs |
|
| NT1 | Requires external NT1 for connection to an ISDN BRI line in North America |
Figure 4-2 shows the front panel of the ISDN BRI S/T WAN interface card.
Figure 4-2 : ISDN BRI S/T WAN Interface Card---Front Panel
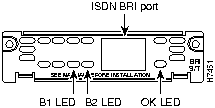
Table 4-3 lists the features of the ISDN BRI U WAN interface card.
Table 4-3 : Features---ISDN BRI U WAN Interface Card
| Feature | Description |
|---|---|
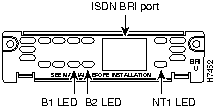
| ISDN BRI port type | RJ-45 |
| Interfaces supported | ISDN BRI (Two 64-kbps B channels, one 16-kbps D channel) |
| LEDs |
|
| NT1 | Integrated NT1 |
Figure 4-3 shows the front panel of the ISDN BRI U WAN interface card.
Figure 4-3 : ISDN BRI U WAN Interface Card---Front Panel
This section lists safety warnings that you should be aware of before installing a WAN interface card in the router.
Installing a WAN Interface Card in the Router
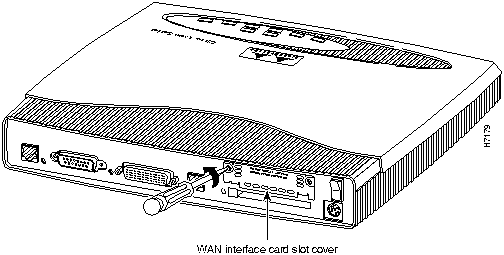
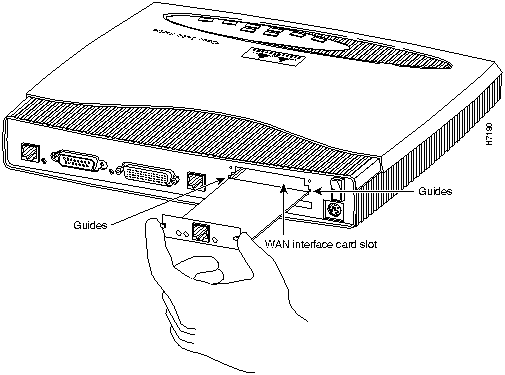
The procedure in the chapter is an example of how to install a WAN interface card in a Cisco 1600 series router. In this example, an ISDN BRI U card is installed in a Cisco 1601 router; however, the same procedure is used to install any of the Cisco 1600-compatible cards in any Cisco 1600 series router.
Following are the tools and parts required to install a WAN interface card in a Cisco 1600 series router:
Installing the WAN Interface Card in the Router
Take the following steps to install the card in a Cisco 1600 series router:
Figure 4-4 : Removing the Slot Cover (Cisco 1601 Shown)
Figure 4-5 : Installing the Card in the Router (Cisco 1601 and ISDN BRI U Card Shown)
Making WAN Interface Card Network Connections
After you install the WAN interface card in the router, you need to connect the card to the WAN. This section describes how to connect the cards' WAN cables.
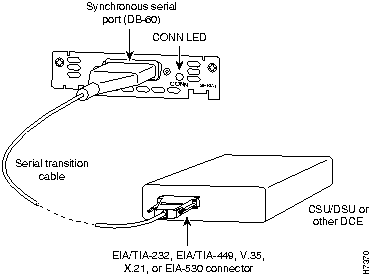
Use a serial transition cable (RS-232, X.21, EIA-449, EIA-530, V.35) to connect the card's serial port (DB-60) to one of the following (see Figure 4-6):
Figure 4-6 : Serial WAN Interface Card---WAN Cabling
ISDN BRI S/T WAN Interface Card
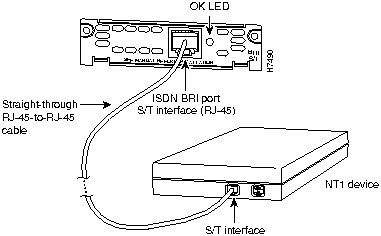
Use an RJ-45-to-RJ-45 cable (not included) to connect the card's ISDN BRI S/T port to the NT1. (See Figure 4-7.) Refer to the documentation that came with the NT1 for instructions on how to connect the NT1 to ISDN BRI services.
Check the OK LED, which lights when the WAN interface card's ISDN S/T port has synchronized with the central office switch.
Figure 4-7 : ISDN BRI S/T WAN Interface Card to NT1---WAN Cabling
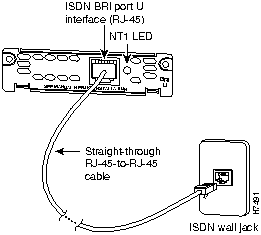
Use an RJ-45-to-RJ-45 cable (not included) to connect the card's ISDN BRI U port to the ISDN wall jack. (See Figure 4-8.)
Check the NT1 LED, which goes on when the WAN interface card's integrated NT1 has synchronized with the central office switch.
Figure 4-8 : ISDN BRI U WAN Interface Card---WAN Cabling
Copyright 1988-1996 © Cisco Systems Inc.
![]()
![]()
![]()
![]()
![]()
![]()
![]()
![]()
![]()
![]()
![]()
![]()
![]()
![]()