|
|

Installing Network Processor Modules in the Cisco 4000 Series
Cisco Product Numbers:
| NP-1E=
NP-2E= NP-6E= NP-1RV2= NP-2R= NP-1F-D-MM= NP1FS-M= |
NP-1F-D-SS=
NP-1A-SM= NP-1A-MM= NP-1A-DS3= NP-1A-E3= NP-2T= NP-4T= |
NP-4B=
NP-4GB= NP-4GU= NP-8B= NP-CT1= NP-CE1B= NP-CE1U= |
This document contains instructions for installing and configuring network processor modules in the Cisco 4000 series routers: the original Cisco 4000, the memory-enhanced Cisco 4000-M, the Cisco 4500, the memory-enhanced Cisco 4500-M, the Cisco 4700, and the memory-enhanced Cisco 4700-M.
This document includes the following sections, which contain step-by-step procedures for installing or replacing and configuring your new network processor modules:
Warning Before working on a chassis or working near power supplies, unplug the power cord on AC units; disconnect the power at the circuit breaker on DC units.
![]()
Warning Before opening the chassis, disconnect the telephone-network cables to avoid contact with telephone-network voltages.
Warning Do not work on the system or connect or disconnect cables during lightning activity.
Warning Read the installation instructions before you connect the system to its power source.
Network Interface Module Options
Available network processor module interface options are listed in Table 1.
Table 1 : Network Processor Module Interface Options
The Cisco 4000 series can support up to three network processor modules at a time, including Ethernet, Token Ring, ATM, ISDN BRI, ISDN PRI, serial, and multimode and single-mode FDDI interfaces. You can place network processor modules in any of the three available positions in any combination.
The different models in the Cisco 4000 series routers support different combinations of network processor modules. The following list addresses router-module and module-module compatibility issues, and slot placement considerations:
To successfully operate a multimode FDDI module, or six or more ports, the system must contain at least 4 MB of shared memory---standard on the Cisco 4000-M, Cisco 4500, Cisco 4500-M, Cisco 4700, and Cisco 4700-M. (The standard shared-memory configuration for the original Cisco 4000 was 1 MB.)
To successfully operate Cisco IOS Release 11.0 or 11.1, 16 MB of main memory are required. A Cisco 4500 running IPX requires 16 MB of main memory DRAM.
To successfully operate an ISDN BRI, ATM, channelized T1/ISDN PRI, or channelized E1/ISDN PRI module, the system requires at least 8 MB of main memory DRAM (16 MB in the original Cisco 4000) and 4 MB of shared memory.
To install new boot ROMs in a Cisco 4000 or Cisco 4000-M, refer to the section "Replacing Boot ROMs."
Network processor modules must be supported by the appropriate level of system software. The minimum system software version for the original Cisco 4000 is Software Release 9.1; for the Cisco 4000M, Software Release 9.14. For the Cisco 4500, Cisco 4500-M, and Cisco 4700 and 4700-M, the minimum software version is Cisco Internetwork Operating System (Cisco IOS) Release 10.2.
Table 2 lists the minimum system software versions for network processor modules.
Table 2 : Minimum Software Release Version
Follow these guidelines to ensure general safety:
Follow these guidelines when working on equipment powered by electricity:
Preventing Electrostatic Discharge Damage
Electrostatic discharge (ESD) can damage equipment and impair electrical circuitry, causing intermittent or total failures. It occurs when electronic printed circuit cards are improperly handled.
Always follow ESD prevention procedures when removing and replacing cards. Observe the following guidelines:
You need the following tools and equipment for removing and installing Cisco 4000 series network processor modules.
The following additional external equipment may be required, depending upon the specific module to be removed or installed:
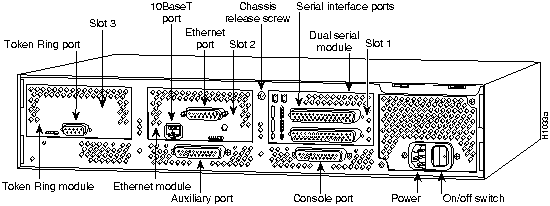
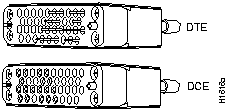
The power cable and power switch are on the lower right side of the rear panel of the router. The system console port, auxiliary port, and network processor module ports are located to the left of the power cable and switch. (See Figure 1.)
Figure 1 : Cisco 4000 Series --- Rear View Showing Slot Numbering and Interface Ports
The chassis contains slots for three network processor modules. Numbers for each are printed on the front panel of the chassis. (See Figure 2.) Slot numbers reflect the order in which the system scans the network processor modules.
The location of network processor modules is not slot dependent; you can move a module to any available slot. However, the air flow cooling for specific modules such as the FDDI module is enhanced when the module is installed in a specific slot. The center slot is the preferred location for air flow maximization.
Figure 2 : Cisco 4000 Series---Front View
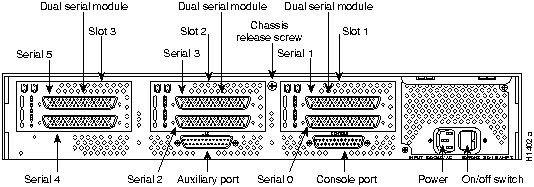
Unit numbering on the chassis rear panel allows the system to differentiate between two interfaces of the same type. The system assigns unit number addresses to these network processor modules by starting with zero for each module interface type and numbering from right to left and from bottom to top. The lowest unit number for an interface type is the module closest to the power supply. (See Figure 3.)
For example, the unit number addresses for the modules in Figure 1 are as listed in Table 3. However, if the Token Ring module were replaced by a second Ethernet module, the unit addresses would be as listed in Table 4.
Table 3 : Unit Number Addresses for Dual-Port Serial, Ethernet, and Token Ring Modules
Table 4 : Unit Number Addresses for Dual-Port Serial and Two Ethernet Modules
Figure 3 shows a chassis configured with three dual-port serial modules. The unit numbering of these modules is listed in Table 5.
Table 5 : Unit Number Addresses for Three Dual-Port Serial Modules
Figure 3 : Cisco 4000 Series Router---Rear View Showing Serial Port Unit Numbering
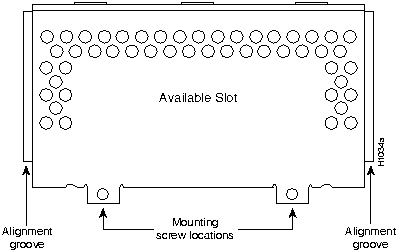
If the router is configured with fewer than three network processor modules, you must place a slot filler panel in the open slot to ensure proper airflow. (See Figure 4.)
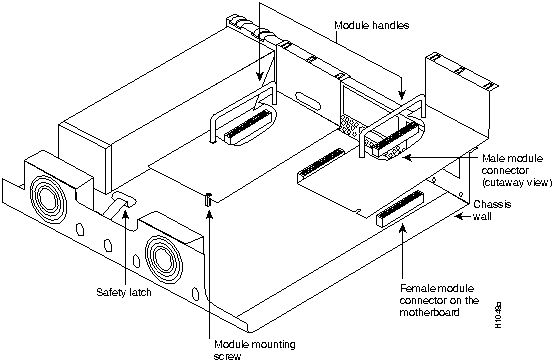
Accessing the Network Processor Modules
To access the network processor modules, you must remove the component tray.
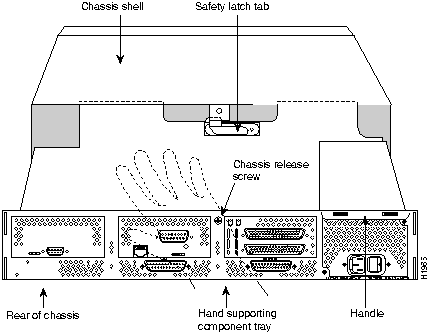
Some Cisco 4000 series routers have a safety latch tab on the chassis that affects the removal of the component tray. (See Figure 5 and Figure 6.)
If you have a chassis with a safety latch tab, follow the procedure in the section "Removing the Component Tray from a Chassis with a Safety Latch."
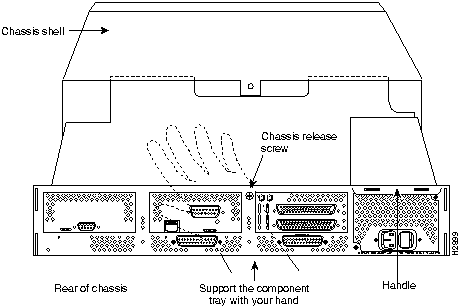
If you have a chassis without a safety latch tab, follow the procedure in the section "Removing the Component Tray from a Chassis without a Safety Latch."
Removing the Component Tray from a Chassis with a Safety Latch
Take the following steps to remove the component tray from a chassis with a safety latch:
Proceed with "Removing Network Processor Modules" on page 12.
Figure 5 : Component Tray Removal for Chassis with a Safety Latch
Removing the Component Tray from a Chassis without a Safety Latch
Take the following steps to remove the component tray from a chassis without a safety latch:
Figure 6 : Component Tray Removal for Chassis without a Safety Latch
Removing Network Processor Modules
After you have removed the component tray from the chassis, you can remove the network processor modules from the chassis.
Take the following steps to remove a network processor module:
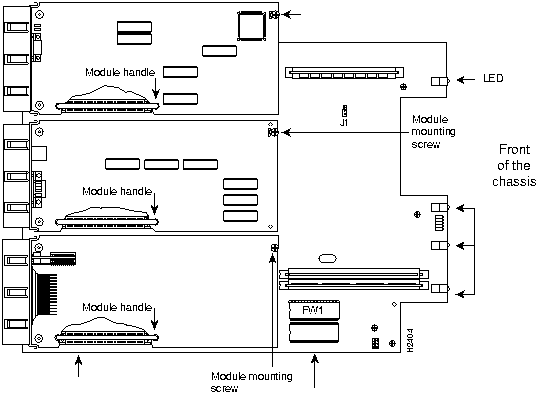
Figure 7 : Cisco 4000-M Component Tray---Typical of Cisco 4000 Series
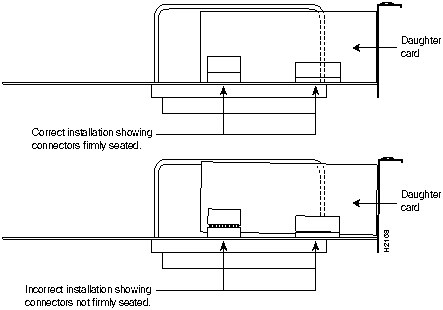
Figure 8 : Network Processor Module Components
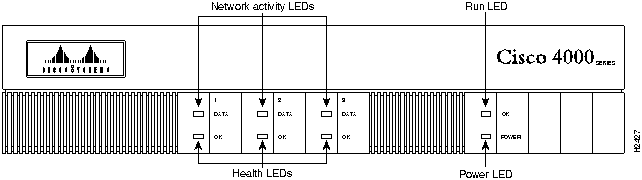
Figure 9 : Network Processor Module Daughter Card Installation Figure 2 shows the Cisco 4000 series chassis front view, including network activity, health indicators, and run and power LEDs.
When you face the front of the chassis, the three LEDs (labeled OK) on the lower left correspond to the network processor modules present. (See Figure 2.) If a slot is empty, the corresponding LED will be off.
When on, these LEDs indicate that the modules are operational. The LEDs and their functions are as follows:
Ethernet Network Processor Modules
Three network processor modules provide Ethernet interfaces. The single-port and dual-port network processor modules provide one and two Ethernet interfaces, respectively. Both an attachment unit interface (AUI) and 10BaseT ports are provided for each interface.
The six-port Ethernet network processor module provides six 10BaseT ports, but does not support Ethernet AUI connections.
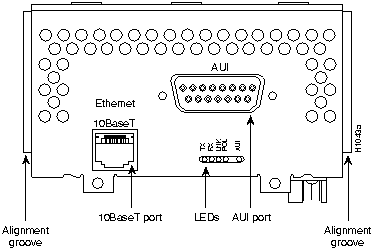
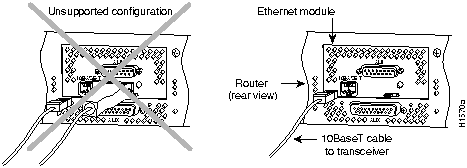
The single-port Ethernet module has an Ethernet AUI connector and a 10BaseT connector. (See Figure 10.) Only one connector on the module can be used at a time. Use either an IEEE 802.3 AUI or a 10BaseT cable to make the connection.
To select either 10BaseT or AUI, see the section "Selecting the Media Type" on page 19.
Figure 10 : Single-Port Ethernet Network Processor Module
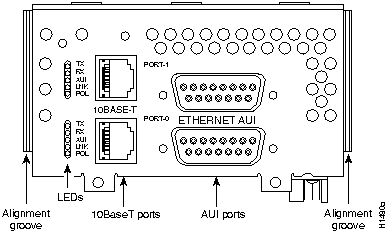
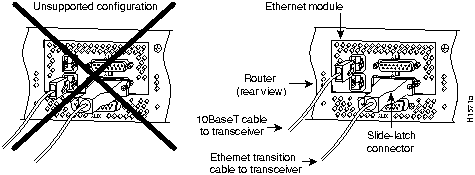
The dual-port Ethernet network processor module has ports for two network connections. (See Figure 11.) You can use either the AUI connector or the 10BaseT connector, but not both. For example, Ethernet port 0 can be attached to either a 10BaseT connector or to an AUI connector. At the same time, Ethernet port 1 can also be attached to a 10BaseT connector or an AUI connector.
To select the 10BaseT or AUI connection, see the section "Selecting the Media Type" on page 19.
Figure 11 : Dual-Port Ethernet Network Processor Module
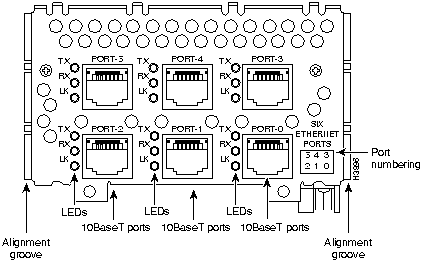
The six-port Ethernet module has ports for six network connections. (See Figure 12.) The port numbering is as shown on the label on the lower right of the module. Only 10BaseT connections are supported on the six-port module.
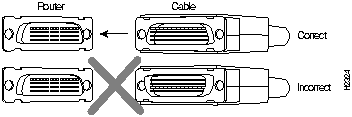
Figure 12 : Six-Port Ethernet Network Processor Module On singleport Ethernet modules, connect either the Ethernet AUI or the 10BaseT connector. (See Figure 13.)
On dual-port Ethernet modules, connect either the Ethernet AUI connector or the 10BaseT connector on a given Ethernet port (see Figure 14.)
The six-port Ethernet module can support connections on any combination of its six ports.
Figure 13 : Unsupported and Supported Single-Port Ethernet Module Connections
Figure 14 : Unsupported and Supported Dual-Port Ethernet Module Network Connections
For the single-port and dual-port Ethernet modules, enter the media command in the router's configuration file to select AUI or 10BaseT on the desired interface. The syntax of the media command is as follows:
The following is an example of configuring the Ethernet 0 interface for a media type AUI connection:
Making Ethernet AUI Connections
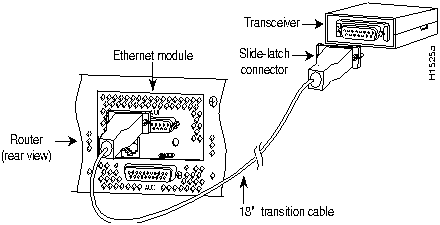
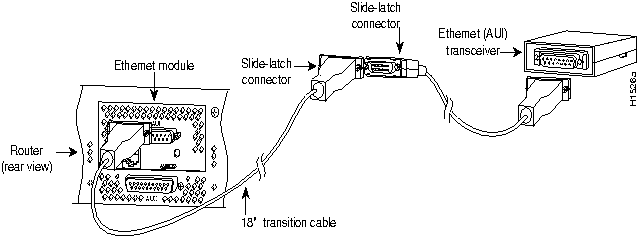
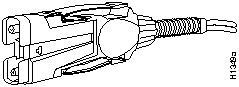
An Ethernet transceiver cable with thumbscrew connectors can be connected directly to the router port by replacing the slide-latch with a jackscrew (provided in a separate bag). Figure 15 shows a single-port Ethernet module with an Ethernet AUI connection to a transceiver.
Figure 15 : Ethernet Network Processor Module AUI Port Connection
Figure 16 shows the transition cable used as a flexible extension of the Ethernet port, enabling an Ethernet transceiver cable with a slide-latch connector to mate with the female end of the 18-inch transition cable.
Figure 16 : Extending the Transition Cable From the Ethernet Port
Take the following steps to make AUI connections:
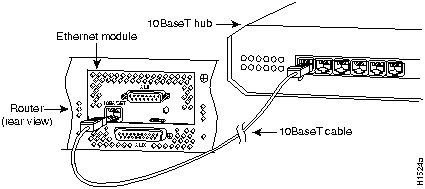
A 10BaseT transition cable can directly connect the router to your network. (See Figure 17.)
Take the following steps to make your 10BaseT connections:
Figure 17 : Ethernet Network Processor Module 10BaseT Connection
Ethernet Network Processor Module LEDs
There are five LEDs for the Ethernet network processor module. The following definitions describe the function of the LED when on:
When viewed from the rear of the chassis, the LEDs on the single-port Ethernet module are labeled as shown in Figure 18:
Figure 18 : Single-Port Ethernet Network Processor Module LEDs
When viewed from the rear of the chassis, the LEDs on the dual-port Ethernet module are labeled as shown in Figure 19.
Figure 19 : Dual-Port Ethernet Network Processor Module LEDs
When viewed from the rear of the chassis, the LEDs on the six-port Ethernet module are labeled as shown in Figure 20.
Figure 20 : Six-Port Ethernet Network Processor Module LEDs
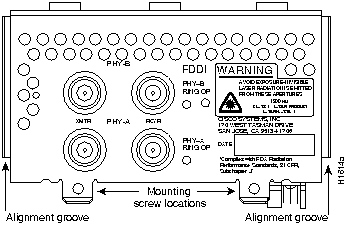
FDDI Network Processor Modules
FDDI module options are as follows:
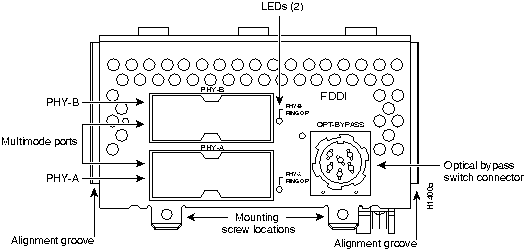
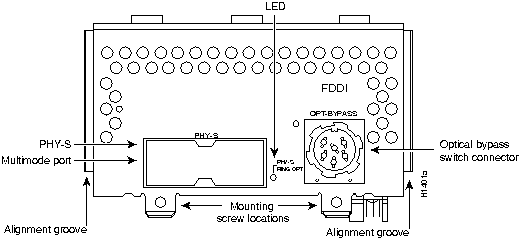
The multimode FDDI network processor module consists of two cards, each with a multimode transceiver, with one card fitting on top of the other. Each FDDI module provides its own combination of attachment stations. Multimode FDDI modules provide either a Dual Attachment Station (DAS) or a single attachment station (SAS), The bottom card is the SAS and contains the PHY-A port. If the DAS option is included, the PHY-B port is located on the module's top card.
The single-mode FDDI network processor modules also provide a DAS.
Distance Limitations for FDDI Connections
The single-mode transmitter and the multimode transceiver each provide 11 dB of optical power. If the distance between two connected stations is greater than the maximum distance shown, significant signal loss can result. Distance limitations for single-mode and multimode FDDI stations are listed in Table 6.
Table 6 : FDDI Maximum Transmission Distances
Older versions of the single-mode network processor module use simplex FC-type connectors (see Figure 21) for the transmit and receive ports. Newer versions of the single-mode network processor module use simplex SC-type connectors. (See Figure 22.) The connector accepts standard 8.7 to 10/125-micron single-mode fiber-optic cable. The single-mode interface supports connections at distances up to 6 miles (10 kilometers).
Figure 21 : Older Version Single-Mode FDDI Network Interface Connector, FC Type
Figure 22 : Newer Version Single-Mode FDDI Network Interface Connector, SC Type
Newer versions of the single-mode module are shipped with an FC-to-SC adapter that lets the module be used with cables installed for the earlier version of the module. (See Figure 23 and Figure 24.)
Figure 23 : Single-Mode FDDI Network Interface FC-to-SC Adapter, FC End
Figure 24 : Single-Mode FDDI Network Interface FC-to-SC Adapter, SC End
The single-mode transmitter uses a small laser to transmit the light signal to the ring. Keep the transmit port covered whenever a cable is not connected to it.
The multimode network processor module connectors are FDDI-standard physical sublayer (PHY) connectors. The media interface connector (MIC) connects to FDDI standard 62.5/125-micron multimode fiber-optic cable. Figure 25 shows the MIC typically used for network and chassis connections in multimode FDDI applications.
Figure 25 : Multimode FDDI Network Interface Connector, MIC Type
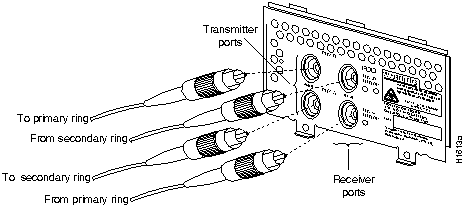
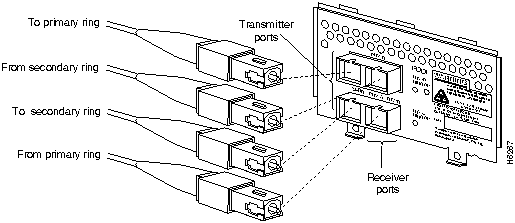
A dual attachment module configuration requires two connections: one to the primary ring and one to the secondary ring. The PHYA port is the bottom port and the PHYB port is the top port on both the multimode and single-mode modules.
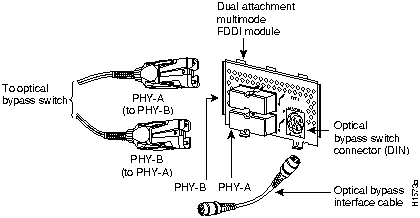
To connect to another DAS, connect PHYA on the module to PHYB on the DAS, and PHYB on the module to PHYA on the DAS. (See Figure 26.)
Figure 26 : Dual Attachment FDDI Connections
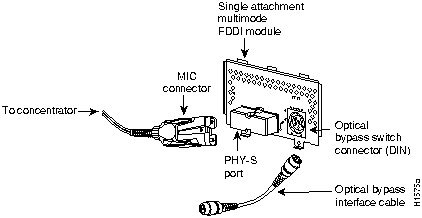
The standard connection scheme for a DAS has the primary ring signal entering the router on the PHYA receive port and returning to the primary ring from the PHYB transmit port. The secondary ring signal enters the router on the PHYB receive port and returns to the primary ring from the PHYA transmit port. The single attachment module's PHYS port can be connected through a concentrator to a single attachment ring, or directly to another device.
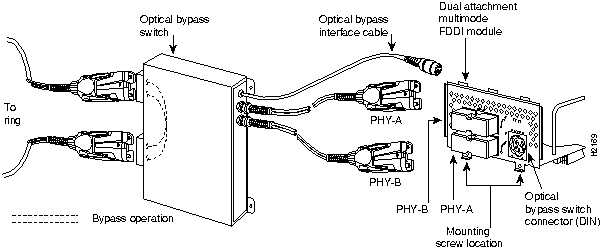
Optical Bypass Switch Connections
An optical bypass switch is a passive optical device powered by the FDDI module. If a fault in the router occurs or if power is lost, the bypass switch is automatically enabled and the ring is unaffected. The system software can also enable the switch if a problem is detected or if the router is taken out of the ring. Both FDDI multimode modules have an optical bypass switch connector.
To connect the FDDI module to an external optical bypass switch (not included), connect the interface cable from the optical bypass switch to the six-pin circular DIN connector on the FDDI module panel. (See Figure 26.)
Additional Required Parts and Tools
In addition to the parts and tools listed in the section "Tools and Equipment Required" on page 7, you need the following to install an FDDI module:
Figure 27 : Dual Attachment Multimode FDDI Network Processor Module---End View
Figure 28 : Single Attachment Multimode FDDI Network Processor Module---End View
Making Multimode FDDI Network Connections
Multimode uses one integrated transmit/receive cable for each physical interface (one for PHYA and one for PHYB). Accordingly, you need one multimode cable for a single attachment connection, and two cables for a dual attachment connection. Follow the procedures described in this section to make multimode FDDI connections.
Dual Attachment Multimode Connections
Take the following steps to connect a dual attachment multimode module:
Figure 31 : Dual Attachment Multimode FDDI Connections
Single Attachment Multimode FDDI Connections
Take the following steps to connect a single-attachment multimode module:
Figure 32 : Making Single Attachment Multimode FDDI Connections
Connecting an Optical Bypass Switch to a Multimode FDDI Network Processor Module
Take the following steps to connect the FDDI module to an external optical bypass switch:
Proceed to the section "FDDI Network Processor Module LEDs."
Making Single-Mode FDDI Network Connections
Take the following steps to connect a single-mode FDDI module:
FDDI Network Processor Module LEDs
The following information will help you to use the FDDI module LEDs:
Figure 33 : Single-Mode Dual Attachment FDDI Connections with FC-Type Connectors
Figure 34 : Single-Mode Dual Attachment FDDI Connections with SC-Type Connectors
Token Ring Network Processor Modules
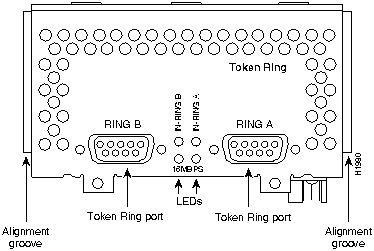
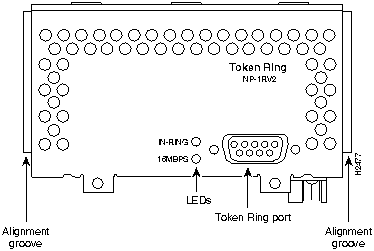
The dual-port Token Ring network processor module has two standard DB-9 connectors (see Figure 35); the single-port modules have one. (See Figure 36 and Figure 37.) On the dual-port module, Port 0 (closest to the power supply) is labeled RING A and Port 1 is labeled RING B. See the section "Slot Numbering" on page 8 for a description of slot numbering.
Figure 35 : Dual-Port Token Ring Network Processor Module Network Connectors
Figure 36 : Version 2 Single-Port Token Ring Network Processor Module Network Connector
Figure 37 : Original Version Single-Port Token Ring Network Processor Module Network Connector
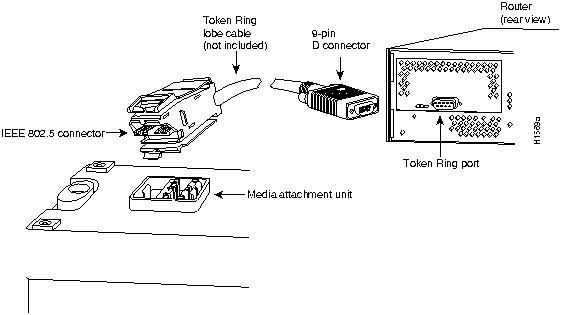
Use a standard ninepin Token Ring lobe cable to connect each Token Ring port directly to a media attachment unit (MAU). (See Figure 38.)
Figure 38 : Token Ring Cable Connections
Take the following steps to connect the router to a Token Ring MAU:
Figure 39 : Making Token Ring Connections
Token Ring Network Processor Module LEDs
For each port on the Token Ring module, there are two green LEDs, labeled 16MBPS and IN-RING. (See Figure 35, Figure 36, and Figure 37.) On the dual-port module, each set of LEDs corresponds to either the ring A or the ring B port. (See Figure 35.)
The LED labeled 16MBPS, when on, indicates ring speed. When off, it indicates a ring speed of 4 Mbps. The LED labeled IN-RING, when on, indicates that the network processor module is inserted into the ring. The LED is off when no module is not inserted into the ring.
Channelized T1/ISDN PRI Network Processor Module
The Cisco 4000 series router supports a channelized T1/ISDN PRI (CT1) network processor module which provides one T1 connection via a serial cable to a channel service unit (CSU). The CT1/PRI controller provides up to 24 virtual channels. The system sees each as a serial interface that can be configured individually. This interface is the physical media that supports ISDN PRI.
The CT1/PRI module, shown in Figure 40, provides a controller for transmitting and receiving bidirectional data at the CT1 rate of 1.544 Mbps. The CT1/PRI module can function as a concentrator for remote sites in WANs.
Figure 40 : Channelized CT1/ISDN PRI Network Processor Module
Following are the CT1/PRI specifications:
CT1/PRI Network Processor Module LEDs
The three LEDs on the CT1/PRI front panel indicate the following:
Two standard CT1 serial cables are available for the CT1/PRI module from Cisco Systems: null-modem (part number 72-0800-xx) and straight-through (part number 72-0799-xx). Null modem cables are used for back-to-back operation and testing. A straight-through cable connects your router to an external CSU (Channel Service Unit).
The interface cable has two 15-pin DB connectors, one at each end, to connect the CT1 network processor module with the external CT1 CSU. Figure 41 shows the interface cable, connectors, and pinouts.
Figure 41 : CT1 Interface Cable
The CT1/PRI interface cables have two male 15-pin DB connectors (one at each end) to connect the CT1 network processor module with the external CSU. Table 7 lists the pinouts for the null-modem CT1 cable, while Table 8 lists the pinouts for the straight-through CT1 cable.
Table 7 : CT1 Null-Modem Cable Pinouts
Table 8 : CT1 Straight-Through Cable Pinouts
Configuring the CT1 Network Processor Module Interface
You must enter configuration mode to configure a new CT1 network processor module or to change the configuration of an existing controller.
If you have replaced a previously configured CT1 network processor module, the system will recognize the new module and bring it up in the previous configuration.
When you verify that the new CT1 module is recognized by the router, have the following information ready to begin the configuration procedure:
The following steps describe a basic CT1 configuration. Press Return after each configuration step.
CE1/PRI Network Processor Module
The Cisco 4000 series router supports a channelized E1/PRI network processor module with one E1 interface. This interface is the physical media that supports ISDN PRI. This CE1/PRI module provides one channelized E1 connection to a Channel Service Unit (CSU) using a serial cable. The module can function as a concentrator for remote sites in WANs.
The CE1/PRI module controller, shown in Figure 42, facilitates transmission and receipt of bidirectional data at the E1 rate of 2.048 Mbps. The controller provides up to 31 virtual channels. Each channel appears to the system as a serial interface that can be configured individually.
Figure 42 : Channelized E1/ISDN PRI Network Interface Processor
Following are the E1 specifications:
The three LEDs on the front panel of the CE1/PRI module indicate the following:
The jumpers on the CE1/PRI module set capacitive coupling between the transmit (Tx) or receive (Rx) shield and chassis ground and the cable resistance (120-ohm or 75-ohm). By default, the module is set with capacitive coupling between the Rx shield and chassis ground. This provides direct current (DC) isolation between the chassis and external devices, as stated in the G.703 specification. Jumper J2 (see Figure 43) controls this function. To set capacitive coupling between the Tx shield and chassis ground, set jumper J2 as described in Table 9.
Figure 43 also shows the location of jumpers J1, J3, J4, J5, and J7. These jumpers set the cable impedance to 120 ohm or 75 ohm. The jumper settings in Figure 43 show the cable impedance set to 120 ohm.
Figure 43 : Location of Jumpers on the CE1/PRI module
Table 9 : Jumper Settings a nd Functions
Four serial cables are available for the CE1/PRI modules. All four have DB-15 connectors on the CE1/PRI end, and BNC, DB-15, Twinax, or RJ-45 connectors on the network end. Figure 44, Figure 45, Figure 46, and Figure 47 show the CE1 interface cables.
Figure 44 : E1 Interface Cable for 75 ohm, Unbalanced Connections (with BNC Connectors)
Figure 45 : E1 Interface Cable for 120 ohm, Balanced Connections (with DB-15 Connectors)
Figure 46 : E1 Interface Cable for 120 ohm, Balanced Connections (with Twinax Connectors)
Figure 47 : E1 Interface Cable for 120 ohm, Balanced Connections (with RJ-45 Connector)
The E1 interface cables have male 15-pin DB connectors at each end for connecting the CE1/PRI module to network equipment. Table 10 lists the pinouts for the E1 interface cables.
Table 10 : E1 Interface Cable Pinouts
Configuring the CE1/PRI Interface
You must enter configuration mode when you install a new CE1/PRI network processor module or to change the configuration of an existing controller. If you replace a previously configured CE1/PRI module, the system will recognize the new module and bring it up in the existing configuration.
After you have verified that the system recognizes the new CE1/PRI module, configure it using the privileged-level configure command. Keep the following information available:
The following steps describe a basic E1 configuration. Press Return after each step.
The ATM processor module for the Cisco 4500, Cisco 4500-M, Cisco 4700, and 4700-M routers provides a User Network Interface (UNI) between the router and an ATM network. This interface to ATM switching fabrics enables the transmitting and receiving data at rates of up to 155 Mbps in each direction (Rx and Tx). The actual rate is determined by the physical layer interface module (PLIM) and the specific physical ATM network layer. All ATM interfaces are full-duplex.
Four ATM network processor modules are available that support PLIMs connecting to the following physical layers:
An ATM network processor module can be installed in any available network processor slot. Unless the middle slot is occupied by an FDDI module, install the ATM network processor module there. You must use the appropriate ATM interface cable and accessories to connect the ATM module with an external ATM network. The cable connects your router to an ATM switch or joins two ATM router interfaces back to back.
For a description of the common ATM terms and acronyms, see the publication Internetworking Terms and Acronyms.
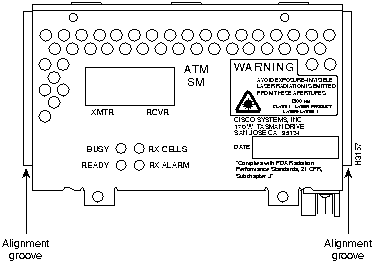
Figure 48 : ATM Network Processor Module with STS-3c/STM-1 Single Mode PLIM
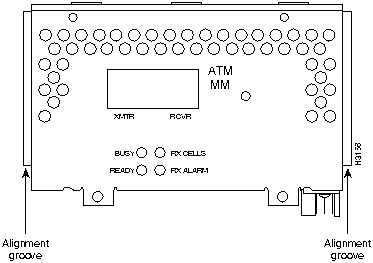
Figure 49 : ATM Network Processor Module with STS-3c/STM-1 Multimode PLIM
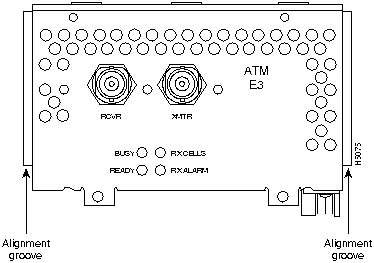
Figure 50 : ATM Network Processor Module With E3/DS-3 PLIM
ATM Network Processor Module Features
The ATM network processor modules support the following features:
ATM Network Processor Module LEDs
Four LEDs on the front panel of the ATM module indicate the following:
For single-mode or multimode SONET connections, connect the fiber cable to the SC-style receptacle on the front panel of the module. The SONET SC-duplex receptacle is shipped with a dust plug. To remove the plug, squeeze the sides as you pull on it.
For SONET/SDH multimode connections, use one multimode duplex SC connector (see Figure 51) or two single SC connectors. (See Figure 52.)
Figure 51 : Duplex SC Connector
Figure 52 : Simplex SC Connector
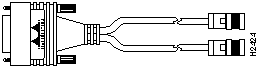
For E3 and DS-3 connections, use the 75 ohm, RG-59, coaxial cable, CAB-ATM-DS3/E3, which has bayonet-style, twist-lock (BNC) connectors and ferrite beads. (See Figure 53.) The E3 and DS-3 PLIMs both require cable CAB-ATM-DS3/E3. Ensure that the transmit and receive portions of the cable are connected to the appropriate module connector.
Figure 53 : CAB-ATM-DS3/E3 Cable---RG-59 Coaxial Cable with BNC Connectors
Connect the ATM module interface cables as shown in Figure 54.
Figure 54 : ATM Module Connections
Take these steps to install the CAB-ATM-DS3/E3 cable and EMI filter assembly for an E3 PLIM:
ATM SONET Distance Limitations
The SONET specification for fiber-optic transmission defines two types of fiber: single mode and multimode. Singlemode fiber is capable of higher bandwidth and greater cable run distances than multimode fiber.
The typical maximum distances for single-mode and multimode transmissions, as defined by SONET, are in Table 11. If the distance between two connected stations is greater than these maximum distances, significant signal loss can result, making transmission unreliable.
Table 11 : SONET Maximum Fiber-Optic Transmission Distances
To design an efficient optical data link, you must evaluate the power budget. Proper operation of an optical data link depends on modulated light reaching the receiver with enough power to be correctly demodulated.
The power budget is defined in two ways:
Figure 55 : Installing the CAB-ATM-DS3/E3 Cable and EMI Filter Clip Assembly
The following variables reduce the power of the signal (light) transmitted to the receiver in multimode transmission:
Attenuation is significantly lower for optical fiber than for other media. For multimode transmission, chromatic and modal dispersion reduce the available system power by the combined dispersion penalty, measured in decibels (dB). The power lost over the data link is the sum of the component, dispersion, and modal losses.
Table 12 lists the factors of attenuation and dispersion limit for typical fiber-optic cable.
Table 12 : Typical Fiber-Optic Link Attenuation and Dispersion Limits
Approximating the Power Margin
The LED used for a multimode transmission light source creates multiple propagation paths of light, each with a different path length and time requirement to cross the optical fiber, causing signal dispersion (smear). Higher order mode loss (HOL) results from light from the LED entering the fiber and radiate into the fiber cladding.
A worst-case estimate of power margin (PM) for multimode transmissions assumes minimum transmitter power (PT), maximum link loss (LL), and minimum receiver sensitivity (PR). In a worst-case situation, not all parts of an actual system will operate at the worst-case levels.
The power budget (PB) is the maximum possible amount of power transmitted. The following equation lists the calculation of the power budget:
The power margin calculation is derived from the power budget and subtracts the link loss:
Table 13 lists the factors that contribute to link loss and the estimate of the link loss value attributable to those factors.
After calculating the power budget minus the data link loss, the result should be greater than zero. Results less than zero may have insufficient power to operate the receiver. If the power margin is positive, as a rule, the link will work.
For SONET versions of the ATM module, the signal must meet the worst-case parameters listed in Table 14.
Table 13 : Estimating Link Loss
Table 14 : SONET Signal Requirements
Multimode Power Budget Example with Sufficient Power for Transmission
The following is an example multimode power budget calculated based on the following variables:
Estimate the power budget as follows:
The value of 2.5 dB indicates that this link would have sufficient power for transmission.
Multimode Power Budget Example of Dispersion Limit
Following is an example with the same parameters as the previous example, but with a multimode link distance of 4 km:
The value of 1.5 dB indicates that this link would have sufficient power for transmission. because of the dispersion limit on the link (4 km x 155.52 MHz > 500 MHz/km), this link will not work with multimode fiber. In this case, single-mode fiber would be the better choice.
The singlemode signal source is an injection laser diode. Single-mode transmission is useful for longer distances because the single transmission path exists within the fiber eliminates smear. In addition, chromatic dispersion is reduced because laser light is essentially monochromatic.
The maximum overload specification on the single-mode receiver is --14 dB. The single-mode receiver can be overloaded when using short lengths of fiber because the transmitter can transmit up to --8 dB, while the receiver could be overloaded at --14 dB, but no damage to the receiver will result. To prevent overloading the receiver connecting short fiber links, insert a 5 to 10 dB attenuator on the link between any singlemode SONET transmitter and the receiver.
SONET Single-Mode Power Budget Example
The following example of a single-mode power budget is of two buildings, 11 kilometers apart, connected through a patch panel in an intervening building with a total of 12 connectors.
Estimate the power budget as follows:
The value of 2.5 dB indicates that this link would have sufficient power for transmission and is not in excess of the maximum receiver input power.
Using Statistics to Estimate the Power Budget
Statistical models more accurately determine the power budget than the worst-case method. Determining the link loss with statistical methods requires accurate knowledge of variations in the data link components. Because statistical power budget analysis is beyond the scope of this document, you can refer to UNI Forum specifications, ITU-T standards, and your equipment specifications.
The following publications contain information on determining attenuation and power budget:
Configuring the ATM Network Processor Module Interface
You must enter configuration mode each time you install a new ATM module to change the configuration of an existing module.
If you have replaced a previously configured ATM module, the system will recognize the new module and bring it up in the existing configuration.
When you have verified that the new ATM network processor module is recognized by the router, use the privileged-level configure command to configure the new module. You should have the following information available:
The following steps describe a basic ATM configuration using just PVCs. Press Return after each step.
The following example shows a basic configuration using switched virtual circuits (SVCs). Press Return after each step.
Serial Data Network Processor Modules
The Cisco 4000 series routers support the following serial interface data communications connections: EIA/TIA-232, EIA/TIA-449, X.21, V.35, and EIA530. The Cisco 4000 series also supports an E1-G.703/G.704 network processor module with many features and functions common to four-port serial interface data communication interfaces.
Two types of serial modules are available: the four-port serial with four 60-pin D-type connectors, and the dual-port serial with two 50-pin D-subconnectors to attach to the transition cable.
Each port requires a serial adapter cable, which provides the interface between the high-density port and the standard connectors for each electrical interface type. The adapter cable determines the electrical interface type and mode (data terminal equipment [DTE] or data communications equipment [DCE]) of the port to which it is connected.
For most interface types, the adapter cable for DTE mode uses a plug at the network end, and the cable for DCE mode uses a receptacle at the network end. Exceptions are V.35 adapter cables, which are available with either a V.35 plug or a receptacle for either mode, and the EIA-530 adapter cable, which is available only in DTE mode with a DB-25 plug at the network end. The mode (DCE or DTE) is labeled on the molded plastic connector shell at the ends of all cables except V.35 (which uses the standard Winchester block-type connector instead of a molded plastic D-shell).
Following are the available interface cable options for the mode and network-end connectors for each cable:
Clocking and Aggregate Four-Port Serial Module Throughput
Two configuration requirements must be met for proper operation of the four-port serial module:
Three example configurations that meet these requirements follow:
Note that the Example 3 configuration requires that two of the four ports remain unused.
The data rate depends on the type of electrical interface used. Use EIA/TIA-232 for speeds up to 64 kbps; use X.21, EIA/TIA-449, V.35, or EIA-530 for higher speeds.
When connecting serial devices, consider the adapter cables as an extension of the router for external connections. Therefore, use DTE cables to connect the router to remote DCE devices such as modems or DSUs, and DCE cables to connect the router to remote DTE devices such as hosts or another router.
Serial signals can travel a limited distance at any given bit rate; generally, the slower the baud rate, the greater the distance. All serial signals are subject to distance limits, beyond which a signal degrades significantly or is completely lost. Table 15 lists the recommended maximum speeds and distances for each serial interface type from the IEEE EIA/TIA-449 specification.
You may produce good results at speeds and distances greater than those listed if you compensate for potential electrical problems. For example, the recommended maximum rate for V.35 is 2 Mbps, but 4 Mbps is commonly used. If you elect to use variable rate settings different than the IEEE specifications, do so at your own risk.
Table 15 : IEEE Standard EIA/TIA-449 Transmission Speed Versus Distance
Balanced drivers enable EIA/TIA-449 signals to travel greater distances than EIA/TIA-232 signals. The recommended distance limits for EIA/TIA-449 are also valid for V.35, X.21, and EIA-530. Typically, EIA/TIA-449 and EIA-530 support 2-Mbps rates, and V.35 can support 4-Mbps rates.
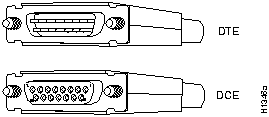
EIA/TIA-232, the most common interface standard in the United States, supports unbalanced circuits at signal speeds up to 64 kbps. The network end of the adapter cable is a standard 25-pin Dshell connector (known as a DB-25). (See Figure 56.) The router console and auxiliary ports also use EIA/TIA232 connections; however, the serial module ports support synchronous connections, while the console and auxiliary ports support asynchronous connections.
Figure 56 : EIA/TIA-232 Adapter Cable Connectors, Network End
EIA/TIA-449, which supports balanced (EIA/TIA-422) and unbalanced (EIA/TIA-423) transmissions, is a faster (up to 2 Mbps) version of EIA/TIA-232 that provides more functions and supports transmissions over greater distances.
The network end of the EIA/TIA-449 adapter cable provides a standard 37-pin D-shell connector. (See Figure 57.) EIA/TIA-449 cables are available as either DTE (DB-37 plug) or DCE (DB-37 receptacle).
Figure 57 : EIA/TIA-449 Adapter Cable Connectors, Network End
The V.35 interface is recommended for speeds up to 48 kbps (although it is effectively used at speeds of 4 Mbps). The network end of the V.35 adapter cable provides a standard 34-pin Winchester-type connector. (See Figure 58.) V.35 cables are available with a standard V.35 plug or receptacle in either DTE or DCE mode.
Figure 58 : V.35 Adapter Cable Connectors, Network End
The X.21 interface uses a 15-pin connection for balanced circuits and is commonly used in the United Kingdom to connect public data networks. X.21 relocates some of the logic functions to the DTE and DCE interfaces and requires fewer circuits and a smaller connector than EIA/TIA-232.
The network end of the X.21 adapter cable is a standard DB-15 connector. (See Figure 59.) X.21 cables are available as either DTE (DB-15 plug) or DCE (DB-15 receptacle).
Figure 59 : X.21 Adapter Cable Connectors, Network End
EIA-530 supports balanced transmission and provides the increased functionality, speed, and distance of EIA/TIA-449 on the smaller, DB-25 connector used for EIA/TIA-232. The EIA-530 standard was created to support the more sophisticated circuitry of EIA/TIA-449 on the existing EIA/TIA-232 (DB-25) hardware instead of the larger, 37-pin connectors used for EIA/TIA449.
Like EIA/TIA-449, EIA-530 refers to the electrical specifications of EIA/TIA422 and EIA/TIA-423. Although the EIA-530 specification recommends a maximum speed of 2 Mbps, it is used successfully at 4 Mbps or faster speeds over short distances.
The EIA-530 adapter cable is available in DTE mode only. The network end of the EIA530 adapter cable is a standard DB-25 plug commonly used for EIA/TIA-232 connections. Figure 60 shows the DB25 connector at the network end of the adapter cable.
Figure 60 : EIA-530 Adapter Cable Connector, Network End (Available in DTE Only)
The 60-pin D-subconnector is standard on the four-port serial module except the G.703/G.704, which has a 15-pin D-subconnector. The 50-pin Dsubconnector is standard on the dual-port serial modules. Use the specific serial transition cable for the module type and the correct EIA/TIA standard connector for your modem or CSU/DSU. (See Figure 62 and Figure 63.)
Figure 61 : 60-Pin Serial Port Cable Connections
![]()
![]()
![]()
![]()
Interface Options
Available Ports Per Module
Ethernet
Single port, dual port, or six port
Synchronous serial
Dual port1 or four port
Token Ring
Dual port or single port
Multimode FDDI2
Single attachment or dual attachment
Single-mode FDDI
Dual attachment
BRI3
Four port or eight port
G.703
Four port (balanced or unbalanced)4
Channelized CT1/ISDN5 PRI6
Single channelized CT1/PRI port
Channelized E1/ISDN PRI
Single channelized E1/PRI port
ATM7 OC3
Single ATM port 8
ATM DS-3
Single ATM DS-3 port
ATM E3
Single ATM E3 port
1 Serial interfaces include EIA/TIA-232, EIA/TIA-449, V.35, X.21, NRZ/NRZI, DTE/DCE; EIA530 DTE, and G.703.
2 FDDI = Fiber Distributed Data Interface
3 BRI = Basic Rate Interface (ISDN BRI S/T RJ-45).
4 For G.703//G.704 connections, balanced or unbalanced ports must be matched with the corresponding balanced or unbalanced cable.
5 ISDN = Integrated Services Digital Network
6 PRI = Primary Rate Interface
7 ATM = Asynchronous Transfer Mode.
8 STS-3C/STM-1 at 155 MHz (single-mode and multimode).
Network Processor Module Type
Minimum Software Release Version
Multimode FDDI
Software Release 9.14(1)
Dual Ethernet
Software Release 9.14(2)
Six-port Ethernet
Cisco IOS Software Release 10.3(6)
Single-mode FDDI
Software Release 9.14(3)
Dual and Version 2 Token Ring
Software Release 9.14(5)
Four-port serial
Software Release 9.14(6)
ISDN BRI
Cisco IOS Software Release 10.2
G.703
Cisco IOS Software Release 10.2(7)
Channelized CT1/ISDN PRI
Cisco IOS Software Release 10.3(4)
Channelized E1/ISDN PRI
Cisco IOS Software Release 10.3(4)
ATM
Cisco IOS Software Release 10.3(4)
![]()
![]()
Slot
Interface Type
Address
1
Serial port (top)
Serial port (bottom)
1
0
2
Ethernet
0
3
Token Ring
0
Slot
Interface Type
Address
1
Serial port (top)
Serial port (bottom)
1
0
2
Ethernet
0
3
Ethernet
1
Slot
Interface Type
Address
1
Serial port (top)
Serial port (bottom)
1
0
2
Serial port (top)
Serial port (bottom)
3
2
3
Serial port (top)
Serial port (bottom)
5
4
![]()
![]()
![]()
![]()
![]()
![]()
router> ena
Password:
router# configure terminal
Enter configuration commands, one per line.
Edit with DELETE, CTRL/W, and CTRL/U; end with CTRL/Z
interface ethernet 0
media-type aui
^z
router# write memory
![]()


Transceiver Type
Maximum Distance Between Stations
Single-mode
Up to 10 kilometers (6.2 miles)
Multimode
Up to 2 kilometers (1.25 miles)
![]()

![]()
![]()
![]()


![]()


15-Pin DB Connector
15-Pin DB Connector
Signal
Pin
Pin
Signal
Transmit Tip
1
3
Receive Tip
Receive Tip
3
1
Transmit Tip
Transmit Ring
9
11
Receive Ring
Receive Ring
11
9
Transmit Ring
15-Pin DB Connector
15-Pin DB Connector
Signal
Pin
Pin
Signal
Transmit Tip
1
1
Transmit Tip
Transmit Ring
9
9
Transmit Ring
Receive Tip
3
3
Receive Tip
Receive Ring
11
11
Receive Ring
Router#
 conf t

Enter configuration commands, one per line. End with CNTL/Z. Router(config)#
Router(config)#
cont CT1 1
Router(config-controller)#
clock source line
Router(config-controller)#
framing esf
Router(config-controller)#
linecode b8zs
Router(config-controller)#
%CONTROLLER-3-UPDOWN: Controller CT1 1, changed state to up Router(config-controller)#
The example shows channel group 0 and time slots 1, 3 through 5, and 7 selected for mapping:
Router(config-controller)#
 channel-group 0 timeslots 1,3-5,7

Router(config-controller)#

%LINEPROTO-5-UPDOWN: Line protocol on Interface Serial1:0, changed state to down
%LINEPROTO-5-UPDOWN: Line protocol on Interface Serial1:0, changed state to up Router(config-controller)#

Router(config-controller)#
Router(config-controller)#
int serial 1:0
Router(config-if)#
ip address 1.1.15.1 255.255.255.0
Router(config-if)#
Router#
write memory
Router#
disable
Router>
![]()
Jumper
Position
Function
J2
1 and 2
2 and 3
Connects the Rx shield to chassis ground (default setting)
Connects the Rx shield through capacitive coupling to chassis ground
J1, J3, J4, J5, J71
1 and 2
2 and 3
Sets cable impedance to 75 ohm
Sets cable impedance to 120 ohm (default setting)
1 All these jumpers must be set to the same impedance.
![]()


CE1 End
Network End
DB-151
BNC
DB-15
Twinax
RJ-45
Pin
Signal
Signal
Pin
Signal
Pin
Signal
Pin
Signal
9
Tx Tip
Tx Tip
1
Tx Tip
Tx-1
Tx Tip
1
Tx Tip
2
Tx Ring
Tx Shield
9
Tx Ring
Tx-2
Tx Ring
2
Tx Ring
10
Tx Shield
--
2
Tx Shield
Shield
Tx Shield
3
Tx Shield
8
Rx Tip
Rx Tip
3
Rx Tip
Rx-1
Rx Tip
4
Rx Tip
15
Rx Ring
Rx Shield
11
Rx Ring
Rx-2
Rx Ring
5
Rx Ring
7
Rx Shield
--
4
Rx Shield
Shield
Rx Shield
6
Rx Shield
1 Any pins not described in this table are not connected.
Router#
 conf t

Enter configuration commands, one per line. End with CNTL/Z. Router(config)#
Router(config)#
cont e1 1
Router(config-controller)#
framing crc4
Router(config-controller)#
 channel-group 0 timeslots 1,3-5,7

Router(config-controller)#

%LINEPROTO-5-UPDOWN: Line protocol on Interface Serial1:0, changed state to down %LINEPROTO-5-UPDOWN: Line protocol on Interface Serial1:0, changed state to up Router(config-controller)#

Router(config-controller)#
Router(config-controller)#
int serial 1:0
Router(config-if)#
ip address 1.1.15.1 255.255.255.0
Router(config-if)#
Router#
write memory
Router#
disable
Router>


![]()

![]()
Transceiver Type
Maximum Distance between Stations1
Single-mode
Up to 9 miles (15 kilometers)
Multimode
Up to 1.5 miles (3 kilometers)
1 This table gives typical results. You should use the power budget calculations to determine the actual distances. See the section "Approximating the Power Margin" on page 47.
Limits
Single-Mode
Multimode
Attenuation
0.5 dB
1.0 dB/km
Dispersion
No limit
500 MHz/km1
1 The product of bandwidth and distance must be less than 500 MHz/km.
Link Loss Factor
Estimate of Link Loss Value
Higher order mode losses
0.5 dB
Clock recovery module
1 dB
Modal and chromatic dispersion
Dependent on fiber and wavelength used
Connector
0.5 dB
Splice
0.5 dB
Fiber attenuation
1 dB/km
Category
Single-Mode
Multimode
PT
--18.5
--15
PR
--30
--28
PB
--11.5
--13
Router# conf t
Router(config)# int atm 0
Router(config-if)#atm sonet stm-1
Router(config-if)#atm framing g832adm
Router(config-if)#atm framing m23adm
Router(config-if)# ip address 1.1.1.1 255.255.255.0
Router(config-if)# atm pvc 1 1 32 aal5snap
Router(config-if)# atm pvc 2 1 33 aal5snap
Router(config-if)# map-group lisCT1
Router(config-if)#
no shut
Router(config-if)# map-list lisCT1
Router(config-map-list)# ip 1.1.1.2 atm-vc 1 broadcast
Router(config-map-list)# ip 1.1.1.3 atm-vc 2 broadcast
Router# write memory
Router# disable
Router# conf t
Router(config)# int atm 0
Router(config-if)#atm sonet stm-1
Router(config-if)#atm framing g832adm
Router(config-if)#atm framing m23adm
Router(config-if)# ip address 2.1.1.1 255.255.255.0
Router(config-if)# atm pvc 1 0 5 qsaal
Router(config-if)# atm nsap-address nsap-addr
AB.CDEF.01.234567.890A.BCDE.F012.3456.7890.1234.12
Router(config-if)# map-group list2
Router(config-if)# no shut
Router(config-if)# map-list list2
Router(config-map-list)# ip 2.1.1.2 nsap-addr nsap-addr br
Router(config-map-list)# ip 2.1.1.3 nsap-addr nsap-addr br
Router# write memory
Router# disable
![]()
Data Rate
EIA/TIA-232 Distances
EIA/TIA-449, X.21, V.35, EIA-530 Distances
bps
Feet
Meters
Feet
Meters
2400
200
60
4100
1250
4800
100
30
2050
625
9600
50
15
1025
312
19200
25
7.6
513
156
38400
12
3.7
256
78
56000
8.6
2.6
102
31
1544000 (CT1)
N/A
N/A
50
15
![]()
![]()