|
|

Installing Fast Ethernet Network Processor Modules in the Cisco 4000 Series
Cisco Product Number: NP-1FE=
This document contains instructions for installing and configuring Fast Ethernet (100E) network processor modules in Cisco 4500, Cisco 4500-M, Cisco 4700, and Cisco 4700-M routers. The 100E network processor module enables Cisco 4000 series routers to connect to 100 Mbps Ethernet networks and create high-speed communication links between critical network devices.
This document is for the 100E network processor module installer, who should be familiar with electronic circuitry and wiring practices and have experience as an electronic or electromechanical technician.
If you have a Cisco 4500-M, or Cisco 4700-M router, use this document with the Cisco 4000 Series Installation Guide and the Cisco 4000 Series Public Network Certification document that shipped with your router. If you have a Cisco 4500 router, refer to the Cisco 4000 Series Hardware Installation and Maintenance publication. If you have a Cisco 4700 router, refer to the Cisco 4000 Series Hardware Installation and Maintenance publication.
This document contains the following sections, including step-by-step procedures for installing or replacing and configuring your new 100E network processor modules:
![]()
Warning The ports labeled "Ethernet," "10BaseT," "Token Ring," "Console," and "AUX" are safety extra-low voltage (SELV) circuits. SELV circuits should only be connected to other SELV circuits. Because the BRI circuits are treated like telephone-network voltage, avoid connecting the SELV circuit to the telephone network voltage (TNV) circuits.
Warning The ISDN connection is a source of voltage that should be inaccessible to user contact. Do not attempt to tamper with or open any public telephone operator (PTO)-provided equipment or connection hardware. Any hardwired connection (other than by nonremovable, connect-one-time-only lug) must be made only by PTO staff or suitably trained engineers.
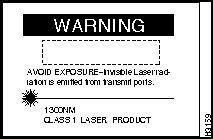
Warning Invisible laser radiation may be emitted from the aperture ports of the single-mode FDDI card when no cable is connected. Avoid exposure and do not stare into open apertures. Following is an example of the warning label that appears on the product:
Overview of the 100E Network Processor Module
By installing and operating the 100E network processor module in a Cisco 4000 series router, high-speed and inter-VLAN communication between critical network devices such as switches, servers, and other routers can be established.
The 100E network processor module provides a set of important benefits to the network, among them:
100BaseT: Fast Ethernet Technology
The term Ethernet is commonly used for all carrier sense multiple access collision detect (CSMA/CD) local area networks (LANs) that generally conform to Ethernet specifications, including IEEE 802.3u.
Stations on a CSMA/CD LAN can access the network at any time. Before sending data, a station listens to the network to see if it is in use. If it is, the station waits until the network is available, then transmits in half-duplex mode.
Ethernet networks are broadcast networks, so all stations see all transmissions. Each station examines received frames to evaluate whether it is the intended destination. If it is, the station passes the frame to a higher protocol layer for processing.
A collision occurs when two stations listen for network traffic, hear none, and transmit almost simultaneously. When this happens, the data in both transmissions is corrupted. The stations detect the collision and use backoff algorithms to set a retransmit time.
Fast Ethernet networks are 100 Mbps networks based on an architecture designed by the Fast Ethernet Alliance. Using Ethernet technology and protocols, Fast Ethernet enables data transfer rates 10 times faster than those possible in 10BaseT networks.
Fast Ethernet architecture requires changes only to the physical layer of the OSI network design standard. The crucial MAC layer is left untouched, and the same Ethernet rules for transmitting and receiving data still apply.
Because devices such as hubs, switches and routers are geared to MAC layer protocols, Fast Ethernet devices are compatible with existing standards while enabling rapid translation between network protocols. Additionally, Fast Ethernet devices can be connected to 10 Mbps networks if speed translation devices are present.
Though Fast Ethernet is used to denote 100BaseT, IEEE 802.3u specifies several physical layer protocols. Each has a name that summarizes its characteristics in the following format:
Each term is defined as follows:
For example, 100BaseT specifies a 100-Mbps, baseband LAN, with maximum network segments of 100 meters (or 400 meters for 100BaseFX).
The Fast Ethernet physical layer protocols are as follows:
100E Network Processor Module Functionality
The 100E network processor module conforms to the IEEE 802.3u Fast Ethernet specification and provides connectivity via 100BaseTX and MII (media independent interface). The MII port enables connectivity to an external 100BaseFX or 100BaseT4 transceiver. The module also supports Interswitch Link (ISL) over Fast Ethernet to ensure VLAN compatibility.
The 100E Fast Ethernet module provides for a number of applications, each of which enhances network functionality. Important applications include:
100E Network Processor Module Design Features
The software architecture of the module is divided into two subsystems, one for the Peripheral Component Interconnect (PCI) bus and a second to perform 100 Mbps functions. The software code tests the module controller at startup, performing diagnostics, initializing the descriptors, buffers, and interrupt vectors for receiving and transmitting packets.
Packets received are checked for encapsulation and processed according to type. Packets are either bridgeable, fast switchable, or process switchable.
Packets are transmitted when the process-level switching code or fast switching code releases a packet. The driver either releases the packet for transmission or holds it in a buffer, or queue, until traffic clears.
The hardware architecture of the 100E module is pipelined. The module is designed to run at a clock speed of 25 MHz (internal and external). It uses the DEC21140 chip as its LAN controller. This controller is initialized during each module start-up session.
The 100E network processor module contains 2 write and 2 read register arrays, and is PCI compliant. Its design enables external control of internal functions.
The hardware design includes MAC address filtering for more efficient network performance.
Module interface options are as follows:
The 100E network processor module does not support these options:
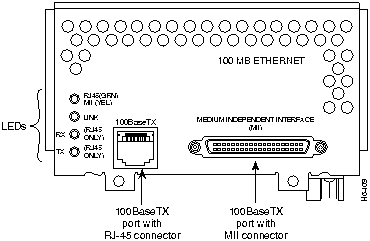
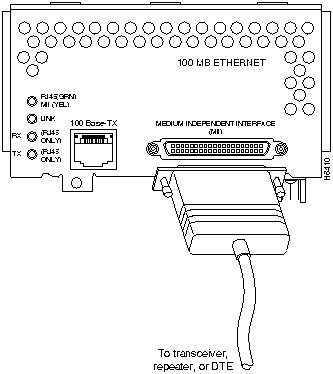
100E Network Processor Module LEDs
The 100E network processor module LEDs are located on the lower left corner of the face plate. (See Figure 1 and Figure 2.)
The four LEDs indicate the following:
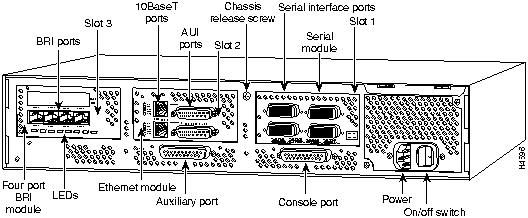
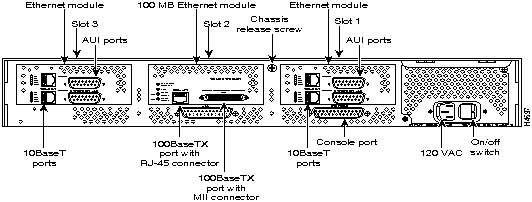
Figure 1 : Cisco 4000 Series --- Rear View Showing Slot Numbering and Interface Ports
Figure 2 : 100E Network Processor Module
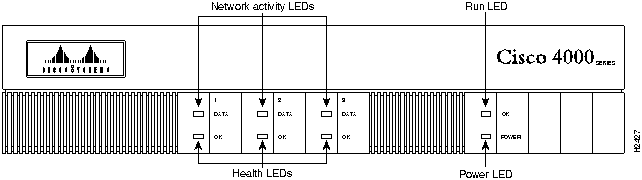
Figure 3 shows the Cisco 4000 series chassis front view with network activity, health, run, and power LEDs.
When you face the front of the chassis, the three LEDs (labeled OK) on the lower left correspond to three module slots. (See Figure 3.) When on, these LEDs indicate that the modules are operational. The upper LEDs (labeled DATA) blink to indicate network activity on the respective interfaces. If no module is installed in a slot, the LEDs corresponding to that slot will be off.
The LED labeled POWER becomes active to indicate that the system power is on. The LED labeled OK goes on to indicate that the system processor is functioning properly.
Figure 3 : Cisco 4000 Series---Front View
Prerequisites for Installing 100E Network Processor Modules
System prerequisites are divided into software and hardware compatibility requirements.
Network processor modules must be supported by the appropriate level of system software. The minimum system software versions for the 100E module are Cisco IOS Release 11.1(5) and Cisco IOS Release 11.2(2). If you have an earlier version of Cisco IOS software, contact Cisco Customer Service (see the section "Cisco Connection Online") or your local sales representative to order the appropriate version.
The 100E network processor module is supported by all models of the Cisco 4000 series router except for the Cisco 4000 and Cisco 4000-M. (See Table 1.)
Some restrictions apply to the use of the 100E module with other network processor modules. (See Table 1.) If two 100E modules are present in a router, you cannot install ATM or FDDI modules. However, a single 100E module will function alongside a single ATM or FDDI module. No additional restrictions apply.
Table 1 : 100E Network Processor Module Support in the Cisco 4000 Series
The standard 4 MB of shared memory found in most Cisco 4000 series routers is sufficient for installations with fewer than 24 physical or virtual interfaces. Routers with 24 or more interfaces require 8 or 16 MB of shared memory. See Table 1 for the shared memory required for specific network processor modules.
Table 2 : Cisco 4500-M and Cisco 4700-M Shared Memory Requirements
The amount of main memory required by a Cisco 4000 series router is affected by the size of the network and by the access list configurations. However, it is difficult to quantify the exact main memory requirements based only on network size. Use the following guidelines to determine approximate main memory requirements.
Main memory requirement guidelines for Cisco 4000 series routers are as follows:
Follow these guidelines to ensure general safety:
Follow these guidelines when working on equipment powered by electricity:
Preventing Electrostatic Discharge Damage
Electrostatic discharge (ESD) can damage equipment and impair electrical circuitry. It occurs when electronic printed circuit cards are improperly handled and can result in complete or intermittent failures.
Always follow ESD prevention procedures when removing and replacing cards. Ensure that the router chassis is electrically connected to earth ground. Wear an ESD-preventive wrist strap, ensuring that it makes good skin contact and operates effectively. Connect the clip to an unpainted surface of the chassis frame to safely channel unwanted ESD voltages to ground.
The following tools and equipment are required to install and remove 100E modules in a Cisco 4000 series router:
The power cable and power switch are on the lower right of the rear panel of the router. The system console port, auxiliary port, and module ports appear to the left of the power cable and switch. (See Figure 1.)
The chassis contains slots for three network processor modules. These slots correspond to the three slot numbers printed on the front panel of the chassis. (See Figure 3.) Slot numbers represent the order in which the system scans the modules.
The location of modules is not slot dependent; you can move a module to any other available slot.
Unit numbering lets the system differentiate between two interfaces of the same type. The system assigns unit number addresses to modules by starting with zero for each module interface type. Numbering is from right to left and from bottom to top. The lowest unit number of that interface type is the module closest to the power supply. For example, the unit number addresses for the modules in Figure 4 are as listed in Table 3.
Table 3 : Unit Number Addresses for Serial, Ethernet, and ISDN BRI Modules
If the ISDN BRI module in Figure 1 was replaced by a second Ethernet module, the unit addresses would be as listed in Table 4.
Table 4 : Unit Number Addresses for Serial and Two Ethernet Modules
Figure 4 shows a chassis configured with two Ethernet modules and a single 100E module (in the center slot). Table 4 shows the corresponding unit numbering.
Figure 4 : Cisco 4000 Series Router---Rear View Showing Port Unit Numbering
Table 5 : Unit Number Addresses for 100E and Two Ethernet Modules
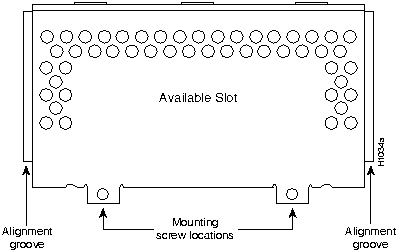
If the router is configured with fewer than three network processor modules, you must place a slot filler panel in the open slot to ensure proper airflow. (See Figure 5.)
Accessing the 100E Network Processor Modules
To access the modules, you must remove the component tray. Procedures for removing the component tray follow.
Removing the Component Tray Procedure
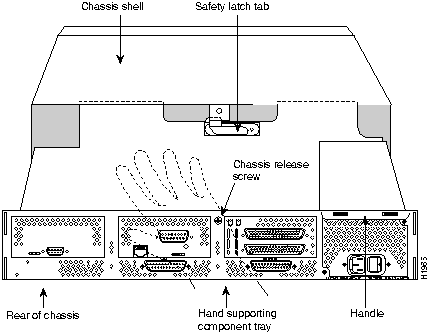
Some Cisco 4000 series routers have a safety latch tab on the chassis that affects removing the component tray. (See Figure 6 and Figure 7.)
If your chassis has a safety latch tab, refer to the next section, "Removing the Component Tray from a Chassis with a Safety Latch."
If your chassis does not have a safety latch tab, go to the section "Removing the Component Tray from a Chassis without a Safety Latch."
Removing the Component Tray from a Chassis with a Safety Latch
Take the following steps to remove the component tray from a chassis with a safety latch:
Proceed to the next section "Removing 100E Network Processor Modules."
Figure 6 : Component Tray Removal for Chassis with a Safety Latch
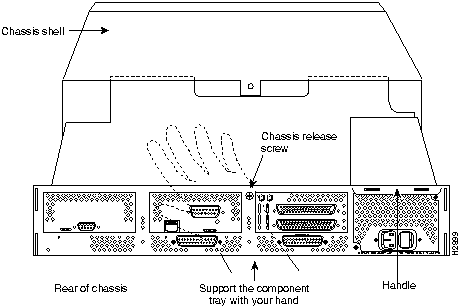
Removing the Component Tray from a Chassis without a Safety Latch
Take the following steps to remove the component tray from a chassis without a safety latch:
Proceed to the next section "Removing 100E Network Processor Modules."
Figure 7 : Component Tray Removal for Chassis without a Safety Latch
Removing 100E Network Processor Modules
After you remove the component tray from the chassis, you can remove the modules from the chassis.
Take the following steps to remove a module:
Figure 8 : Cisco 4000-M Component Tray---Typical of Cisco 4000 Series
Figure 9 : Network Processor Module Components
Figure 10 : Network Processor Module Daughter Card Installation
Replacing or Adding 100E Network Processor Modules
Take the following steps to replace or add a module:
Take the following steps to replace the component tray in the chassis shell:
Making 100E Network Connections
The two interface receptacles on the 100E network processor module are a single MII, 40-pin, D-shell type, and a single RJ-45. Each connection supports IEEE 802.3u interfaces that are compliant with the 100BaseX and 100BaseT standards. Only one can be used at a time.
The RJ-45 connection does not require an external transceiver. The MII connection requires an external physical sublayer (PHY) and an external transceiver.
Figure 11 shows the RJ-45 connectors.
Figure 11 : RJ-45 Connector and Plug
Table 6 lists the pinouts and signals for the RJ-45 connectors. Refer to the RJ-45 pinout in Table 5 when selecting proper common-mode line terminations for the unused Category 5, UTP cable pairs 4/5 and 7/8. Wire pairs 4/5 and 7/8 are actively terminated in the RJ-45, 100BaseTX port circuitry in the 100E module. Common-mode termination reduces electromagnetic interference (EMI) and susceptibility to common-mode sources.
Table 6 : RJ-45 Connector Pinout
Depending on your RJ-45 interface cabling requirements, use the pinouts in Figure 12 and Figure 13.
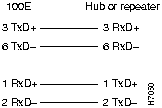
Figure 12 : Straight-Through Cable Pinout (Connecting 100E RJ-45 Interface to a Hub or Repeater)
Figure 13 : Crossover Cable Pinout (RJ-45 Connections Between Hubs and Repeaters)
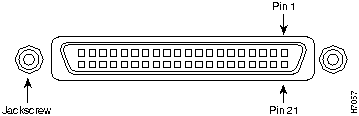
The module transceiver must be equipped with the appropriate connector, depending on the media type used for the MII connection. Connectors can be ST-type for optical fiber, RJ-45 for 100BaseT4, and so on. Figure 14 shows the pin orientation of the female MII connector on the 100E module.
The MII receptacle uses 2-56 screw-type locks, called jackscrews (shown in Figure 14), to secure the cable or transceiver to the MII port and provide strain relief. MII cables and transceivers have knurled thumbscrews (tightened with the fingers) that fasten to the jackscrews on the module's MII connector (shown in Figure 14). In contrast, the RJ-45 modular plug has strain relief functionality incorporated into the design of its standard plastic connector.
Figure 14 : MII Connection (Female)
Table 6 lists the MII connector pinouts and signals. MII cables are available commercially.
Table 7 lists the cabling specifications for 100-Mbps 100BaseT transmission over UTP and STP cables.
Table 8 : Specifications and Connection Limits for 100-Mbps 100BaseT Transmission
Table 8 contains IEEE 802.3u 100BaseT physical characteristics.
Table 9 : IEEE 802.3u Physical Characteristics
Attaching 100E Interface Cables
For a single 100E module, you can use either the RJ-45 connection or the MII connection.
If there are two 100E modules in the router, you can use the RJ-45 connection for one and the MII connection for the other.
Connect RJ-45 and MII cables as follows:
Figure 15 : Connecting RJ-45 Cables Figure 16 : Connecting MII Cables
Replacing the Final Connections to the Router
Take the following steps to make the final connections to the router:
Figure 17 : DC-Input Power Supply Connections
Configuring the 100E Network Processor Module Interface
When you install a new 100E module or wish to configure an existing interface, you must enter configuration mode. If the new module replaces a previously configured module, the system will bring the new module up in the existing configuration.
After you verify that the new 100E module is installed correctly (the enabled LED goes on), use the privileged-level configure command to configure the new interfaces. You will need the following information:
Using the EXEC Command Interpreter
Before you use the configure command, you must enter the privileged level of the EXEC command interpreter with the enable command. The system will prompt you for a password if one is set.
The system prompt for the privileged level ends with a pound sign (#) instead of an angle bracket (>). At the console terminal, enter the privileged level as follows:
Using the configure Command---Descriptions and Examples
Following are descriptions and examples of the commands for configuring the 100E module port 0. Configuring other 100E modules is an identical process except that the port numbers reflect consecutive unit numbering. When two modules of the same type are installed in a Cisco 4000 series router, the system assigns the first port on the second module the next number in the sequence.
Descriptions are limited to fields that are relevant for establishing and verifying interface configuration. After configuring the new 100E interface, use show commands to display its status and those of all installed interfaces, or to verify changes that you made.
Depending on the requirements for your system configuration and the routing protocols that you intend for the interface, you may need to enter additional configuration subcommands.
The RJ-45 connection is the default. To change to an MII connection and then verify it, use the following series of commands:
Use the media-type 100BaseTX command to return the interface to its default state for RJ-45 connections.
Checking the Router Configuration
After you configure the interface, use the show interface command to check the network interface statistics. Options to the show interface command include the type of interface (for example, serial), and the unit number of the interface. The following example shows the use of the show interface command:
The field underrun in the output of the show interface command may be nonzero in approximately 1 of 250,000 packets.
To display the current internal status of an interface module, use the show controller command with the interface type and unit number options:
Use the information in this section to help isolate problems. This section helps you rule out the router as the problem source. You can always contact a service representative for information on how to proceed in resolving the problem. Before you call, have the following information ready:
The key to problem solving is to isolate the problem to a specific subsystem. By comparing how the system is operating to standard and smooth operation, it is easier to isolate a problem.
When problem solving, consider the following subsystems of the router:
After you have the information listed above and have attempted to isolate the problem, contact customer assistance. Refer to the section "Cisco Connection Online."
Troubleshooting the Power and Cooling Systems
Check the following items to help isolate the problem:
Troubleshooting the 100E Network Processor Modules and Cables
Check for the following symptoms to help isolate the problem:
Cisco Connection Online (CCO), formerly Cisco Information Online (CIO), is Cisco Systems' primary, real-time support channel. Maintenance customers and partners can self-register on CCO to obtain additional content and services.
Available 24 hours a day, 7 days a week, CCO provides a wealth of standard and value-added services to Cisco's customers and business partners. CCO services include product information, software updates, release notes, technical tips, the Bug Navigator, configuration notes, brochures, descriptions of service offerings, and download access to public and authorized files.
CCO serves a wide variety of users through two interfaces that are updated and enhanced simultaneously---a character-based version and a multimedia version that resides on the World Wide Web (WWW). The character-based CCO supports Zmodem, Kermit, Xmodem, FTP, Internet e-mail, and fax download options, and is excellent for quick access to information over lower bandwidths. The WWW version of CCO provides richly formatted documents with photographs, figures, graphics, and video, as well as hyperlinks to related information.
You can access CCO in the following ways:
For a copy of CCO's Frequently Asked Questions (FAQ), contact
Copyright 1988-1996 © Cisco Systems Inc.
![]()
![]()
![]()
![]()
![]()
Cisco 4000 Series Router
Maximum Number of 100E Network Processor Modules
Other Module Restrictions
4000, 4000-M
Not supported
---
4500, 4500-M, 4700, 4700-M
One
One ATM or FDDI module--No restrictions on other modules
4500, 4500-M, 4700, 4700-M
Two
No ATM or FDDI modules--No restrictions on other modules
Network Processor Module
Per-Module Shared Memory Requirements
Dual-port Ethernet and dual-port serial
0.4 MB
Dual-port Token Ring, four-port serial, and G.703/G.704 serial
0.6 MB
Six-port Ethernet, Eight-port BRI, CT1/PRI, and CE1/PRI
1.2 MB
Fast Ethernet
1.5 MB
ATM and one FDDI1
2.0 MB
Two FDDI2
3.0 MB
1 FDDI modules are an exception in that two FDDI modules do not require double the shared memory of one FDDI module.
2 FDDI modules are an exception in that two FDDI modules do not require double the shared memory of one FDDI module.
![]()
![]()
Slot
Interface Type
Address
1
Serial port (labeled port 3)
Serial port (labeled port 2)
Serial port (labeled port 1)
Serial port (labeled port 0)
3
2
1
0
2
Ethernet port (top)
Ethernet port (bottom)
1
0
3
BRI port (labeled port 3)
BRI port (labeled port 2)
BRI port (labeled port 1)
BRI port (labeled port 0)
3
2
1
0
Slot
Interface Type
Address
1
Serial port (labeled port 3)
Serial port (labeled port 2)
Serial port (labeled port 1)
Serial port (labeled port 0)
3
2
1
0
2
Ethernet port (top)
Ethernet port (bottom)
1
0
3
Ethernet port (top)
Ethernet port (bottom)
3
2
Slot
Interface Type
Address
1
Ethernet port (top)
Ethernet port (bottom)
1
0
2
100 MB Ethernet port (top)
100 MB Ethernet port (bottom)
1
0
3
Ethernet port (top)
Ethernet port (bottom)
3
2
![]()
![]()
![]()
![]()
![]()
![]()
![]()
![]()
![]()
![]()
![]()
![]()
![]()
![]()
Pin
Description
1
Receive Data + (RxD+)
2
RxD--
3
Transmit Data + (TxD+)
6
TxD--

Pin1
In
Out
In/Out
Description
14--17
--
Yes
--
Transmit Data (TxD)
12
Yes
--
--
Transmit Clock (Tx_CLK)2
11
--
Yes
--
Transmit Error (Tx_ER)
13
--
Yes
--
Transmit Enable (Tx_EN)
3
--
Yes
--
MII Data Clock (MDC)
4--7
Yes
--
--
Receive Data (RxD)
9
Yes
--
--
Receive Clock (Rx_CLK)
10
Yes
--
--
Receive Error (Rx_ER)
8
Yes
--
--
Receive Data Valid (Rx_DV)
18
Yes
--
--
Collision (COL)
19
Yes
--
--
Carrier Sense (CRS)
2
--
--
Yes
MII Data Input/Output (MDIO)
22--39
--
--
--
Common (ground)
1, 20, 21, 40
--
--
--
+5.0 volts (V)
1 Any pins not indicated are not used.
2 Tx_CLK and Rx_CLK are generated by the external transceiver.
Parameter
RJ-45
MII
Cable specification
Category 51 UTP2, 22 to 24 AWG3
Category 3, 4, or 5, 150-ohm UTP or STP, or multimode optical fiber
Maximum cable length
--
0.5 m (1.64') (MII-to-MII cable4)
Maximum segment length
100 m (328') for 100BaseTX
1 m (3.28')5 or 400 m (1.312') for 100BaseFX
Maximum network length
200 m (656')5 (with 1 repeater)
--
1 EIA/TIA-568 or EIA-TIA-568 TSB-36 compliant.
2 Cisco Systems does not supply Category 5 UTP RJ-45 or 150-ohm STP MII cables. Both are available commercially.
3 AWG = American Wire Gauge. This gauge is specified by the EIA/TIA-568 standard.
4 This is the cable between the MII port on the 100E module and the appropriate transceiver.
5 Between any two stations on a segment.
Parameter
100BaseT
Data rate (Mbps)
100
Signaling method
Baseband
Maximum segment length (meters)
100 m between DTE1 and repeaters
Media
RJ-45: Category 5 UTP
MII: Category 3, 4, or 5, 150-ohm UTP or STP, with appropriate transceiver
Topology
Star/Hub
1 DTE = data terminal equipment.

![]()
![]()

![]()
Router>
enable
Password:
Router#
Router# config t
Enter configuration commands, one per line.  End with CNTL/Z.
Router(config)# int fa 0
Router(config-if)# media-type mii
Router(config-if)# ^Z

Router# sh int fa 0

FastEthernet0 is administratively down, line protocol is down

  (display text omitted)
  Encapsulation ARPA, loopback not set, keepalive not set, hdx, MII
  (display text omitted)
router# show interface fastethernet 0
router# show controller fastethernet 0
http://www.cisco.com.
cco.cisco.com.
ccohelp@cisco.com.
For additional information, contact
ccoteam@cisco.com.
tac@cisco.com.
To obtain general information about Cisco Systems, Cisco products, or upgrades, contact 800 553-6387, 408 526-7208, or
csrep@cisco.com.

![]()
![]()
![]()
![]()
![]()
![]()
![]()
![]()