Banner
HomeTOCPrevNextGlossSearchHelp

PDF

Table of Contents

Installing the Cisco 200 Software

Installing the Cisco 200 Software

Installing the Cisco 200 Software

This chapter describes how to install and configure the Cisco 200 software using INSTALL.EXE, Cisco's DOS-based installation program.


Note The operating system you use to install the Cisco 200 software (DOS) is unrelated to the operating system you use to run the software (DOS, Windows 3.1, or Windows for Workgroups 3.11).

This chapter contains the following sections:


Before You Start

Before you run INSTALL.EXE, you should complete the following:

DISKCOPY a: a: /v

The /v switch verifies the copies as they are made. Change the original (source) disk to the destination disk when you are prompted. When you finish copying, store the original disk in a safe place.


Planning Remote Installations

The Cisco 200 Software Installation Worksheet is provided for the system administrator to complete and send to the operator(s) who will be installing and configuring the Cisco 200 at the remote sites. The worksheet indicates the selections you should make when running the INSTALL.EXE utility, and provides space for instructions on modifying the ISDN200.CFG or NET.CFG file if necessary.


Cisco 200 Software Installation Worksheet

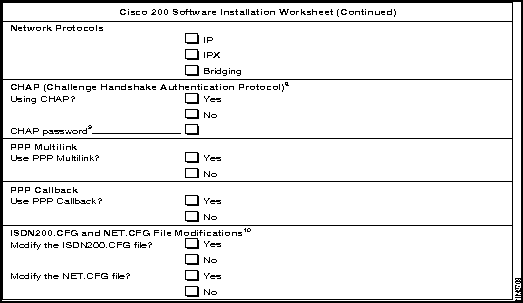
The Cisco 200 Software Installation Worksheet (see Table 2-1) lists the information you should have available before you install and configure the Cisco 200 software. Make a copy of the worksheet and have your system administrator fill it out for your network configuration. Place the completed worksheet in your Site Log.

Table 2-1 : Cisco 200 Software Installation Worksheet
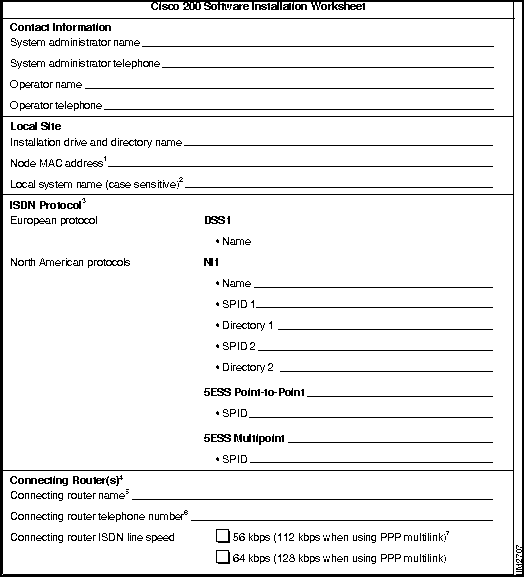
nm2707.gif

Table 2-1 : Cisco 200 Software Installation Worksheet (Continued)
nm2708.gif

1. Addresses must be no more than 12 hexadecimal characters: they can include a combination of numbers (1-9, 0) and letters (A-F). Each node MAC address must be unique. You should designate 00 to be the first two characters in order to avoid confusion with a broadcast address.

2. Your Cisco 200 workstation. If connected to a Cisco router using Challenge Handshake Authentication Protocol (CHAP), this name must be identical to the "username" configured on the router.

3. D-channel protocol and parameters of the ISDN switch to which the Cisco 200 is connected.

4. Duplicate this page if you have two or more connecting routers. You must specify the variable information below for each connecting router.

5. If connected to a Cisco router using Challenge Handshake Authentication Protocol (CHAP), this name must be identical to the "hostname" configured on that router.

6. Be sure to include all digits necessary to connect to the router (country code, area code, international access, long distance access, public access, etc.)

7. When the Cisco 200 for DOS, Windows 3.1, and Windows for Workgroups 3.11 is connected to a Cisco router using dial-on-demand routing, CHAP must be configured on both ends.

8. The CHAP password must be identical to the password entered in the router after the username.

9. If yes, attach additional sheet listing required modifications.


Running INSTALL.EXE

The INSTALL.EXE utility installs the Cisco 200 software. INSTALL.EXE simplifies the process of installing and configuring the Cisco 200 within the DOS environment.

To install the Cisco 200 software, complete the following tasks:


Starting the Installation

To install the Cisco 200 software for the first time, follow the steps in this section.


Note If you have previously installed the Cisco 200 software, and now want to modify your configuration files, see the section "What to Do Next" later in this chapter, or see the appendix "Modifying the Cisco 200 Configuration Files."

The NET.CFG and ISDN200.CFG configuration files cannot be changed using the INSTALL.EXE program. The program is designed this way so you can install future software upgrade(s) without repeating the entire configuration procedure.


Note When you are instructed to select a menu item, press one of the arrow keys until the item you want is highlighted. The up arrow key moves the highlight up the list one item at a time; the down arrow key moves it down the list one item at a time. When the item you want to select is highlighted, press Enter.

Step 1 Insert the working copy of the Cisco 200 disk containing INSTALL.EXE into the disk drive of your PC.

Step 2 Change to the drive where the disk is inserted and enter the following command at the prompt:

INSTALL

The Welcome dialog box appears.

Step 3 Press any key to continue. The Installation Option dialog box appears. See Figure 2-1. Highlight the "Install Cisco 200" option and press Enter.

Figure 2-1 : Installation Option Dialog Box

nm1687.gif

The Select Installation Drive dialog box appears. See Figure 2-2.

Figure 2-2 : Select Installation Drive Dialog Box

nm1553.gif


Selecting the Installation Drive and Directory

Step 1 Select the drive where you want to install the Cisco 200 files and press Enter. INSTALL.EXE detects how much space is currently available on your hard drive(s) and displays this information.


Note The installation directory must be the directory that contains the NetWare Client files.

The Select Installation Directory dialog box appears. See Figure 2-3.

Figure 2-3 : Select Installation Directory Dialog Box

nm1554.gif

INSTALL.EXE will select C:\NWCLIENT as the default directory, whether or not you have installed the NetWare Client files in the standard NetWare directory.

Step 2 Either accept the default, or enter a different directory name and press Enter.

If the directory you enter does not exist, you are prompted to create a new directory. The Create Installation Directory dialog box displays. See Figure 2-4.

Figure 2-4 : Create Installation Directory Dialog Box

nm1555.gif

Step 3 To create a new directory, select Yes.

If you select No, the dialog box in Figure 2-3 will redisplay, allowing you to change the directory name.

Step 4 After you enter the name of the correct installation directory, press Y to create the new directory.


If you have previously installed the Cisco 200 software in the directory you have just selected, dialog boxes will appear informing you that NET.CFG and ISDN200.CFG files already exist in the Cisco 200 directory. These files cannot be changed using the INSTALL.EXE program. The program is designed this way so you can install future software upgrade(s) without repeating the entire configuration procedure.

Press any key to exit from each of these messages. Proceed with the section
"Completing the Installation" later in this chapter.

If you want to modify the NET.CFG and ISDN200.CFG files, see the section "What to Do Next," later in this chapter, or see the appendix "Modifying the Cisco 200 Configuration Files."

The Create NET.CFG dialog box appears. See Figure 2-5.

Figure 2-5 : Create NET.CFG Dialog Box

nm1556.gif


Creating the NET.CFG File

Step 1 The Create NET.CFG dialog box indicates that INSTALL.EXE has not detected a NET.CFG file in the Cisco 200 directory. Press any key to create a NET.CFG file.

The node Media Access Control (MAC) Address dialog box appears. See Figure 2-6.

Figure 2-6 : Node Media Access Control (MAC) Address Dialog Box

nm1557.gif

Step 2 Enter a node MAC address. The MAC address consists of 12 hexadecimal characters (0 through 9 and A through F). In this chapter, 000123456789 is the example node MAC address.


Each node MAC address must be unique. The node MAC address is assigned by your system administrator. If you are unsure what your node MAC address is, consult your Cisco 200 Software Installation Worksheet or your system administrator.

If you enter an invalid character, the invalid node MAC address dialog box appears (see Figure 2-7). Reenter the node MAC address.

Figure 2-7 : Invalid Node MAC Address Dialog Box

nm1503.gif

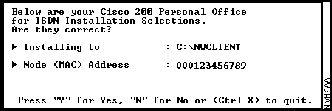
If the node MAC address is valid, the Installation Selections Confirmation dialog box appears. See Figure 2-8.

Figure 2-8 : Installation Selections Confirmation Dialog Box

nm1688.gif

Step 3 If the selections are correct, enter Y to accept. Enter N to return to the previous display and enter the correct information.

If you enter Y, the NET.CFG Created dialog box displays (see Figure 2-9). Press any key to continue.

Figure 2-9 : NET.CFG Created Dialog Box

nm1684.gif


Creating the ISDN200.CFG File

The ISDN200.CFG Creation dialog box displays. See Figure 2-10. This indicates that INSTALL.EXE has not detected an existing ISDN200.CFG file in the selected directory.

Step 1 Press any key to continue.

Figure 2-10 : ISDN200.CFG Creation Dialog Box

nm1560.gif

The Local System Name dialog box appears. See Figure 2-11.

Figure 2-11 : Local System Name Dialog Box

nm1561.gif

Step 2 Enter the local system name assigned by your system administrator. Follow these guidelines:

  • Any combination of alphanumeric characters

  • Case sensitive

  • No underscores (_), hyphens (-), asterisks (*), or spaces

Step 3 Press Enter. If you entered any invalid characters, an error message will appear and you must enter the local system name again.

The ISDN D-Channel Protocol Dialog Box appears. See Figure 2-12.

Figure 2-12 : ISDN D-Channel Protocol Dialog Box

nm1562.gif


Selecting the ISDN Protocol

Step 1 Select the type of ISDN D-channel protocol used by your ISDN carrier. Verify your ISDN switch protocol on the Cisco 200 Software Installation Worksheet.


The Cisco 200 must be configured to use the appropriate D-channel protocol, not the switch type.

ISDN switches are a particular switch type, such as DMS-100, 5ESS, and Siemens EWSD. These switches can use different D-channel protocols, such as NI1, Custom 5ESS Point-to-Point, Custom 5ESS Multipoint, and DSS1.

If your switch is not configured for one of these D-channel protocols, have your carrier reconfigure the ISDN circuit to one of the listed D-channel protocols.

Step 2 Press Enter. Based on the protocol you selected, proceed to the appropriate section in the text that follows:

North American ISDN Protocols:

European ISDN Protocols:


Configuring the NI1 SPID(s)

Step 1 If you selected NI1, the NI1: SPID and Directory Entry dialog box appears. See Figure 2-13.

Figure 2-13 : NI1: SPID and Directory Entry Dialog Box

nm1907.gif

Enter the SPID and directory numbers listed on your Cisco 200 Software Installation Worksheet. Use the Enter key to move through the data entry lines. Press Ctrl+Enter when you finish entering SPID information.

You must enter at least one SPID and its directory. If you are configuring only one SPID, however, leave the lines for the second SPID and directory blank.
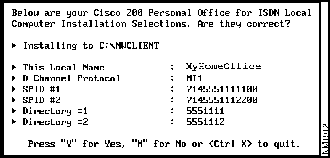
Step 2 The Local Computer Configuration Confirmation dialog box appears. See Figure 2-14. Enter Y to accept the local computer configuration as shown; enter N to reject this configuration and make changes to it.

Figure 2-14 : Local Computer Configuration Confirmation Dialog Box

nm1912.gif

The ISDN200.CFG Local Configuration dialog box displays. See Figure 2-15.

Figure 2-15 : ISDN200.CFG Local Configuration Dialog Box

fig_1.gif

Step 3 Press any key to continue. Proceed to the section "Configuring the Connecting Router" later in this chapter.


Configuring the 5ESS SPID

If you selected 5ESS (Point-to-Point or Multipoint), the 5ESS: SPID Entry dialog box appears. See Figure 2-16.

Figure 2-16 : 5ESS: SPID Entry Dialog Box

nm1511.gif

Step 1 Enter the SPID number listed on your Cisco 200 Software Installation Worksheet.

Step 2 Press Ctrl+Enter. The ISDN200.CFG Local Configuration Dialog Box displays. See Figure 2-17. Press any key to continue.

Figure 2-17 : ISDN200.CFG Local Configuration Dialog Box

nm1690.gif

Proceed with the next section, "Configuring the Connecting Router."


Configuring the Connecting Router

You are now prompted for the parameters for the connecting routers. The Connecting Router Name dialog box displays. See Figure 2-18.

Figure 2-18 : Connecting Router Name Dialog Box

nm1565.gif

Step 1 Enter the name of the connecting router as provided by your system administrator.

The connecting router is the router or PC to which you will be sending data. Follow these guidelines:

  • Up to 12 alphanumeric characters

  • Case sensitive

  • No underscores (_), hyphens (-), asterisks (*), or spaces

In this document, Headquarters is the example connecting router name. Press Enter when you have entered the connecting router name. If you enter an invalid name, an error message will appear and you must enter the connecting router name again.

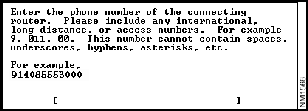
The Connecting Router Telephone Number dialog box displays. See Figure 2-19.

Figure 2-19 : Connecting Router Telephone Number Dialog Box

nm1566.gif

Step 2 Enter the telephone number of the connecting router and press Ctrl+Enter. The number should include in a single string all numbers necessary to dial the remote router, including:

  • International access code

  • Long-distance access code

  • Public access code

  • Signalling system 7 code

  • Country code

  • Area code

  • Seven-digit telephone number (North America)

  • Subscriber/extension (Europe)

    Do not separate the numbers with spaces, hyphens, or any nonnumeric character. If you do so, an error message will appear and you will be asked to reenter the number. In this chapter, 914085553000 is the example connecting router telephone number.

The ISDN Line Speed dialog box displays. See Figure 2-20.

Figure 2-20 : ISDN Line Speed Dialog Box

nm1567.gif

Step 3 Select the speed of the connecting router's ISDN line. The default is 64 or 128 kbps.

The Protocol Selection dialog box displays. See Figure 2-21.

Figure 2-21 : Protocol Selection Dialog Box

nm1568.gif

Step 4 Select the network protocol(s) you use and press Ctrl+Enter.

If you selected IP as one of the protocol types, the TCP/IP dialog box displays. See Figure 2-22.

Figure 2-22 : TCP/IP Dialog Box

nm1569.gif

Step 5 Read the dialog box, then press any key to continue. The Authentication (CHAP) dialog box displays. See Figure 2-23.

Figure 2-23 : Authentication (CHAP) Dialog Box

nm1570.gif

Step 6 If you will be using the Challenge Handshake Authentication Protocol (CHAP), enter Y. The Authentication (CHAP) Password dialog box displays. See Figure 2-24.

If you will not be using CHAP, enter N and proceed with the next section, "Completing the Installation."

Figure 2-24 : Authentication (CHAP) Password Dialog Box

nm1571.gif

Step 7 Enter the CHAP password provided by your system administrator.

The CHAP password is case-sensitive and must match exactly the password on the connecting router.

If you answered Y in Step 6 but do not enter a valid password, the Reenter (CHAP) Password dialog box displays. See Figure 2-25.

Figure 2-25 : Reenter (CHAP) Password Dialog Box

nm1521.gif

Step 8 Reenter the CHAP password and press Enter.

The Do You Want to Use PPP Multilink dialog box appears. See Figure 2-26.

Figure 2-26 : Do You Want to Use PPP Multilink Dialog Box

nm1590.gif

Step 9 Read the information in the Do You Want to Use PPP Multilink dialog box. If you want to use PPP multilink, press Y; otherwise, press N.

The Do You Want to Use PPP Callback dialog box appears. See Figure 2-27.

Figure 2-27 : Do You Want to Use PPP Callback Dialog Box

nm1953.gif

Step 10 If you want to use PPP callback, which allows for centralized billing and increased security, press Y; otherwise, press N.


If you use PPP callback, remote users will be restricted to dialing in from a specific telephone number.
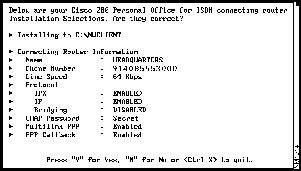
The Connecting Router Selections Confirmation dialog box displays. See Figure 2-28.

Figure 2-28 : Connecting Router Selections Confirmation Dialog Box

nm1914.gif

Step 11 Enter Y to confirm your choices for this connecting router, or enter N to reenter the connecting router information.

If you entered Y, the Configure Another Connecting Router dialog box displays. See Figure 2-29.

Figure 2-29 : Configure Another Connecting Router Dialog Box

nm1573.gif

Step 12 Enter Y to configure another connecting router, or enter N if you have configured all connecting routers for this ISDN line.

Step 13 If you entered Y, repeat Step 2 through Step 12 to enter all the connecting routers or PCs you will be dialing using this ISDN line.

After you finish configuring connecting routers, enter N.

To add or delete connecting routers later, see the section "What to Do Next," later in this chapter.

Step 14 When you finish configuring all connecting routers, a message similar to that in Figure 2-30 will display. Press any key to continue.

Figure 2-30 : ISDN200.CFG for Connecting Router Configuration Notice Dialog Box

nm1692.gif


Completing the Installation

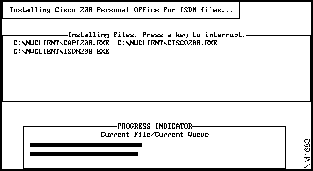
Step 1 The Installing Files Progress dialog box displays, as shown in Figure 2-31, while INSTALL.EXE copies all necessary files into the designated directory.

Figure 2-31 : Installing Files Progress Dialog Box

nm1683.gif

When all files have been copied, the Installation Complete dialog box displays. See Figure 2-32.

Figure 2-32 : Installation Complete Dialog Box

nm1576.gif

Step 2 Press any key. The NetWare Client Files Reminder dialog box displays. See Figure 2-33.

Figure 2-33 : NetWare Client Files Reminder Dialog Box

nm1587.gif

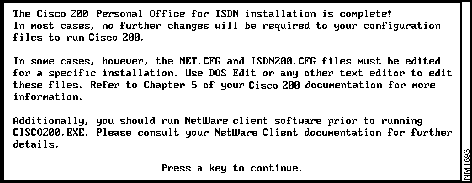
Step 3 Press any key to continue. The Installation Complete dialog box displays. See Figure 2-34.

Figure 2-34 : Installation Complete Dialog Box

nm1693.gif

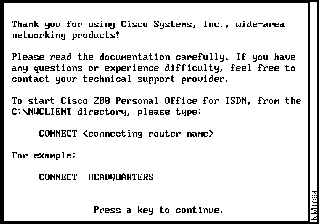
Step 4 Press any key to continue. The Thank You dialog box displays. See Figure 2-35.

Figure 2-35 : Thank You Dialog Box

nm1694.gif

Step 5 Press any key to continue. INSTALL.EXE will take you to the directory in which you installed the Cisco 200 software.


Note If you are using the NetWare ODI drivers and you did not install the Cisco 200 software and the NetWare Client software into the same directory, copy the NetWare Client files into the Cisco 200 directory.


What to Do Next

You have now completed installation of the Cisco 200 software.

For information on configuring the Cisco 200 software in Windows 3.1 or Windows for Workgroups 3.11, refer to the chapter "Configuring the Cisco 200 Software for Use in Windows."

If you need to modify your Cisco 200 configuration---to add another connecting router for example---see the appendix "Modifying the Cisco 200 Configuration Files."

If you must reinstall the Cisco 200 software using INSTALL.EXE---for example, if you want to install an updated version of the software---follow the procedure described below in "Reinstalling the Cisco 200 Software."

For information on running the Cisco 200, see the chapter "Using the Cisco 200."


Reinstalling the Cisco 200 Software

If you must reinstall the Cisco 200 software using INSTALL.EXE---for example, if you want to install an updated version of the software---use one of the following procedures:

  • To upgrade your Cisco 200 software, but retain the current configurations outlined in the ISDN200.CFG and NET.CFG files, run INSTALL.EXE and install the Cisco 200 files into the same directory you used in the previous installation. The installation script will not overwrite the ISDN200.CFG and NET.CFG configuration files.

  • To reinstall the Cisco 200 software and create new configuration files, follow one of these procedures:

    • Delete the following Cisco 200 files in the installation directory:

NET.CFG
ISDN200.CFG
ISDN200.EXE
README.TXT
ISDNEXP1.EXP
ISDNEXP2.EXP
CAPI200.EXE
CISCO200.EXE
NETCFG.EXP
CONNECT.BAT
DCONNECT.BAT

Run INSTALL.EXE again, using the same installation directory name as you did during the previous installation.

Note Do not reinstall the Cisco 200 software merely to change configuration parameters or add a connecting router. The NET.CFG and ISDN200.CFG files cannot be modified by simply running INSTALL.EXE again. To add or delete destinations or routers, or edit configuration parameters, use a text editor or word processor that allows you to save the file as ASCII (DOS) text, to edit the NET.CFG and ISDN200.CFG files. See the appendix "Modifying the Cisco 200 Configuration Files" for more information.


HomeTOCPrevNextGlossSearchHelp
-

Copyright 1988-1996 © Cisco Systems Inc.