|
|

Catalyst 5000 Series Power Supply
Configuration Note
Product Numbers: WS-X5008
This document contains instructions for installing and configuring the Catalyst 5000 series power supplies. For a complete description of commands used to configure and maintain the Catalyst 5000 series switch, refer to the Catalyst 5000 Series Configuration Guide and Command Reference publication. And for complete hardware configuration and maintenance procedures, refer to the Catalyst 5000 Series Hardware Installation and Maintenance publication. These documents are available on UniverCD or in print.
Sections in this document include the following:
![]()
What is the Catalyst 5000 Series Switch?
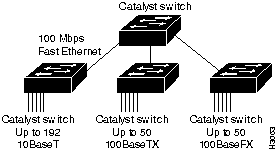
The Catalyst 5000 series switch provides high-density switched Ethernet for both wiring closet and data center applications. The switch includes a single integrated 1.2 gigabit-per-second (Gbps) multiple-LAN-switching backplane, called the switching backplane, which supports switched 10-megabit-per-second (Mbps) and 100-Mbps Fast Ethernet with backbone connections to Fast Ethernet, Fiber Distributed Data Interface (FDDI), Copper Distributed Data Interface (CDDI), and Asynchronous Transfer Mode (ATM) networks. Figure 1 is an example of a configuration using the Catalyst 5000 series switch.
Figure 1 : Cascaded Switches Using Fast Ethernet Interfaces on the Supervisor Engine Module
The Catalyst 5000 series switch chassis has five slots. The first slot is used for the supervisor engine module, which provides Layer 2 switching, local and remote management, and dual Fast Ethernet interfaces. The remaining four slots can be used for any combination of modules for additional 10- and 100-Mbps Ethernet, CDDI/FDDI, and ATM connections. Figure 2 shows the rear view of the Catalyst 5000 series switch, which provides access to the supervisor engine and switching modules, power supplies, and fan assembly.
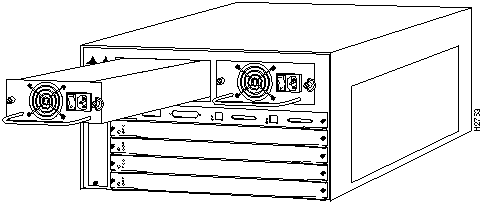
Figure 2 : Catalyst 5000 Series Switch Chassis Rear View
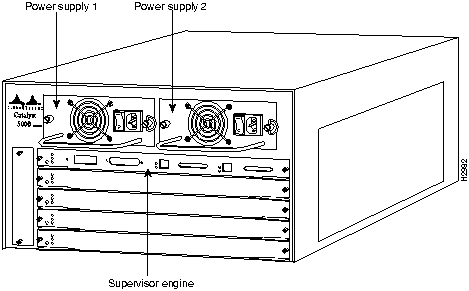
The Catalyst 5000 series switch comes equipped with one 376W, AC-input power supply. An optional second identical power supply is also available for fault-tolerant power. Dual power supplies are automatically load sharing and redundant, which means that a second power supply can be installed or replaced without interrupting system operation. (See Figure 2.)
Following are the Catalyst 5000 series switch power supply specifications:
Table 1 : Power Supply Specifications
| Description | Specification |
|---|---|
| Dimensions (H x W x D) | 1.2 x 14.4 x 16 in (3 x 35.6 x 40.6 cm) |
| Weight | 11 lb (4.73 kg) |
| Environmental Conditions:
Operating temperature Nonoperating temperature Humidity |
32 to 104°F (0 to 40°C) -40 to 167°F (-40 to 75°C) 10 to 90%, noncondensing |
| DC voltages supplied and steady-state maximum current ratings | +5V @ 70A
+12V @ 2A +24V @ 0.2A |
| Power supply | 376W maximum (AC-input power supplies) |
| Power dissipation | 350W maximum configuration, 110W typical with maximum configuration |
| Heat dissipation | 563W (1919 Btu1/hr) |
| Input voltage | 100--240VAC wide input with power factor corrector |
| Frequency | 47--63 Hz autoranging |
| AC current rating | 2.5A maximum at 90--132VAC, 1.6A maximum at 175--264VAC with the chassis fully configured |
| Airflow | 95 cfm2 through the system fan assembly |
| Operating temperature | 32--104°F (0--40°C) |
| Nonoperating temperature | -40--167°F (-40--75°C) |
| Humidity | 10--90%, noncondensing |
| Agency approvals:
Safety EMI3 |
UL4 1950, CSA5-C22.2 No. 950-93, and EN60950 FCC Class A (47 CFR, Part 15), EN55022 Class B and VCCI Class 2 with shielded cables |
The environmental monitoring functions use three levels of status conditions to monitor the system. These levels are normal, alarm, and power supply shutdown. The processor monitors the temperature inside the switching module compartment, and the power supplies use the normal and critical levels to monitor DC voltages. Table 2 lists temperature thresholds for the (processor-monitored) levels. Table 3 lists the DC power thresholds for the normal and alarm (power-supply-monitored) levels.
Table 2 : Processor-Monitored Temperature Thresholds
| Parameter | Normal | Alarm |
|---|---|---|
| Airflow | 10--55°C | > 55°C |
Table 3 : Power-Supply-Monitored Voltage Thresholds
| Parameter | Alarm | Normal | Alarm |
|---|---|---|---|
| +5V | < 4.74V | 4.74--5.26V | > 5.26V |
| +12V | < 11.40V | 11.40--12.60V | > 12.60V |
| +24V | < 20.00V | 20.00--30.00V | > 30.00V |
The three levels of status condition are as follows:
The processor uses the two levels of status conditions (normal, alarm) to monitor the air temperature in the switching-module compartment. Sensors on the supervisor engine module monitor the temperature of the cooling air that flows through the switching-module compartment. If the air temperature exceeds a defined threshold, the system processor displays warning messages on the console terminal. The processor stores the present parameter measurements for both temperature and DC voltage in NVRAM. These measurements can be retrieved later as a report of the last shutdown parameters.
The power supply monitors its own internal temperature and voltages. The power supply is either within tolerance (normal) or out of tolerance (alarm level), as shown in Table 3. If an internal power supply temperature or voltage reaches a critical level, the power supply shuts down without any interaction with the processor.
If the processor detects that AC input power is dropping but it can recover before the power supply shuts down, it logs the event as an intermittent power failure. The reporting functions display the cumulative number of intermittent power failures logged since the last power up.
When two power supplies are installed and both are turned on, each provides concurrently about half of the required power to the system. If one of the power supplies fails, the second power supply immediately ramps up to full power to maintain uninterrupted system operation. Load sharing and fault tolerance are automatically enabled when the second power supply is installed; no software configuration is required.
Each power supply should be connected to a separate AC source so that, in case of an input power line or power supply failure, the second power supply maintains uninterrupted system power.
On the supervisor engine module faceplate, the PS1 LED goes on when the power supply in the left bay, labeled power supply 1, is installed and supplying power to the system. The PS2 LED goes on when the power supply in the right bay, labeled power supply 2, is installed and supplying power to the system. Both the LEDs should go on in systems with redundant power. The supervisor engine module LEDs are shown in Figure 3 and described in Table 4.
Figure 3 : Supervisor Engine Module Power Supply LEDs
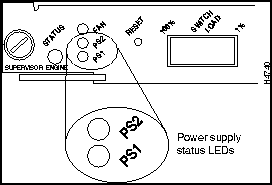
Table 4 : Supervisor Engine Module Power Supply LEDs
| LED | Description |
|---|---|
| PS1 | If the left bay power supply is operational, the PS1 LED is green.
If the left bay power supply is not operational, the PS1 LED is red. If the left bay power supply is off or not installed, the PS1 LED is off. |
| PS2 | If the right bay power supply is operational, the PS2 LED is green.
If the right bay power supply is not operational, the PS2 LED is red. If the right bay power supply is off or not installed, the PS2 LED is off. |
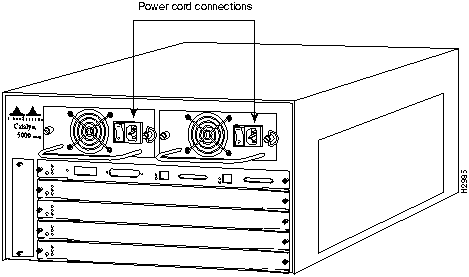
To connect an AC-input power supply, follow these steps:
Figure 4 : Power Cord Connection
Connect the redundant power supply to a separate input line. Connect the redundant AC-input power supply as follows:
The following guidelines will help to ensure your safety and protect the equipment. This list is not inclusive of all potentially hazardous situations that you may be exposed to as you install the switch, so be alert.
The supervisor engine, switching modules, and redundant (second) power supplies are designed to be removed and replaced while the system is operating without presenting an electrical hazard or damage to the system. Before removing a redundant power supply, ensure that the first supply is powered on. However, you must shut down the system before removing or replacing any of the replaceable components inside the front panel; for example, the backplane. Never install equipment that appears damaged.
Follow these basic guidelines when working with any electrical equipment:
In addition, use the guidelines that follow when working with any equipment that is disconnected from a power source but still connected to telephone wiring or other network cabling.
Installing and Replacing Power Supplies
The Catalyst 5000 switch is configured to your order and is ready for installation and startup when it leaves the factory. As your communication requirements change, you may want to upgrade your system and add or replace a power supply. This section describes the procedures for installing, replacing, and reconfiguring power supplies.
The 376W power supplies (AC-input) used in the switch support redundant hot swapping. When two power supplies are installed, you can install, remove, or replace one of the supplies without affecting system operation. When power is removed from one supply, the redundant power feature causes the second supply to ramp up to full power and maintain uninterrupted system operation. In systems with dual power supplies, connect each power supply to separate input lines to maximize the likelihood that in case of a line failure, the second source will still be available and can maintain maximum overcurrent protection for each power connection.
A modular power cord connects each power supply to the separate site power sources.
You will need a 1/4-inch flat-blade screwdriver to remove and install filler plates and to loosen or tighten the captive installation screws on the power supply.
Always install a filler plate over an empty power supply bay to protect the connectors from contamination.
Take the following steps to remove a power supply:
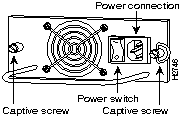
Figure 5 : Power Supply Switch and AC Connection
Figure 6 : Power Supply Installation
Figure 7 : Handling a Power Supply
Enter the show system command to display the power supply and Catalyst 5000 series switch status. The power supply status is listed in the PS-Status field of the show system command screen.
Example
In the following example, the system status and other information is displayed:
Copyright 1988-1996 © Cisco Systems Inc.
![]()
![]()
![]()
![]()
![]()

Console> show system
PS-Status Fan-Status Temp-Alarm Sys-Status Uptime d,h:m:s
--------- ---------- ---------- ---------- --------------
ok        ok         off        ok         27,17:05:50

Modem    Baud  MAC-Address-Range
-------- ----- -------------------------------------
disabled  9600 00-04-0b-a0-04-1f to 00-04-0b-a0-05-56

System Name              System Location          System Contact
------------------------ ------------------------ ----------------------
WBU-Catalyst-5000 5      Closet 202 1/F           Luis x5529
Console>

![]()
![]()
![]()
![]()
![]()
![]()
![]()
![]()