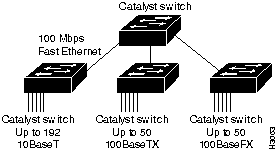
The Catalyst 5000 series switch provides high-density switched Ethernet for both wiring closet and data center applications. The switch includes a single integrated 1.2 gigabit-per-second (Gbps) multiple-LAN-switching backplane, called the switching backplane, which supports switched 10-megabit-per-second (Mbps) and 100-Mbps Fast Ethernet with backbone connections to Asynchronous Transfer Mode (ATM), Fast Ethernet, Fiber Distributed Data Interface (FDDI), and Copper Distributed Data Interface (CDDI). Figure 1 is an example of a configuration using the Catalyst 5000 series switch.
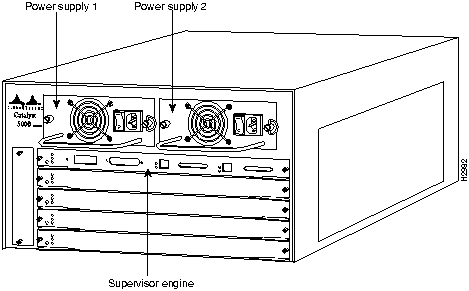
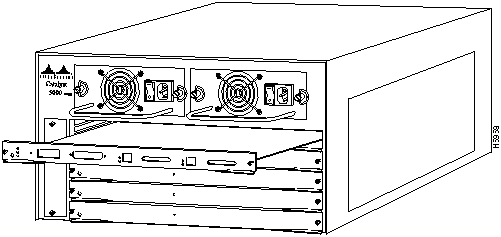
The Catalyst 5000 series switch chassis has five slots. The first slot is used for the supervisor engine module, which provides Layer 2 switching, local and remote management, and dual Fast Ethernet interfaces. The remaining four slots can be used for any combination of modules for additional 10- and 100-Mbps Ethernet, CDDI/FDDI, and ATM connections. Figure 2 shows the rear view of the Catalyst 5000 Series switch, which provides access to the supervisor engine and switching modules, power supplies, and fan assembly.
You need an antistatic mat or foam pad to support the removed supervisor engine module. You also need a 3/16-inch flat-blade screwdriver to tighten the captive installation screws that secure the Catalyst 5000 supervisor engine module in its slot.
The following guidelines will help to ensure your safety and protect the equipment. This list is not inclusive of all potentially hazardous situations that you may be exposed to as you install the switch, so be alert.
Warning Metal objects heat up when connected to power and ground, and can cause serious burns.
Safety with Electricity
The supervisor engine, switching modules, and redundant power supplies are designed to be removed and replaced while the system is operating without presenting an electrical hazard or damage to the system. Before removing a redundant power supply, ensure that the other supply is powered on.
You must shut down the system before removing or replacing any of the replaceable components inside the front panel; for example, the backplane. Never install equipment that appears damaged.
Follow these basic guidelines when working with any electrical equipment:
- Before beginning any procedures requiring access to the chassis interior, locate the emergency power-off switch for the room in which you are working.
- Disconnect all power and external cables before installing or removing a chassis.
- Do not work alone when potentially hazardous conditions exist.
- Never assume that power has been disconnected from a circuit; always check.
- Do not perform any action that creates a potential hazard to people or makes the equipment unsafe.
- Carefully examine your work area for possible hazards such as moist floors, ungrounded power extension cables, and missing safety grounds.
In addition, use the guidelines that follow when working with any equipment that is disconnected from a power source but still connected to telephone wiring or other network cabling.
 Warning Do not work on the system or connect or disconnect cables during periods of lightning activity.
- Never install telephone jacks in wet locations unless the jack is specifically designed for wet locations.
- Never touch uninsulated telephone wires or terminals unless the telephone line has been disconnected at the network interface.
- Use caution when installing or modifying telephone lines.
Preventing Electrostatic Discharge Damage
ESD damage, which occurs when electronic cards or components are improperly handled, can result in complete or intermittent failures. The supervisor engine module and switching modules each consist of a printed circuit card that is fixed in a metal carrier. Electromagnetic interference (EMI) shielding, connectors, and a handle are integral components of the carrier. Although the metal carrier helps to protect the cards from ESD, use a preventive antistatic strap whenever you handle the supervisor engine module or switching modules. Handle the carriers by the handles and the carrier edges only; never touch the cards or connector pins.
 Caution Always tighten the captive installation screws on the supervisor engine module and switching modules when you are installing them. These screws prevent accidental removal, provide proper grounding for the system, and help to ensure that the bus connectors are properly seated in the backplane.
Following are guidelines for preventing ESD damage:
- Always use an ESD wrist strap or ankle strap and ensure that it makes good skin contact.
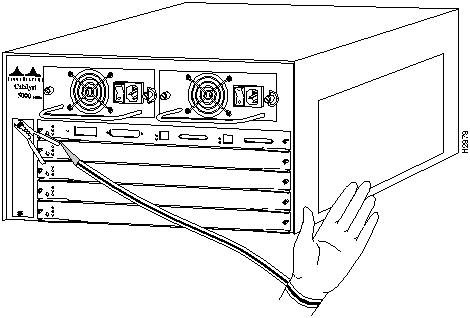
- When removing switching modules, connect the equipment end of the strap to one of the captive installation screws on an installed switching module or power supply. (See Figure 3.) When replacing internal components that are accessible from the rear of the chassis (for example, the supervisor engine module), connect the strap to an unpainted inner surface of the chassis such as the inner frame, which is exposed when the panels are removed.
Figure 3 : Placement of ESD Wrist Strap
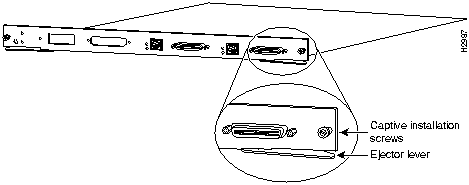
- When installing a supervisor engine module or switching module, use the ejector levers (shown in Figure 4) to properly seat the bus connectors in the backplane, then tighten both (left and right) captive installation screws. These screws prevent accidental removal, provide proper grounding for the system, and help to ensure that the bus connectors are seated in the backplane.
- When removing a supervisor engine module or switching module, use the ejector levers to release the bus connectors from the backplane. Grasp the captive screws and pull the carrier out slowly, using your hand along the bottom of the carrier to guide it straight out of the slot.
- Handle carriers by the handles and carrier edges only; avoid touching the card or any connector pins.
- When removing a supervisor engine module or switching module, place the removed card component side up on an antistatic surface or in a static shielding bag. If the component will be returned to the factory, immediately place it in a static shielding bag.
- Handle bare cards by the edges only.
- Avoid contact between the switching module and clothing. The wrist strap protects only the card from ESD voltages on the body; ESD voltages on clothing can still cause damage.

Caution For safety, periodically check the resistance value of the antistatic strap. The measurement should be between 1 and 10 Mohms.
Avoiding Problems When Inserting and Removing Switching Modules
The function of the ejector levers (see Figure 4) on the supervisor engine module is to align and seat the card connectors in the backplane. Failure to use the ejector levers and insert the switching module properly can disrupt the order in which the pins make contact with the backplane. Follow the installation and removal instructions carefully, and review the following examples of incorrect insertion practices and results:
- Using the faceplate to force a switching module all the way into the slot can pop the ejector levers out of their springs. If you then try to use the ejector levers to seat the switching module, the first layer of pins (which are already mated to the backplane) can disconnect and then remate with the backplane, which the system interprets as a card failure.
- Using the faceplate to force or slam the switching module all the way into the slot can also damage the pins on the card connectors if they are not aligned properly with the backplane.
- When using the faceplate (rather than the ejector levers) to seat the switching module in the backplane, you may need to pull the switching module back out and push it in again to align it properly. Even if the connector pins are not damaged, the pins mating with and disconnecting from the backplane will cause the system to interpret a card failure. Using the ejector levers ensures that the card connector mates with the backplane in one continuous movement.
- Using the faceplate to insert or remove a switching module, or failing to push the ejector levers to the full 90-degree position, can leave some (not all) of the connector pins mated to the backplane, a state that will suspend the system. Using the ejector levers and making sure that they are pushed fully into position ensures that all three layers of pins are mated with (or free from) the backplane.
It is also important to use the ejector levers when removing a switching module to ensure that the card connector pins disconnect from the backplane in the logical sequence expected by the system. Any supervisor engine module or switching module that is only partially connected to the backplane can hang the bus.
Figure 4 : Ejector Levers and Captive Installation Screws (Supervisor Engine Module Shown)
Removing the Supervisor Engine Module
The system dynamic random access memory (DRAM) resides in a SIMM on the supervisor engine module. Take the following steps to remove the supervisor engine module before adding the SIMM:
Step 1 Turn OFF the system power and disconnect any devices connected to the supervisor engine module console and auxiliary ports.
Step 2 Use a screwdriver to loosen the captive installation screws at the left and right sides of the supervisor engine module.
Step 3 Place your thumbs on the left and right ejector levers and simultaneously push the left lever left and the right lever right to release the supervisor engine module from the backplane connector.
Step 4 Grasp the supervisor engine module handle with one hand and place your other hand under the carrier to support and guide the module out of the slot. Avoid touching the card.
Step 5 Carefully pull the supervisor engine module straight out of the slot, keeping your other hand under the carrier to guide it. Keep the module at a 90-degree orientation to the backplane.
Step 6 Place the supervisor engine module on an antistatic mat or foam pad. Position it so that the faceplate edge is closest to you.
Step 7 Refer to Figure 5 to locate the version number of the supervisor engine module.
Figure 5 : Locating the Supervisor Engine Module Version Number
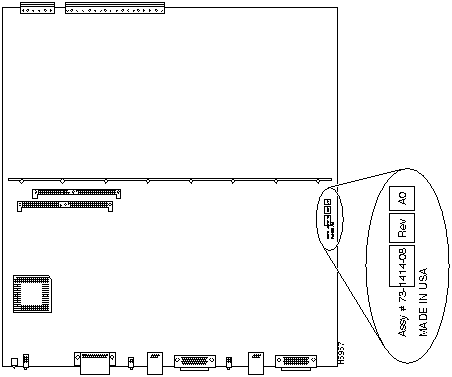
 Caution The SIMM in this upgrade kit is for installation in supervisor engine module versions 73-1414-01 through 73-1414-08 only. The SIMM in this upgrade kit is not equivalent to or compatible with SIMMs that are factory installed on supervisor engine modules 73-1414-09 and above.
Installing the SIMM
The default DRAM configuration on the supervisor engine module is 4 MB. This section provides the steps for increasing the amount of DRAM from 4 MB to 8 MB by adding the 4-MB SIMM contained in this upgrade kit to the supervisor engine module.
 Caution You must use the custom SIMM that is shipped in this upgrade package. Install this SIMM in supervisor engine module versions 73-1414-01 through 73-1414-08 only.
Take the following steps to install the new SIMM:
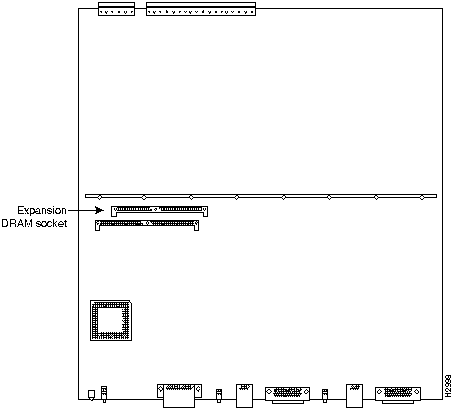
Step 1 Locate the expansion DRAM socket in the socket labeled U128 expansion DRAM socket. (See Figure 6.)
Figure 6 : Supervisor Engine Module SIMM Sockets
Step 2 Remove the SIMM from the antistatic bag.
 Caution Handle the SIMM by its card edges only; avoid touching the memory module, pins, or traces (the metal fingers along the connector edge of the SIMM). SIMMs are sensitive components that are susceptible to ESD damage, and can be shorted by mishandling.
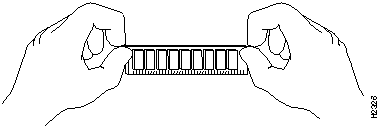
Step 3 Hold the sides of the SIMM between your thumb and middle finger, with your forefinger against the far edge, opposite the connector edge. (See Figure 7.)
Figure 7 : Handling a SIMM
Step 4 Orient the SIMM with its component side up and the connector edge (the metal fingers) closest to you.
Step 5 Tilt the SIMM to approximately the same angle as that of the socket and insert the entire connector edge into the socket.
 Caution When inserting the SIMM, use firm but not excessive pressure. If you damage a socket, you must to return the supervisor engine module to the factory for repair.
Step 6 Gently push the SIMM into the socket until the retaining springs snap into the holes in the SIMM. If necessary, rock the SIMM gently back and forth to seat it properly.
Step 7 When the SIMM is installed, check both alignment holes (two on each SIMM), and ensure that the spring retainer is visible. If it is not, the SIMM is not seated properly. If the SIMM appears misaligned, carefully remove it and reseat it in the socket. Push the SIMM firmly back into the socket until the retainer springs snap into place.
Reinstalling the Supervisor Engine Module
Following are installation steps for reinstalling the supervisor engine module:
 Caution Handle the supervisor engine module by the carrier edges only to prevent ESD damage.
Step 1 Ensure that there is enough clearance to accommodate any interface equipment that you will connect directly to the supervisor engine module ports.
Step 2 Hold the supervisor engine module handle with one hand, and place your other hand under the carrier to support the module and guide it into the slot. Avoid touching the card.
Step 3 Place the back of the switching module in the slot, and align the notch on the sides of the switching module carrier with the groove in the slot. (See Figure 8.)
Figure 8 : Module Installation
Step 4 While keeping the supervisor engine module at a 90-degree orientation to the backplane, carefully slide the module into the slot until the supervisor engine module faceplate makes contact with the ejector levers.
Step 5 Using the thumb and forefinger of each hand, simultaneously push the left lever and the right lever in to fully seat the supervisor engine module in the backplane connector.
 Caution Be sure to use the ejector levers when installing the supervisor engine module. A supervisor engine module that is partially seated in the backplane will cause the system to halt and subsequently crash.
Step 6 Use a screwdriver to tighten the captive installation screws on the left and right ends of the switching module.
Step 7 Reconnect the console port cable to the connector on the supervisor engine module.
Starting the System
Take the following steps to check the components and power up the system:
Step 1 Be sure the following components are secure:
- The supervisor engine module is inserted all the way into its slot, and all its captive installation screws are tightened.
- All interface cable connections are secured.
- Each power supply is inserted all the way into its bay, and the captive installation screw is tightened.
- All power-supply cables are securely connected to the power supply.
Step 2 Check the external power connections; the power-supply switches should still be OFF.
- At the power source end of the power cable, make sure that the connector is securely installed in a grounded outlet and that the source power is within the range labeled on the back of the switch.
- When two supplies are present, make sure that the second cord is connected to a separate line from the first, if possible.
Step 3 Check the console terminal and make sure it is ON.
Step 4 Turn the power supply (or supplies) ON.
- The PS1 and PS2 LEDs on the supervisor engine module faceplate turn green when both power supplies are ON.
Step 5 Listen for the system fan assembly and check the fan LED on the supervisor engine module. You should immediately hear it start to operate.
- The status LED on the supervisor engine module stays orange while the system initializes; until the boot is complete.
Step 6 When the supervisor engine module and all other Catalyst 5000 modules are initialized, use the show module or show port [mod_num/port_num] command to verify that the system has acknowledged the supervisor engine module and brought it up.
Note If a Catalyst 5000 contains 2.1 Software Memory Upgrade Kit SIMMs and is running a software release prior to 2.1 (such as release 1.5), the command show version displays only 4 MB of memory. You must install software release 2.1 or above to allow the command show version to recognize 2.1 Software Memory Upgrade Kit SIMMs and display the total memory as 8 MB.
Troubleshooting
If the system fails to boot properly, or if the console terminal displays a checksum or memory error, ensure that the SIMM is installed correctly. If necessary, shut down the system and remove the supervisor engine module. Check the SIMM by looking straight down on it and then looking horizontally, at eye level. The SIMMs should all be aligned at the same angle and the same height when properly installed. If the SIMM appears to stick out, or rest in the socket at a different angle from that of the other SIMM, remove the SIMM and reinsert it. Then replace the supervisor engine module and reboot the system for another installation check.
If after several attempts the system fails to restart properly, contact a customer service representative for assistance. Before you call, make note of any error messages, unusual LED states, or any other indications that might help diagnose the problem.
Note The time required for the system to initialize (boot) varies with different switch configurations. Switches with 8 MB of DRAM will take longer to boot than those with 4 MB of DRAM.

Copyright 1988-1996 © Cisco Systems Inc.