|
|

This chapter contains detailed procedures for installing the Catalyst 2820 and 1900 on a table, shelf, or rack and connecting it to other devices. The first thing is to ensure that you have all the components. When unpacking the unit, turn to the "Packing List" section in the "Fast Install Guide" chapter for the list of included items.
Warning Do not work on the system or connect or disconnect cables during periods of lightning activity.
![]()
Warning Do not touch the power supply when the power cord is connected. For systems with a power switch, line voltages are present within the power supply even when the power switch is off and the power cord is connected. For systems without a power switch, line voltages are present within the power supply when the power cord is connected.
![]()
Warning Read the installation instructions before you connect the system to its power source.
![]()
Warning This product relies on the building's installation for short-circuit (overcurrent) protection. Ensure that a fuse or circuit breaker no larger than 120 VAC, 15A U.S. (240 VAC, 10A international) is used on the phase conductors (all current-carrying conductors).
![]()
Warning To prevent the switch from overheating, do not operate it in an area that exceeds the maximum recommended ambient temperature of 104°F (40°C). To prevent airflow restriction, allow at least 3 inches (7.6 cm) of clearance around the ventilation openings.
![]()
Warning The device is designed to work with TN power systems.
![]()
Warning This equipment is intended to be grounded. Ensure that the host is connected to earth ground during normal use.
![]()
Warning Ultimate disposal of this product should be handled according to all national laws and regulations.
![]()
Warning When installing the unit, the ground connection must always be made first and disconnected last.
![]()
Warning Do not stack the chassis on any other equipment. If the chassis falls, it can cause severe bodily injury and equipment damage.
![]()
Warning Only trained and qualified personnel should be allowed to install or replace this equipment.
![]()
Warning Care must be given to connecting units to the supply circuit so that wiring is not overloaded.
![]()
Warning A voltage mismatch can cause equipment damage and may pose a fire hazard. If the voltage indicated on the label is different from the power outlet voltage, do not connect the chassis to that receptacle.
![]()
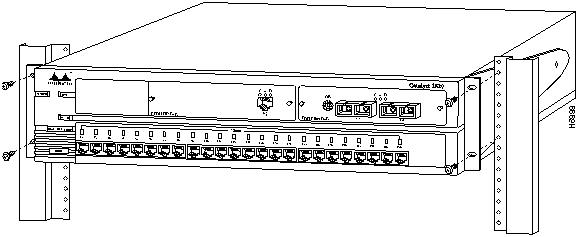
Installing the Switch in a Rack
The nature of rack-mounted equipment requires that the following guidelines be observed:
Follow these steps to install the unit in the rack.
Figure 4-1 : Catalyst 2820 Installed in a Rack The system LED turns green, and the Catalyst 2820 or 1900 automatically starts a series of self-tests described in the "Power-On Self-Test (POST)" section in this chapter.
Follow these steps to install the Catalyst 2820 or 1900 on a table or shelf.
The system LED turns green, and the Catalyst 2820 or 1900 automatically starts the series of tests described in the "Power-On Self-Test (POST)" section in this chapter.
When the Catalyst 2820 or 1900 is first turned on and the switch begins its POST, the system and port LEDs are green. As each of the thirteen tests is run, the port LEDs, starting with number sixteen, turn off. (Because there are only thirteen tests, LEDs fifteen, fourteen, and thirteen are unaffected.)
After the POST completes successfully, the port LEDs turn green, indicating that the switch is operational. If a test fails, the associated port LED stays off, and the system LED turns amber.
All POST failures except the real-time clock test (number 5) are fatal. If the real-time clock fails POST, the switch begins forwarding packets, but the system LED turns amber, and a POST-failure message appears on the console screen. Certain switch features, such as the bandwidth utilization meter, are lost if the real-time-clock test fails.
Connecting to the Switch Ports
Once the Catalyst 2820 or 1900 is installed, you can begin connecting devices to its ports. Note that all UTP connections, whether 10BaseT, 100BaseTX, or FDDI UTP, must be within 100 meters of the Catalyst 2820 or 1900.
Connecting to 10BaseT Ports 1 through 24
Use this procedure to connect to the 10Base-T ports 1 through 24.
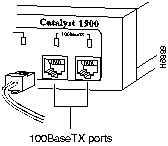
Connecting to the 100BaseTX Ports (Catalyst 1900 Only)
Use this procedure to connect to the 100BaseTX ports A and B.
Figure 4-3 : 100BaseTX Connections Connecting to the Expansion Slot Ports (Catalyst 2820 Only)
Procedures for installing Catalyst 2820 modules in the Catalyst 2820 high-speed expansion slots are included in the Catalyst 2820 Modules User Guide.
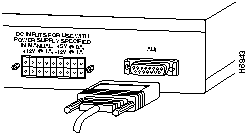
Connecting via the AUI Connector
Use the AUI connector on the back panel to connect to an external transceiver for attachment to a thick coaxial, thin coaxial, or fiber-optic cable.
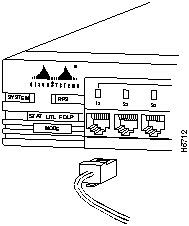
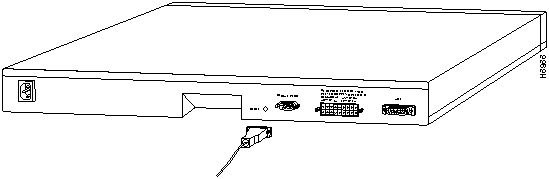
Connecting a Terminal via the EIA/TIA-232 Port
Figure 4-5 : EIA/TIA-232 (RS-232) Connection Insert the other end of the cable into the terminal.
The management console's logon panel appears.
Copyright 1988-1996 © Cisco Systems Inc.
![]()
![]()
![]()
![]()
![]()
![]()
![]()
![]()