|
|

This chapter walks you through configuration of a typical Asynchronous Transfer Mode (ATM) network after autoconfiguration has established the default network connections described in the chapter "Configuring the LightStream 1010 ATM Switch."
The network configuration modifications described in this chapter are used to optimize your ATM network operation. Because the LightStream 1010 offers true plug-and-play operation, most users may not need to perform any of these procedures. In some cases however, the autoconfiguration of interfaces may not maximize the potential of the LightStream 1010 features.
For a complete description of LightStream 1010 ATM switch configuration examples see the Light Stream 1010 ATM Switch Software Configuration Guide publication. The LightStream 1010 ATM Switch Command Reference publication provides the complete syntax for every switch configuration command and describes the no form of each command.
Table 7-1 list the types of supported virtual connections.
Table 7-1 : Supported LightStream 1010 Virtual Connection Types
| Connection | Point-to-
Point |
Point-to-
Multipoint |
Transit | Terminate |
|---|---|---|---|---|
| Permanent virtual channel link (PVCL) | 3 | 3 | -- | -- |
| Permanent virtual path link (PVPL) | 3 | 3 | -- | -- |
| Permanent virtual channel connection (PVCC) | 3 | 3 | 3 | 3 |
| Permanent virtual path connection (PVPC) | 3 | 3 | 3 | -- |
| Soft permanent virtual channel connection (Soft PVCC) | 3 | -- | 3 | -- |
| Soft permanent virtual path connection (Soft PVPC) | 3 | -- | 3 | -- |
| Switched virtual channel connection (SVCC) | 3 | 3 | 3 | 3 |
| Switched virtual path connection (SVPC) | 3 | 3 | 3 | -- |
Description of Example Network
The example network shown in Figure 7-1 will be used to describe some standard ATM configuration tasks you might want to perform after completing the tasks described in the chapter "Configuring the LightStream 1010 ATM Switch."
Figure 7-1 : Example Network Configuration
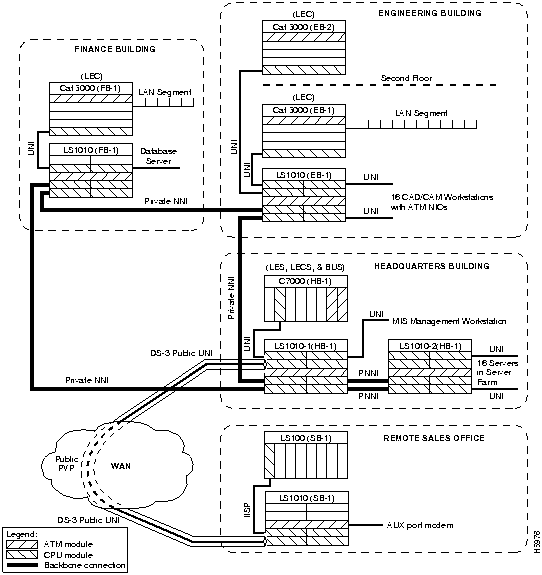
The network configuration shown in Figure 7-1 is an example of a corporate campus ATM backbone network connecting three buildings with an ATM connection across the wide area network (WAN) to a remote sales office.
The following configuration examples describe a part of the network configuration shown in Figure 7-1:
The configuration examples in this chapter will use the following format:
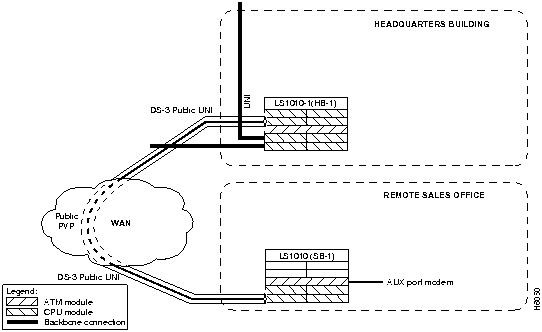
This section describes configuring a connection from switch LS1010-1(HB-1) in the headquarters building, through the public WAN to switch LS1010(SB-1) in the remote sales office as a PVC. See Figure 7-2 for a detail of the example network being configured.
Figure 7-2 : PVC Connection Example
To configure a PVC for the network management connection on switch LS1010-1(HB-1) in the headquarters building, use the following EXEC commands using the no form of this command to disable:
| Task | Command |
|---|---|
| At the privileged EXEC prompt, enter configuration mode from the terminal | configure1
[terminal] |
| Configure the connection-traffic-table-row instead of using a default. This is an optional command | atm connection-traffic-table-row [index row-index] cbr peak-cell-rate rate [tolerance cell-count]2 |
| Select the interface to be configured | interface atm card/sub_card/port [.vpt #] |
| Configure PVC interface | atm pvc vpi vci [cast-type type] [upc upc] [pd pd] [rx-cttr index] [tx-cttr index] interface atm card/sub_card/port [.vpt #] vpi vci |
Syntax Description
vpi---The ATM network virtual path identifier (VPI) to use for this virtual channel (VC) in the range of 0 through 255
vci---The ATM network virtual channel identifier (VCI) to use for this VC in the range of 0 through 65,535
cast-type---p2p | p2mp-root | p2mp-leaf (default = p2p)
upc---User parameter control pass | tag | drop (default = pass)
pd---Packet discard on | off (default = on)
rx-cttr (connection-traffic-table-row index)---should be configured before using this command
tx-cttr (connection-traffic-table-row index)---should be configured before using this command
Example
The following example configures a PVC on switch LS1010-1(HB-1) located in the headquarters building at interface 0/1/0, VPI=50, VCI = 100, and ATM interface 0/1/0
VPI = 100, VCI = 200:
LS1010-1(HB-1)(config)# interface atm 0/1/0
LS1010-1(HB-1)(config-if)# atm pvc 50 100 interface atm 0/1/0 100 200
To show the interface configuration, use the following commands:
| Task | Command |
|---|---|
| Show the ATM interface configuration | show atm vc
or show atm vc card/sub_card/port [.vpt #] vpi vci |
Examples
The following example displays the switch LS1010-1(HB-1) located in the headquarters building at the virtul configuration:
LS1010-1(HB-1)#show atm vc
Interface    VPI     VCI     Type   X-Interface  X-VPI   X-VCI   Status
ATM0/0/0     0       5        PVC     ATM2/0/0     0       32      UP
ATM0/0/0     0       16       PVC     ATM2/0/0     0       33      UP
ATM0/0/0     0       18       PVC     ATM2/0/0     0       34      UP
ATM0/0/0.99  99      3        PVC     ATM2/0/0     0       83      UP
ATM0/0/0.99  99      4        PVC     ATM2/0/0     0       84      UP
ATM0/0/0.99  99      5        PVC     ATM2/0/0     0       80      UP
ATM0/0/0.99  99      16       PVC     ATM2/0/0     0       81      UP
ATM0/0/0.99  99      18       PVC     ATM2/0/0     0       82      UP
ATM0/0/1     0       5        PVC     ATM2/0/0     0       35      UP
ATM0/0/1     0       16       PVC     ATM2/0/0     0       36      UP
ATM0/0/1     0       18       PVC     ATM2/0/0     0       37      UP
ATM0/0/2     0       5        PVC     ATM2/0/0     0       38      UP
ATM0/0/2     0       16       PVC     ATM2/0/0     0       39      UP
ATM0/0/2     0       18       PVC     ATM2/0/0     0       40      UP
ATM0/0/3     0       5        PVC     ATM2/0/0     0       41      UP
ATM0/0/3     0       16       PVC     ATM2/0/0     0       42      UP
ATM0/0/3     0       18       PVC     ATM2/0/0     0       43      UP
LS1010(SB-1)#
The following example displays the switch LS1010-1(HB-1) located in the headquarters building at the virtual configuration on interface 0/1/0:
LS1010(SB-1)#show atm vc interface atm 0/1/0
Interface    VPI     VCI     Type   X-Interface  X-VPI   X-VCI   Status
ATM0/1/0     0       5        PVC     ATM2/0/0     0       44      UP
ATM0/1/0     0       16       PVC     ATM2/0/0     0       45      UP
ATM0/1/0     0       18       PVC     ATM2/0/0     0       46      UP
LS1010(SB-1)#
The following example displays switch LS1010-1(HB-1) located in the headquarters building at the virtual configuration on interface 0/1/0, VPI = 50, VCI = 100:
LS1010-1(HB-1)#show atm vc interface atm 0/1/0 50 100
Interface: ATM0/1/0, Type: oc3suni
VPI = 50  VCI = 100
Status: UP
Last-status-change-time:00:00:34
Connection-type: PVC
Cast-type: point-to-point
Packet-discard-option: enabled
Usage-Parameter-Control (UPC): pass
Number of OAM-configured connections: 0
OAM-configuration: disabled
OAM-states:  Not-applicable
Cross-connect-interface: ATM0/1/0, Type: oc3suni
Cross-connect-VPI = 100
Cross-connect-VCI = 200
Cross-connect-UPC: pass
Cross-connect OAM-configuration: disabled
Cross-connect OAM-state:  Not-applicable
Rx cells: 0, Tx cells: 0
Rx connection-traffic-table-index: 1
Rx service-category: UBR (Unspecified Bit Rate)
Rx pcr-clp01: 0
Rx scr-clp01: none
Rx tolerance: none
Tx connection-traffic-table-index: 1
Tx service-category: UBR (Unspecified Bit Rate)
Tx pcr-clp01: 0
Tx scr-clp01: none
Tx tolerance: none
LS1010-1(HB-1)#
Configuring a Public Network VP Tunnel Example
This section describes configuring the DS-3 public User-Network Interface (UNI) ATM connection from the headquarters building across the WAN to the remote sales office as a VP tunnel. See Figure 7-3 for a detail of the example network being configured.
Figure 7-3 : Public VP Tunnel Network Example

Rationale
Public DS-3 carriers require VPs across their networks. To support signaling across the public network between switch LS1010-1(HB-1) in the headquarters building and the remote sales office switch LS1010(SB-1) a VP tunnel must be configured.
Following is the task list and an example of the commands used to configure the public DS-3 UNI connections in the example:
atm pvp and VP Tunnel Command Description
To configure a VP tunnel connection use the following EXEC commands using the no form of this command to disable:
| Task | Command |
|---|---|
| At the privileged EXEC prompt, enter configuration mode from the terminal | configure1
[terminal] |
| Configure the connection-traffic-table-row index | atm connection-traffic-table-row [index row-index] cbr peak-cell-rate rate [tolerance cell-count] |
| Select the physical interface to be configured. | interface atm card/sub_card/port[.vpt #] |
| Configure interface PVP | atm pvp vpi [cast-type type] [upc upc] [rx-cttr index] [tx-cttr index] |
| Change to configuration mode. | exit |
| Create a VP tunnel | interface atm card/sub_card/port.vpt # |
Syntax Descriptions
vpi---The ATM network VPI to use for this VP in the range of 1 through 255
cast-type ---p2p | p2mp-root | p2mp-leaf (default = p2p)
upc---pass | tag | drop (default = pass)
rx-cttr (connection-traffic-table-row index)---should be configured before using this command
tx-cttr (connection-traffic-table-row index)---should be configured before using this command
Examples
The following examples configure the ATM VP tunnel on the switch LS1010-1 (HB-1) located in the headquarters building at interface 1/0/0, VPI 99 to switch LS1010 (SB-1) located in the remote sales office at interface 4/0/0, VPI 99:
LS1010-1(HB-1)(config)#interface atm 1/0/0
LS1010-1(HB-1)(config-if)#atm pvp 99
LS1010-1(HB-1)(config-if)#interface atm 1/0/0.99

LS1010(SB-1)(config)#interface atm 4/0/0
LS1010(SB-1)(config-if)#atm pvp 99
LS1010(SB-1)(config-if)#exit
LS1010(SB-1)(config)#interface atm 4/0/0.99
Using show atm interface to Display Virtual Path Tunnel
To show the ATM virtual interface configuration use the following commands:
| Task | Command |
|---|---|
| Show the ATM interface configuration. | show atm interface atm card/sub_card/port [.sub_inter #] |
Example
The following example displays the configuration of the switch LS1010-1(HB-1) located in the headquarters building at subinterface 1/0/0.99:
LS1010-1(HB-1)(config)#show atm interface atm 1/0/0.99
Interface:      ATM1/0/0.99     Port-type:    vp tunnel
IF Status:      UP              Admin Status: up
Auto-config:    disabled        AutoCfgState: not applicable
IF-Side:        Network         IF-type:      UNI
Uni-type:       Private         Uni-version:  V3.0
Max-VPI-bits:   8               Max-VCI-bits: 14
Max-VP:         0               Max-VC:       32768
ATM Address for Soft VC: 47.0091.8100.0000.0060.3e5a.db01.4000.0c80.0000.63
Configured virtual links:
  PVCLs SoftVCLs   SVCLs  Total-Cfgd  Installed-Conns
      5        0       0           5                5
Input cells: 0, Output cells: 0
5 minute input rate: 0 bits/sec, 0 cells/sec
5 minute output rate: 134028000 bits/sec, 2528830 cells/sec
LS1010-1(HB-1)(config)#
This section describes configuring the Interim Interswitch Signaling Protocol (IISP) connection from switch LS1010 (SB-1) in the remote sales office building to the switch LS1010 (SB-1) in the same building. See Figure 7-4 for an example of this type of network configuration.
Figure 7-4 : IISP Network Segment Example
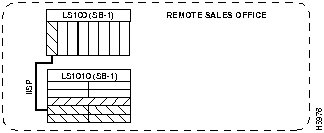
Rationale
The LightStream 100 ATM switch does not support the PNNI protocol and requires that the connection between the switches be manually configured as IISP.
Following are the task list and an example of the commands used to configure the connections in the example:
To configure an IISP connection on an interface, use the following EXEC commands using the no form of this command to disable:
| Task | Command |
|---|---|
| At the privileged EXEC prompt, enter configuration mode from the terminal | configure1
[terminal] |
| Select the interface to be configured | interface atm card/sub_card/port[.sub_inter #] |
| Disable the interface | shutdown |
| Disable autolink determination | no atm auto-configuration |
| Configure IISP on the interface | atm iisp side {user | network} |
| Reenable the interface | no shutdown |
| Configure the ATM route address prefix | atm route prefix atm-address-prefix |
| Exit interface configuration mode | exit |
| Exit configuration mode | exit |
Syntax Description
side = specify if this is a user or network side connection.
atm-address-prefix---13 bytes of ATM address including 3-byte Cisco International Code Designator (ICD), 4 bytes assigned by Cisco, 6-byte Media Access Control (MAC) address.
Example
The following example configures switch LS1010(SB-1) located in the remote sales building at interface 3/0/0 with no autodetermination as IISP, side = user, and sets the ATM route address prefix = 47.0091.8100.0000.0000.0ca7.ce01:
LS1010(SB-1)(config)#interface atm 3/0/0
LS1010(SB-1)(config-if)#shutdown
LS1010(SB-1)(config-if)#no atm auto-configuration
LS1010(SB-1)(config-if)#atm iisp side user
LS1010(SB-1)(config-if)#no shutdown
LS1010(SB-1)(config)# atm route prefix 47.0091.8100.0000.0000.0ca7.ce01
LS1010(SB-1)(config-if)#exit
LS1010(SB-1)(config)#exit
LS1010(SB-1)#
To show the interface configuration use the following command:
| Task | Command |
|---|---|
| Show the interface | show running-config |
Example
The following example displays the configuration of the switch LS1010(SB-1) located in the remote sales building at interface 3/0/0.100:
LS1010(SB-1)#show running-config
Building configuration...

Current configuration:
!
version 11.1
no service pad
service udp-small-servers
service tcp-small-servers
!
hostname LS1010-1(HB-1)
!
boot system flash slot0:rhino/ls1010-wi-m_1.083.bin.Z
!
atm over-subscription-factor 16
atm service-category-limit cbr 3000
atm qos uni3-default  cbr max-cell-loss-ratio 12
atm address 47.0091.8100.0000.0060.3e5a.db01.0060.3e5a.db01.00
!
interface ATM0/0/0
 no keepalive
 no atm auto-configuration
 no atm ilmi-enable
 no atm ilmi-lecs-implied
 atm iisp side user
 atm pvp 99

<Information Deleted>

end
LS1010(SB-1)#
Configuring Classical IP Over ATM
This section describes configuring a port on switch LS1010-1(HB-1) in the headquarters building to allow a classical IP-over-ATM connection to the switch CPU.
The following sections describe configuring the LightStream 1010 ATM switch in either an SVC or PVC environment:
Configure Classical IP over ATM in a SVC Environment
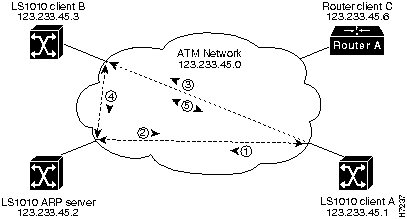
This section describes classical IP over ATM in an SVC environment. It requires a network administrator to configure only the device's own ATM address and that of a single ATM ARP server into each client device.
Figure 7-5 describes the steps needed to set up a classical IP over ATM connection between LightStream 1010 ATM switch client A and client B.
Figure 7-5 : Example of Classical IP Over ATM Connection Setup
Configure as an ATM ARP Client
In an SVC environment, configure the ATM ARP mechanism on the interface by performing the following tasks starting in global configuration mode.
Using NSAP Address Example
The following example configures CPU interface 2/0/0 of client A, in Figure 7-5, as the following:
Using ESI Example
The following example configures CPU interface 2/0/0 of client A, in Figure 7-5, as the following:
Configure as an ATM ARP Server
Cisco's implementation of the ATM ARP server supports a single, nonredundant server per logical IP subnetwork (LIS) and supports one ATM ARP server per subinterface. Thus, a single LightStream 1010 ATM switch can support multiple ARP servers by using multiple interfaces.
To configure the ATM ARP server, complete the following tasks starting in global configuration mode:
You can designate the current LightStream 1010 ATM switch as the ATM ARP server in Step 6 by adding the keyword self.
The idle timer interval is the number of minutes a destination entry listed in the ATM ARP server's ARP table can be idle before the server takes any action to time out the entry.
Example
The following example configures CPU interface 2/0/0 of the ARP server, in Figure 7-5, as the following:
To show the IP over ATM interface configuration, use the following command:
Example
In the following example the show atm arp command displays the configuration of switch LS1010(HB-1) located in the headquarters building at interface 2/0/0:
The following example displays the map-list configuration of the switch static map and IP over ATM interfaces:
Configure Classical IP over ATM in a PVC Environment
This section describes classical IP over ATM in a PVC environment. The ATM Inverse ARP mechanism is applicable to networks that use PVCs, where connections are established but the network addresses of the remote ends are not known. A server function is not used in this mode of operation.
In a PVC environment, configure the ATM Inverse ARP mechanism by performing the following tasks, starting in global configuration mode:
Repeat Step 4 for each PVC you want to create.
The inarp minutes interval specifies how often Inverse ARP datagrams are sent on this virtual circuit. The default value is 15 minutes.
Example
The following example configures CPU interface 2/0/0 to use IP over ATM encapsulation as follows:
To show the IP over ATM interface configuration use the following command:
Example
The following example displays the map-list configuration of the switch static map and IP over ATM interfaces:
Configuring LAN Emulation Client Example
This section describes configuring a LANE client connection from the switch LS1010-1(HB-1) in the headquarters building to the CPU port 2/0/0 of the switch.
Rationale
Interface 2/0/0 configured as a LANE client will allow configuration of the switch from a remote host.
Using the atm lane client ethernet Command Description
To configure the interface 2/0/0 as a LANE client on switch LS1010-1(HB-1), use the following EXEC commands using the no form of these commands to disable.
Syntax Description
lecs-address---LAN Emulation configuration server address
elan-name (Optional)---Name of the emulated LAN. Maximum length is 32 characters
atm-address-template---ATM address or a template in which wildcard characters are replaced by any nibble or group of nibbles of the prefix bytes, the end system identifier (ESI) bytes, or the selector byte of the automatically assigned ATM address.
Example
The following example configures the LAN Emulation configuration server address to the client on switch LS1010-1(HB-1) located in the headquarters building at interface 2/0/0 client ATM ad dress = .0800.200C.1001.**, as a client Ethernet connection, name = mis.
To show the interface configuration use the following command:
Example
The following example displays the LANE configuration of switch LS1010-1(HB-1) located in the headquarters building at interface 2/0/0:
ATM network operations are optimized using software configuration modifications beyond the default network configuration. This chapter provides a small sample of the many configuration optimization commands available. The LightStream 1010 ATM Switch Software Configuration Guide lists the detailed tasks needed to configure and maintain your LS1010-1(HB-1). The LightStream 1010 ATM Switch Command Reference provides the complete syntax for every switch configuration command, and describes the no form of each command.
Copyright 1988-1996 © Cisco Systems Inc.
Task
Command
configure1
[terminal]
interface atm 2/0/0[.sub_inter #]
or
Specify the end-system-identifier address of the interface.atm nsap-address nsap-address
atm esi-address esi-address
ip address address mask
atm arp-server nsap nsap-address
exit
See the following note.atm route {addr-prefix2} atm 2/0/0 internal
1 This command is documented in the LightStream 1010 ATM Switch Command Reference publication.
2 First 19-bytes of NSAP address
LS1010-1(HB-1)(config)#interface atm 2/0/0
LS1010-1(HB-1)(config-if)#$dress 47.0091.8100.0000.1111.1111.1111.1111.1111.1111.00
LS1010-1(HB-1)(config-if)#ip address 123.233.45.1 255.255.255.0
LS1010-1(HB-1)(config-if)#$dress 47.0091.8100.0000.1111.1111.1111.2222.2222.2222.00
LS1010-1(HB-1)(config-if)#exit
LS1010-1(HB-1)(config)#$0.0000.1111.1111.1111.1111.1111.1111 atm 2/0/0 internal
LS1010-1(HB-1)(config)#interface atm 2/0/0
LS1010-1(HB-1)(config-if)#atm esi-address 0041.0b0a.1081.40
LS1010-1(HB-1)(config-if)#ip address 123.233.45.1 255.255.255.0
LS1010-1(HB-1)(config-if)#$7.0091.8100.0000.1111.1111.1111.2222.2222.2222.00
LS1010-1(HB-1)(config-if)#exit
LS1010-1(HB-1)(config)#
Task
Command
configure1
[terminal]
interface atm 2/0/0[.sub_inter #]
or
Specify the end-system-identifier address of the interface.atm nsap-address nsap-address
atm esi-address esi-address
atm arp-server self
ip address address mask
atm arp-server time-out minutes2
exit
See the following note.atm route {addr-prefix3} atm 2/0/0 internal
1 This command is documented in the LightStream 1010 ATM Switch Command Reference publication.
2 When you use this form of the atm arp-server command, it indicates that this interface will perform the ATM ARP server functions. When you configure the ATM ARP client (as described earlier), the atm arp-server command is usedwith a different keyword and argumentto identify a different ATM ARP server to the client.
3 First 19-bytes of NSAP address
LS1010-1(HB-1)(config)#interface atm 2/0/0
LS1010-1(HB-1)(config-if)#atm esi-address 0041.0b0a.1081.40
LS1010-1(HB-1)(config-if)#atm arp-server self
LS1010-1(HB-1)(config-if)#ip address 123.233.45.2 255.255.255.0
LS1010-1(HB-1)(config-if)#exit
Task
Command
Show the ATM interface ARP configuration.
show atm arp
Show the ATM map list configuration.
show atm map
LS1010-1(HB-1)#show atm arp

Note that a '*' next to an IP address indicates an active call

      IP Address        TTL     ATM Address
ATM2/0/0:
    * 10.0.0.5          19:21   4700918100567000000000112200410b0a108140

LS1010-1(HB-1)#
LS1010-1(HB-1)#show atm map
Map list ATM2/0/0_ATM_ARP : DYNAMIC
arp maps to NSAP 36.0091810000000003D5607900.0003D5607900.00
        , connection up, VPI=0 VCI=73, ATM2/0/0
ip 5.1.1.98 maps to NSAP 36.0091810000000003D5607900.0003D5607900.00
        , broadcast, connection up, VPI=0 VCI=77, ATM2/0/0

Map list ip : PERMANENT
ip 5.1.1.99 maps to VPI=0 VCI=200

LS1010-1(HB-1)#
Task
Command
configure1
[terminal]
interface atm 2/0/0
ip address address mask
atm pvc vpi vci encap aal5snap [inarp minutes]
1 This command is documented in the LightStream 1010 ATM Switch Command Reference publication.
Switch(config)#interface atm 2/0/0
Switch(config)#ip address 11.11.11.11
Switch(config-if)#atm pvc 0 100 encap aal5snap inarp 10 interface atm 0/0/0 50 100
Task
Command
Show the ATM interface ARP configuration.
show atm map
LS1010-1(HB-1)#show atm map
Map list yyy : PERMANENT
ip 1.1.1.2 maps to VPI=0 VCI=200

Map list zzz : PERMANENT

Map list a : PERMANENT

Map list 1 : PERMANENT

Map list ATM2/0/0_ATM_ARP : DYNAMIC
arp maps to NSAP 47.009181005670000000001122.00410B0A1081.40
        , connection up, VPI=0 VCI=85, ATM2/0/0
ip 10.0.0.5 maps to NSAP 47.009181005670000000001122.00410B0A1081.40
        , broadcast, ATM2/0/0

LS1010-1(HB-1)#
Task
Command
configure1
[terminal]
atm lecs-address lecs-address
interface atm 2/0/0[.sub_inter #]
lane client-atm-address atm-address-template
lane client ethernet [elan-name]
1 This command is documented in the LightStream 1010 ATM Switch Command Reference publication.
LS1010-1(HB-1)(config)# atm lecs-address 47.0091.0000.0000.0000.0000.0000.0000.00
LS1010-1(HB-1)(config)# interface atm 2/0/0
LS1010-1(HB-1)(config-if)# lane client-atm-address...0800.200C.1001.**
LS1010-1(HB-1)(config-if)# lane client ethernet mis
Task
Command
Show the LANE client configuration.
show lane client
LS1010-1(HB-1)#show lane client
LE Client ATM2/0/0  ELAN name: mis Admin: up  State: operational
Client ID: 2
HW Address: 0061.3e5b.bb02   Type: ethernet             Max Frame Size: 1516
ATM Address: 47.00918100000000613E5BBB01.000011112222.00

 VCD  rxFrames  txFrames  Type       ATM Address
   0         0         0  configure  47.333300000000000000000000.000111222333.00
 104         1        11  direct     47.333300000000000000000000.001122334455.00
 105        15         0  distribute 47.333300000000000000000000.001122334455.00
 106         0        10  send       47.333300000000000000000000.000000111111.00
 107        19         0  forward    47.333300000000000000000000.000000111111.00
 108         5         6  data       47.00918100000000613E5BBB01.00000C523BC8.00

LS1010-1(HB-1)#
![]()
![]()
![]()
![]()
![]()
![]()
![]()
![]()