|
|

The AXIS Release 3.0 allows the user to perform the following management functions:
To perform these user interface functions, AXIS Release 3.0 offers a variety of physical access paths and a variety of protocols. Depending upon the function to be performed, there are four physical access methods that can be used as follows:
The protocols that can be employed are:
A matrix of permissible user interface combinations in Release 2 is shown in Table 3-1.
Table 3-1 : UI Function/Access Path/Protocol Combinations
| UI Function | Physical Access Path | TCP/IP Protocols Used |
|---|---|---|
| Enter Commands using CLI | ASC Maintenance Port
ASC Control Port In-band BNM T3 Port LAN Port |
None
SLIP, TCP, Telnet IP, TCP, Telnet IP, TCP, Telnet |
| Configure/Collect Statistics and Configuration Files | ASC Control Port
In-band BNM T3 Port LAN Port |
SLIP, TCP, TFTP
IP, TCP TFTP IP, TCP, TFTP |
| Enter Commands using SNMP | ASC Control Port
In-band BNM T3 Port LAN Port |
SLIP, UDP, SNMP
IP, UDP, SNMP IP, UDP, SNMP |
| Download Firmware | ASC Control Port
In-band BNM T3 Port LAN Port |
SLIP, TCP, TFTP
IP, TCP, TFTP IP, TCP, TFTP |
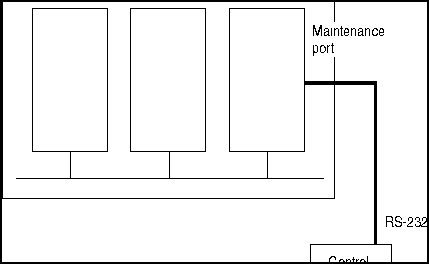
The maintenance port is the upper RS-232 connector on the ASC line module. The connector is DB-25 (female). With serial line access via the maintenance port, the user interface prompt appears once the dumb terminal is connected and the system is powered up. No special software is required and the connection is made through a standard (not null modem) cable. This arrangement is shown in Figure 3-1. Entering commands via a dumb (or emulated) terminal is the only use for the Maintenance Port. The maintenance port is configured for 8 data bits, no parity, one stop bit and 9600 bps.
Figure 3-1 : Maintenance Port Access
The control port is the middle RS-232 connector on the ASC line module. The connector is an RS-232 DB-25 (female). For this type of connectivity, the control terminal (PC or workstation) must support TCP/IP using a SLIP serial connection and the control port must have been previously configured with an IP address. The control terminal can be connected either locally or remotely using modems. When entering command line commands through the control port, the user interface prompt appears when user performs a Telnet login to the port's IP address.
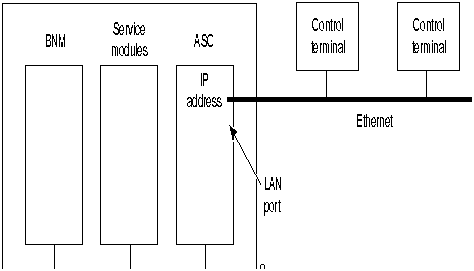
The LAN Port on the ASC is an Ethernet AUI port.
The Control and LAN Ports support Telnet (for CLI), TFTP and SNMP sessions as indicated in Table 3-1. Use of the Control Port is shown in Figure 3-2.
If you have multiple devices to which you want to log into to configure, you might want to connect your workstation or PC to a terminal server, that can dial out to multiple devices. Figure 3-3 illustrates a possible scenario for terminal server control port access.
How the LAN port is connected is shown in Figure 3-4
Figure 3-2 : Control Port Access
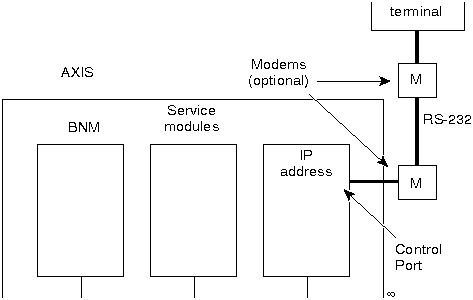
Figure 3-3 : Control Port Access Via a Terminal Server

Figure 3-4 : LAN Port Access to AXIS
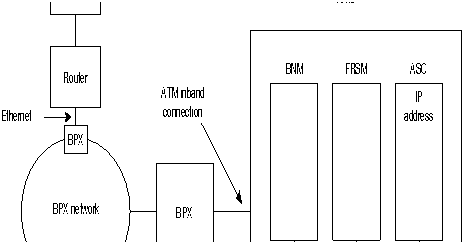
Inband access uses a portion of the bandwidth of the AXIS/BPX T3 connection by reserving a number of ATM virtual connections for network management functions. For this type of connectivity, the control terminal (PC or workstation) is connected through the BPX network and must support TCP/IP and the inband port on the BNM must have been previously configured with an IP address. When using the inband port to enter CLI commands, the user interface prompt appears when the user performs a Telnet login to the port's IP address.
Figure 3-5 : Inband Access Example
User Accounts and Privilege Levels
AXIS systems have security features built-in to prevent unauthorized use of the system. The security features require that each user on the system must have a valid account (specified by a userid), password and privilege level.
The combination of account, password, and privilege level determine which commands the user can execute.
Before a user can be logged in, the user must have a previously assigned account, password and privilege level. The account (userID) and privilege level are assigned using the adduser command. There is a default password which is used the first time a user logs in. When logged in, the user can change the password to a personal password with the cnfpwd configure password command.
Each user is assigned an account which is known by its userID which is specified as a parameter in the adduser command. The userID consists of up to 12 alphanumeric characters including letters, numbers, a hyphen, and an underscore. UserIDs are case sensitive.
When a user attempts to log in, the system prompts for a valid userID.
AXIS permits one superuser account and 63 user accounts, AXIS ships with a pre-configured superuser account (which can also be changed by Superuser).
Each account is assigned a privilege level when the account is established with the adduser command. Only an already established user can execute the adduser command to open a new account and then can only specify a privilege level of the new account at the same or lower level than his or her own privilege level.
All commands have an assigned privilege level and a command can only be executed by a user whose privilege level is equal to or above the privilege level of the command. There is one superuser privilege level and 6 user levels designated 1 through 6 (with 1 being the highest).
A default password is used the first time a user logs in (see the release notes for details of the default password). Once a user is logged on, the user can change his or her own password using the cnfpwd command
The password must consist of from 6 to 15 characters. Only letters, numbers, a hyphen, an underscore and spaces are allowed. The password is case-sensitive. For security, the password is not displayed as it is entered.
When a user attempts to log in, the system prompts for a valid password after the userID prompt has been entered. The user must respond with the account's valid password.
Setting Up Management Connectivity to the AXIS Shelf
The following paragraphs describe how to setup the various user interface access paths. Initiating commands to the shelf involves providing the correct user password.
When no user is logged into the system the prompt is:
To login, the user must respond to the login: prompt by entering his or her userID followed by the ENTER key. This causes the following prompt:
The user must respond with the appropriate password followed by the ENTER key, the first time a new user logs on, the system requires a password to be entered. A user can change his or her password at any time. When a correct password has been entered, the following prompt appears:
Enter the slot number of the card to receive the commands followed by the ENTER key. The normal command prompt will appear and commands for the specified card/slot can be entered.
To issue commands to another module, the user must issue the cc (change card) command:
followed by the ENTER key.
Connecting via the Maintenance Port
Setting Up IP Addresses for Control Port, LAN Port or Inband Access
Before you can access AXIS using the control port, LAN port or inband virtual connection, you must configure IP addresses for each of these destinations on the ASC card. To configure IP addresses, proceed as follows:
For the Control Port and Ethernet port the AXIS is now configured for you to access the unit via the specified port. See the Connecting via the Control Port section and Connecting via the LAN port section for details. For inband access, you need a connection across the network. See the Connections via an Inband Connection section for details.
Connecting via the Control Port
If the workstation used for entering commands is to be connected over a terminal server:
Connecting via an Inband Connection
Before you can access AXIS using the inband method, you must set up or add a connection across the network. To configure a connection to AXIS that will terminate on the inband port of the ASC card, proceed as follows:
The LAN port allows the shelf to be connected to an Ethernet network through using an appropriate transceiver. Thus a workstation connected to the Ethernet network can communicate directly with the AXIS. The port should be given an IP address to allow TCP/IP protocols to be used.
The Command Line Interface (CLI)
The Command Line Interface (CLI) uses a simple alphanumeric terminal and employs the concept of a system prompt to which the user types in commands.
The CLI also employs the concept of a user being logged into a particular module (slot) in the AXIS shelf and all commands entered are assumed to apply to that module (slot). In this way the CLI can be used for managing both the core cards and the service modules.
For security, logging in involves entering a correct pre-assigned password which allows the user access only to commands of a specified privilege level or below.
For information on performing some of the management functions using the StrataView Plus Connection Manager and Equipment Manager, see StrataCom's StrataView Plus User's Guide.
One command that must be entered using the CLI is the Configure Interface IP address (cnfifip). Since a control station, including StrataView Plus, uses an IP address to communicate with the shelf, the various ports on the shelf must first be assigned IP addresses using the cnfifip command.
Each CLI command and its syntax and privilege level is provided in the AXIS Command Reference Manual.
Establishing the AXIS to BPX Connection
This step must be performed on the BPX at BOTH ends of the connection ("A" and "B"). This connection is established only once per shelf.
On the BPX:
AXIS provides the ability to manage the shelf through Simple Network Management Protocol (SNMP) commands. These commands are issued from an SNMP Manager which accesses the AXIS shelf either through the Ethernet port, the control port, or inband connection.
Each ASC and service module in the shelf contains an SNMP agent and a Management Information Base (MIB) for that module. The SNMP agent responds to GET, GET NEXT and SET commands from the SNMP Manager, thereby providing the user with the ability to interrogate and update the MIB.
The AXIS MIB resides with an object ID of axis under the strataCom branch of the SNMP tree structure (1.3.6.1.4.1.351.110) as shown in Figure 3-6. The AXIS MIB consists of five major sections, namely, axisSystem, cardGeneric, cardSpecific, axisLines and axisServices.
Figure 3-6 : Axis MIB Tree Structure

The axisSystem section consists of three sub-sections. The first is axisShelf which contains information about the shelf as a whole such as nodename, time, date, etc.. The second is the axisAsm which contains the shelf alarm table. This table contains the threshold, severity and status of alarms in the shelf. The third is the axis redundancy group and contains information about the redundant configurations within the shelf.
The cardGeneric section contains objects that are common to all card types. This section contains five sub-sections. The first is cardInformation and contains card type, card slot, serial number, hardware and firmware revision number, etc. The second is cardInterface which contains a list of physical interfaces and service types available on a card. The third is cardSelfTest which contains a selftest enable/disable object, the interval between selftests and the results of the last selftest. The fourth is controlMsgCounter which contains the current values of the control SAR counters (control frames transmitted and received, control cells discarded, etc.). The fifth is sarChannelCounter which contains the current values of the channel SAR counters. These counters are for ATM cells and are maintained on a per VC basis.
This section contains objects that are specific to a particular type of card. The cardSpecific section contains seven sub-sections. The first is bnmClockConfig and contains the primary and secondary clock sources, the status and impedance of the external T1/E1 clock input. The second is bnmAddressTranslation and contains shelf, slot and channel mapping data. The third is bnmATMCounters and contains the ATM counters on the BNM card. These counters contain the current values of ATM cells transmitted, ATM cells received, etc. The fourth contains ASC LMI signaling information. The fifth is currently unused. The sixth contains service module feature information and the seventh contains service module rate control configuration data.
The axisLines section consists of four subsections. The first is serialInterface and contains information about the serial (maintenance and control ports) lines in the shelf. The second is ethernetInterface and contains information about the Ethernet LAN port in the shelf. The third and fourth are dsx1 and dsx3 which contain information about configuration, alarm configuration, alarm status and counters for the DS1 and DS3 lines.
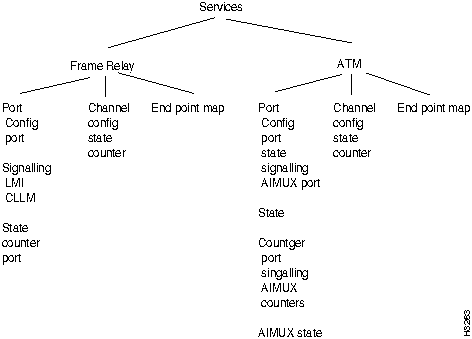
The axisServices sections consists of the AXIS service. This section contains information about frame relay channel configurations, configurable parameters, and LMI signalling. This section also contains similar MIB objects for ATM services.
The services for frame relay are further organized as shown in Figure 3-7
The AXIS MIB is distributed as a text file (ASN.1) on a diskette from which it can be printed and used to compile the MIB into an SNMP Manager. The AXIS MIB (and hence the AXIS shelf) can also be managed from StrataView Plus (Release 8.1). For complete details of managing the shelf from StrataView Plus, refer to the StrataView Plus manual.
AXIS Release 2 supports the transfer of data files between the shelf and a workstation using Trivial File Transfer Protocol (TFTP). The functions provided by these file transfers are the configuring and collection of statistics and the downloading of AXIS firmware.
In order to perform a file transfer the workstation must establish connectivity with the shelf either through the control port (using SLIP) or through the Inband port. In both cases TCP/IP protocol is employed and the shelf must be assigned an IP address. For details of how to establish connectivity, refer to Setting Up Management Connectivity to the AXIS Shelf.
AXIS shelves are shipped with the latest version of the firmware already pre-loaded. AXIS firmware upgrades can be downloaded over the network from StrataCom's ISC (International Support Center). Firmware and firmware upgrades for the AXIS shelf are also distributed as a Firmware Media Kit on diskettes. The contents of the kit are:
TFTP, either through the Control Port or Inband ATM, is used for downloading firmware from a workstation into the AXIS modules.
The host uses the following command sequence to download the firmware as follows.
If the download process is disrupted for a timeout or other such errors, re-start the TFTP download process without resetting the AXIS shelf.
If there is a hardware or system failure that requires resetting the card being downloaded, the firmware must be downloaded using the backup boot procedure. This is a two step procedure. First download the boot firmware and then download the on-line firmware. If a backup boot procedure becomes necessary, contact StrataCom Product Support for assistance.
After the firmware file has been transferred completely and successfully, the module should be reset for the downloaded firmware to take effect.
Configuring and Collecting Statistics
Configuring statistics specifies to the shelf which statistic counters are to be collected. A file is constructed which lists the statistic counters to be collected and is downloaded into the shelf using TCP/IP TFTP.
Collecting statistics causes the statistics to be transferred as a data file to the workstation. The workstation first requests the statistics and the AXIS shelf responds by uploading the statistic file to the workstation. A list of statistics counters for each card type is provided in Appendix C.
The method of collecting statistics in AXIS conforms to the standard StrataCom method which is also employed in IPX and BPX nodes. As such StrataCom's StrataView Plus (Release 7.2 and later) supports the standard TFTP method of configuring and collecting statistics and can be used as the workstation which is attached to AXIS for this purpose. StrataView Plus provides a convenient and easy-to-use graphical user interface (GUI) for both configuring the statistics to be collected and actually collecting those statistics from the AXIS shelf. Using StrataView Plus relieves the user of knowing and constructing the file formats required for correctly transferring the statistics files.
Each type of statistic collected in StrataCom networks is categorized under a major grouping known by an object type name and an object type number and minor grouping known as a sub-type. Within the sub-type, the statistic has a statistic type number. For example, the statistic "ATM Cell Header HEC Errors" has an object type name of IPX-ATM, an object type of 2, a sub-type of 1 and a statistic type of 45. This combination of groups and type number uniquely identify a particular type of statistic.
Each AXIS statistic can be configured individually for collection. To configure statistics, the workstation transfers a file (filename = enable.stats) using TFTP to AXIS which specifies those statistic types to be collected. The specified statistics are grouped by Object Type, then Object Sub-type. Multiple Object types each containing multiple Object Sub-types each containing multiple Statistic types can be specified in one file.
To collect statistics from the AXIS shelf, the workstation uses TFTP to issue a request in the form:
Get Nodename.mmddyyhhmm, where
Upon receipt of this message, the shelf responds with a file containing the collected statistics.
Statistics Collection File Format
Table 3-2 : Format of statistics collection file
| Field Description | Field Size |
|---|---|
| Fixed Header Section | |
| Domain number of AXIS shelf | 1 byte |
| Node number of AXIS shelf | 1 byte |
| Release number (example, 725a for release 7.2.5.A) | 4 bytes |
| Status byte | 1 byte |
| Peak Flag | 1 byte |
| File collection interval | 1 byte |
| Bucket interval | 1 byte |
| Number of Object Types | 1 byte |
| Data Dependent Section | |
| Object Type identifier | 1 byte |
| Number of Object Sub-types | 2 bytes |
| Object Sub-type identifier | 1 byte |
| Key information | variable length |
| Number of Stat types | 1 byte |
| Stat type | 1 byte |
| Stat value | 4 bytes |
| Peak value | 4 bytes |
| REPEAT Stat type, Stat value and Peak value for each bucket until number of stat types is satisfied | n bytes |
| REPEAT Object Sub-type section | n bytes |
| REPEAT Object type section | n bytes |
Configuration Save and Restore
AXIS provides Save and Restore functions which are performed using the TFTP facility.
The Save function allows a user to copy a service module's current configuration file (which is saved on a disk on the ASC) to a network file system. The Restore function allows a user to copy a service module's configuration file from the network file system to the ASC's disk. Using these functions, the configuration files for AXIS service modules can be backed up to an independent network system and later restored if the configuration files in the AXIS shelf become lost or corrupted or if the configuration is to be restored to a previous version.
The TFTP Get command is used to save a configuration as follows:
where configuration filename is:
For example:
will save the configuration file for the service module in slot 5.
The TFTP Put command is used to save a configuration as follows:
where configuration filename is:
|
|
Copyright 1988-1996 © Cisco Systems Inc.