|
|

Connecting Power for AC Systems
The AC power assembly can be configured with either a single primary input AC source or optionally both primary and secondary (redundant) input AC sources. AC power is supplied through connectors on the rear panel.
The AC power assembly holds up to six independent 875 watt power supplies each of which supplies power to a common output bus. Power is then available for AXIS shelves through connectors on the rear panel.
The number of power supplies that are configured in the assembly depends upon the number of AXIS shelves that have to be supported. The maximum number of AXIS shelves that can be supported by a single AC power assembly is four.
In a worst-case fully loaded configuration each AXIS shelf requires 500 watts. Therefore, a power assembly equipped with three power supplies, totaling 2625 watts, can supply enough power for a four shelf rack. A power assembly equipped with four power supplies, totaling 3500 watts, provides enough power for a four shelf rack even in the event of a single power supply failure. More power supplies provide even more protection in the event of multiple power supply failures.
In addition to supplying power, each power supply provides a signal that indicates the status of the power supply.
The rear panel has:
Figure 6-13 : AC Power Assembly Block Diagram
Referring to Figure 6-13, power is available at each of the four connectors on the right of the rear panel and a cable from any of these four connectors can be connected to any shelf in the rack.
Each of the rightmost three connectors of the group of four also provides a power supply status signal for monitoring power supply performance by an AXIS shelf. Each of these connectors provides a status signal for a particular power supply as shown in the diagram.
The group of three connectors on the left of the rear panel supply status signals only for any remaining power supplies that may be configured in the assembly.
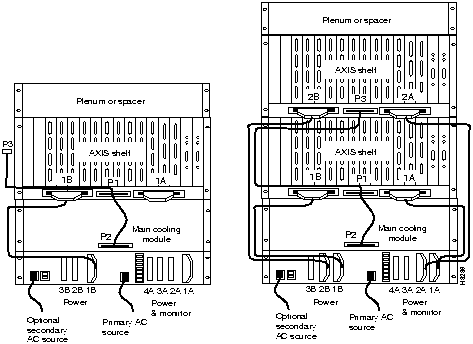
Refer to Figure 6-14 and Figure 6-15 when performing the following steps.
![]()
Figure 6-14 : AC Cabling for One and Two Shelf Racks
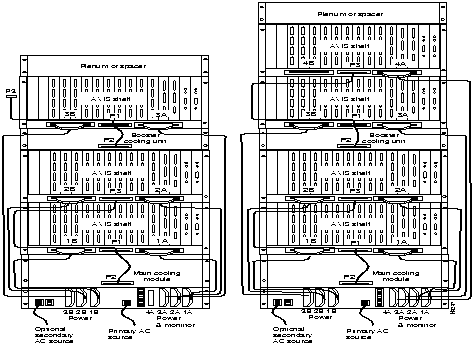
Figure 6-15 : AC Cabling for Three and Four Shelf Racks
A fully loaded multi-AXIS rack may have between 150 and 200 cables attached to the rack's modules. Cable Management kits are available for installation on the rear of rack modules. These kits provide the means to route the power and data cables in a neat and orderly fashion to and from the modules in the rack.Depending upon the number of racks in the shelf and the number of cables connected to the shelves, one or more cable management kits may be required.
The cable management kits are installed to rear of the Cooling Module, the Booster Cooling Module and the Plenum as required. Note that a cable management kit cannot be installed on the spacer unit.
There are two basic cable management kits, one for the plenum chamber and another for the cooling and booster cooling modules.
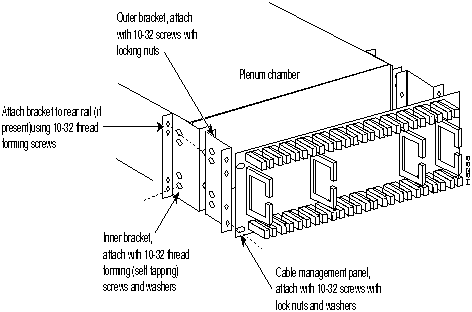
The plenum chamber kit consists of a cable management panel and the necessary brackets, screws and washers for rear mounting on the plenum as follows:
Table 6-1 : Plenum Chamber Kit Bill of Material
| Part No. | Description | Quantity |
|---|---|---|
| 204532 | # 10 flat washer | 8 |
| 212885-06 | 10-32, 0.375" long screws with locking nuts | 8 |
| 212897-06 | 10-32, 0.375" long thread forming screws | 4 |
| 215961-00 | Inner bracket | 2 |
| 215963-00 | Outer bracket | 2 |
| 216164-01 | Cable management panel | 1 |
A cable management kit for the plenum is shown in Figure 6-16. Referring to this figure, install the kit as follows:
Figure 6-16 : Cable Management Kit on the Plenum Chamber Main Cooling and Booster Cooling Kit
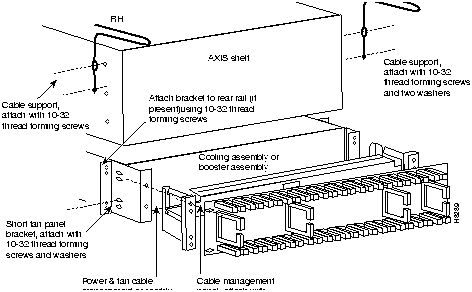
For the cable management kit that is installed on the cooling module and booster cooling module, the kit consists of a set of brackets, a power routing assembly, and the cable management panel as follows:
Table 6-2 : Cooling and Booster Kit Bill of Materials
A cable management kit for the cooling and booster units is shown in Figure 6-17. Referring to this figure, install the kit as follows:
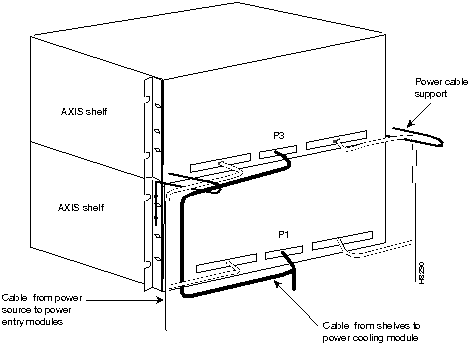
Figure 6-17 : Installation of Cable Management Kit on Cooling Module There are two kinds of power cables on an AXIS shelf. The first are the power cables that power the shelf, either directly from a 48 VDC source or from a StrataCom power supply module. The second are those power cables that power the cooling module and booster module.
At the AXIS shelf end the cables should be routed through the power cable support so that they can be routed down the side of the rack as shown in Figure 6-18.
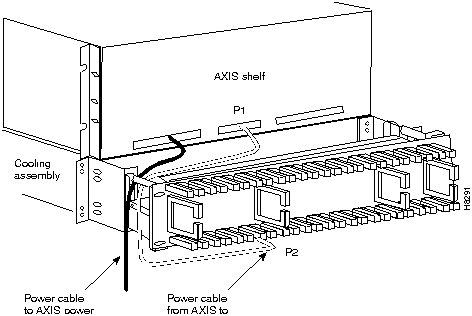
Figure 6-18 : Routing Power Cables at the shelf At the cooling assembly, the cable should be routed through the cable management kit as shown in Figure 6-19
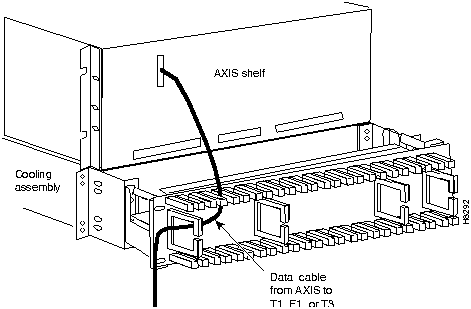
Figure 6-19 : Routing power cables at the cooling assembly Data Cables connected to the AXIS shelf back cards are routed up or down to cable management panel where is fed through the fingers and then routed left or right to the side of the rack. The cables can then be routed to their appropriate equipment (router, for example).
Figure 6-20 : Routing Data Cables at the cooling assembly Systems may be shipped with empty slots with filler cards or with plug-in cards installed. If filler cards are installed in any of the slots, they may need to be replaced with functional cards. Remove, replace and install front and back cards as necessary to obtain the correct configuration.
Removing and Installing the Front Cards
When seated, AXIS front cards are retained by a mechanical latch attached to the card.
Figure 6-21 : Front Card Insertion/Extractor Lever To remove a front card:
To install a front card:
Removing and Installing the Back Cards
Back cards are retained through two screws: one at the top of the faceplate and one at the bottom of the faceplate.
To remove a back card:
To install a back card:
Making the BNM Trunk Connection
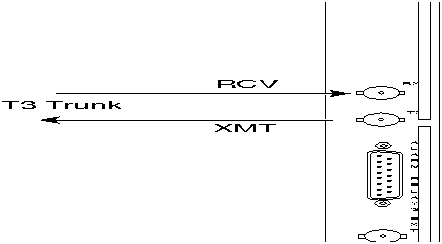
Connect two T3 coaxial cables between the T3 BNC connectors on the AXIS BNM line module card and the T3 BNC connectors on the BPX's BNI Line Module. The Transmit port on the BPX line module must connect to the Receive port on the AXIS BNM line module and vice versa, see Figure 6-22.
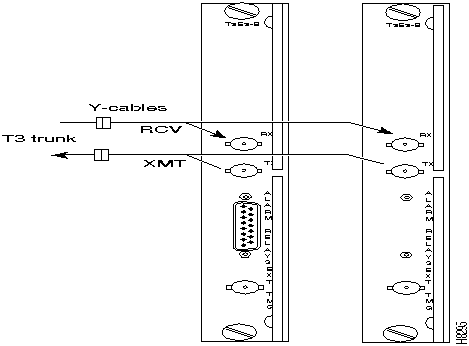
Figure 6-22 : Connecting T3 Cables If redundant BNM cards are being used, use Y-cable adapters as shown in Figure 6-23. It is recommended that specially designed short T3 or E3 Y-cables be purchased from StrataCom.
Figure 6-23 : Cabling for Redundant BNM Cards Making the Service Interface Connections
The customer's frame relay is connected to the AXIS shelf through T1 or E1 lines. T1 lines use cables terminated with DB15 connectors, E1 lines use cables terminated with either DB15 or BNC connectors (depending upon the line module configuration).
Service lines using DB 15 connectors need only one cable per port. Service lines using BNC connectors require two cables (one transmit and one receive) from the E1 port of the customer's equipment to a E1 port on an AXIS line module.
Dry contact relay closures are available for forwarding AXIS alarms to a user office alarm system. Separate visual and audible alarm outputs are available for both major and minor alarm outputs. The AXIS alarm outputs are available from a DB15 connector on the BNM line module faceplate. Refer to Appendix B for the pinouts on this connector. Use switchboard cable for running these connections.
Making External Clock Connections
If the AXIS node is to be synchronized to some other external equipment or a local digital central office, a connector on the back card can be used to provide a clock input.
For a T1 clock input, the DB15 connector, marked EXT TMG, on the T3E3-D line module is used.
For a E1 clock input, the BNC connector, marked EXT TMG, on the T3E3-B line module is used.
Dumb Terminal onto the Maintenance Port
When using an alpha-numeric (dumb) terminal to input Command Line Interface commands, the terminal must be connected directly (no modem) to the Maintenance Port DB25 connector on the ASC line module faceplate. Use a conventional RS-232 cable with a DB25 connector at each end. A so-called "Null Modem" cable is NOT required. This port should never be Y-cabled.
Workstation onto the Control Port
When using a workstation to issue commands or transfer files to and from the shelf, the workstation can be attached through the RS-232 Control Port on the ASC line module faceplate. Using this connection requires the workstation to communicate using TCP/IP and SLIP communication protocols.
The workstation can be attached either directly with no modems or remotely through modems. In either case, a conventional RS-232 modem cable should be used.
If the shelf has dual redundant ASC modules, use a Y-cable to connect the workstation or modem to the Control Port of both the ASC modules. If a modem is used, a null-modem cable is required.
Before applying power to the AXIS shelf, check the following items:
To apply power to a DC system, press the BLACK button on each of the power entry modules until they latch in the IN position.To apply power to an AC system, switch the circuit breakers on the rear of the power module to the ON position.
The LEDs on the front cards may flash for a few moments while the shelf performs a self-test and then settle down to Active or Standby.
When power is applied and the LEDs have stabilized:
Before the AXIS shelf can receive commands, SNMP requests, file downloads, etc. the shelf must be assigned IP addresses for the Control port, the LAN port and the inband channel. This procedure requires a alpha-numeric terminal to be connected to the Maintenance port of the active ASC card and addresses assigned through the command line interface. Carry out the following procedure, see the AXIS Command Supplement for details of how to login and use the specific commands.
Once the IP addresses have been assigned, the shelf can be managed from StrataView Plus.
Copyright 1988-1996 © Cisco Systems Inc.
Part No.
Description
Quantity
204532
# 10 flat washer
12
212885-06
10-32, 0.375" long screws with locking nuts
8
212897-06
10-32, 0.375" long thread forming screws
8
216303-00
Cable support
2
216749-00
Power & fan cable management assembly
2
216751-00
Short fan panel bracket
2
216164-01
Cable management panel
1
![]()
If a back card is removed and reseated or changed for another back card, the associated front card must be reset.
![]()
If you accidentally attempt to insert a service module back card into slots 1, 2, 3, or 4 and then have difficulty in operating the shelf, examine the backplane pins and the backcard connector on the wrongly inserted backcard to see if they have been bent or damaged.
![]()
![]()
![]()
![]()
![]()
![]()
![]()
![]()