|
|

This chapter describes periodic maintenance procedures, troubleshooting procedures, and the replacement of major BPX components.
Most monitoring and maintenance of the BPX is done via the BPX operating system software. Preventive maintenance of the BPX hardware is minimal and requires only the following:
This section describes basic troubleshooting steps to be taken for some of the more obvious node failures (refer to Table 4-1). This is not an exhaustive set of procedures, and does not take into account any of the diagnostic or network tools available to troubleshoot the BPX. Refer to the "Troubleshooting Commands" chapter in the Command Reference Manual for information on commands and command usage.
General Troubleshooting Procedures
The BPX runs self tests continuously to ensure proper function. When the node finds an error condition that affects its operation, it downs the card or trunk affected. It then selects a standby card or alternate trunk if one is available.
The FAIL indicators on the cards indicate that the system has found these cards defective in some mode, and now considers them as failed cards. It is at this point that you would use Table 4-1 to find the cause and obtain the information on replacing the failed component.
Figure 4-1 : Troubleshooting the BPX Node
Displaying the Status of Cards in the Node
When a card indicates a failed condition on the alarm summary screen, use the Display Cards (dspcds) command to display the status of the circuit cards on a node. The information displayed for each card type includes the card slot number, software revision level, and the status of the card. The possible status description for each card type are listed in Table 4-1. Refer to the Command Reference for more information on the Display Cards command.
Table 4-1 : Card Status for the BPX
After an alarm occurs, use the BPX software to isolate the problem. (Refer to Troubleshooting the BPX for troubleshooting information). If an BPX part has failed, then it must be replaced.
Parts should be replaced only by qualified personnel who have taken the StrataCom training courses or have been trained by a qualified system manager. For assistance in diagnosing or replacing a failed part, call the StrataCom ISC representative.
When replacing a part, save the electrostatic bag, foam, and carton that the new part comes in. These packaging materials are needed for returning the failed part to StrataCom. Refer to Appendix D, "Customer Support" for instructions on ordering and returning BPX parts.
The BPX front cards are as follows:
When a card has failed, the red FAIL indicator for that card turns on. Before replacing it, check to see if the card only needs to be reseated. After reseating the card, wait for it to run its self-tests to see if the ACTIVE light comes on. If the card is seated correctly, but the FAIL light is still on, replace the card.
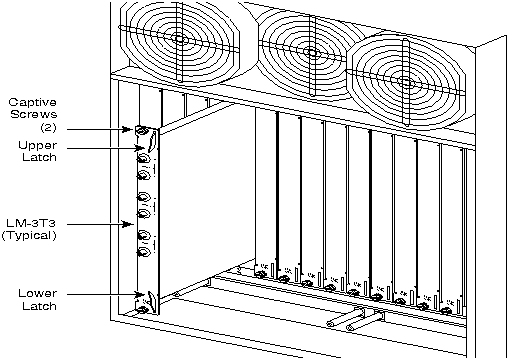
To remove a front card, perform the following steps:
To install a front card in the BPX, perform the following steps:
Figure 4-2 : Unlatching the Air Intake Grille The configuration of the back card may be slightly different depending on whether it is a single card or redundant card configuration. A standby card in a redundant card configuration may be removed without disrupting system operation even if it is a BCC. Removing a single card, however, will cause a system outage.
To remove a line module, perform the following steps:
To install a line module, perform the following steps:
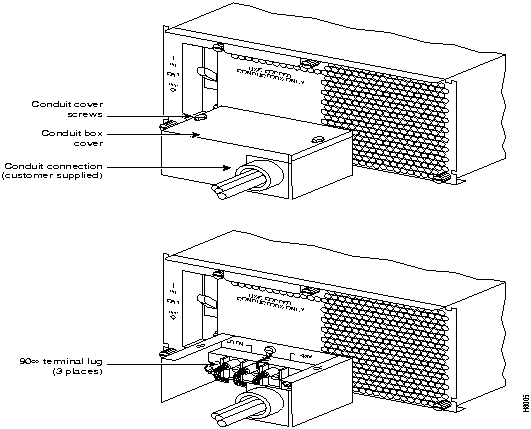
Figure 4-3 : Removing a Line Module Replacing a DC Power Entry Module
DC Power Entry Modules (PEMs) contain few active components so they should rarely need replacement. Access is from the back of the node. To remove a PEM, proceed as follows:
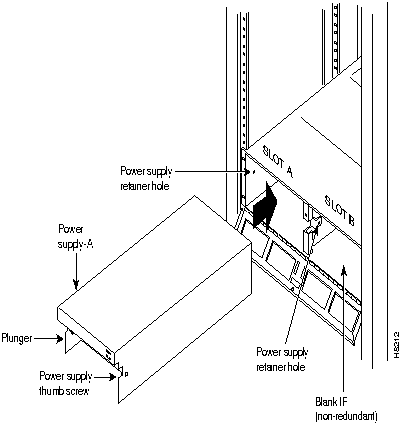
Figure 4-4 : DC Power Entry Module with Conduit Box BPX nodes are powered by redundant power supplies; either power supply can supply the current requirements of the node. The AC Power Supply is part of an assembly which is replaced as a single unit. Access to the AC Power Supply assembly is from the front, but first, the Air Intake Grille must be removed.
To remove a power supply, proceed as follows:
Figure 4-5 : AC Power Supply Assembly Field-Installing a Second AC Power Supply
To field-install a redundant power supply, perform the following steps:
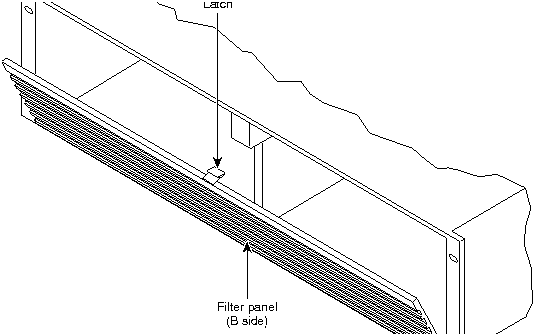
Figure 4-6 : Removing Blank Filler Panel (B side shown) The Fan Assembly provides the primary cooling for the BPX node and is located at the top, rear of the BPX cabinet. There are three fans in the Fan Assembly. The fan on the right (#1) and the one on the left (#3) can be changed out individually with very little effort or interruption in the operation of the node. The fan in the middle (#2) requires powering down the node and removing the Fan Assembly to replace.
To replace fan #1 or #3 in the Fan Assembly, perform the following steps:
To replace fan #2 requires powering down the node and replacing the whole Fan Assembly. Under normal ambient room temperatures, this can be scheduled for the next available quiet time. Perform the following steps:
Replacing the Temperature Sensing Unit
The temperature sensing unit is located on the ASM card. If the temperature indication using the dspasm command does not appear to be correct, try a replacement ASM card.
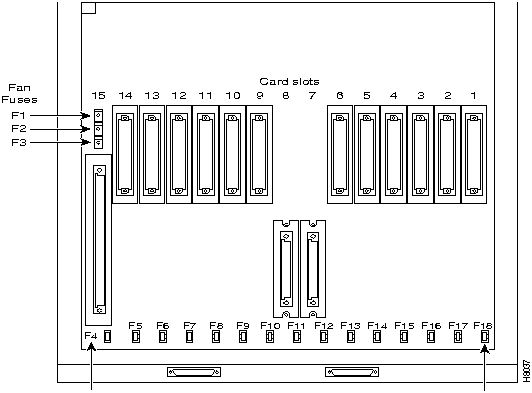
Replacing Card Slot and Fan Fuses on the System Backplane
There is a separate fuse provided on the System Backplane for each card slot. These fuses are numbered F4 through F18, corresponding to card slots F15 down through F1 respectively (Figure 4-7). There three separate fan fuses provided on the System Backplane. These fuses are numbered F1 through F3, corresponding to Fans 1 through 3 (Figure 4-7).
Backplane fuses rarely, if ever, need replacement. Backplane fuses are intended to prevent catastrophic damage to the backplane in the event of accidental shorting of -48VDC on the backplane to chassis ground. This type of event could be caused by bent backplane pins, inadvertent contact of conductive elements (EMI Cans, EMI Gaskets, etc.) to power pins, or (in the case of a fan fuse) a pinched wire harness.
These fuses are located in sockets on the backplane and are therefore not readily accessible. A special tool (StrataCom P/N 218090-00) and a special set of instructions are required for fuse replacement. It is recommended that only factory-trained personnel perform the procedure. Contact StrataCom ISC for further information.
Figure 4-7 : Card Slot and Fan Fuse Locations on System Backplane
Copyright 1988-1996 © Cisco Systems Inc.
![]()
![]()
![]()
![]()
![]()
![]()
Symptom
Probable Cause
Remedy
Front panel LED on individual card not lighted
Card Fuse
Check card fuse. Replace if defecive.
Try another card of the same type. If still no LED lighted, backplane card slot fuse may be defective. Refer to Replacing Card Slot and Fan Fuses on the System Backplane.
No front panel LEDs are lighted.
AC Systems:
DC Systems
Switch on circuit breakers. If problem persists, pull all cards and power supplies out to see if a shorted card or supply exists.
BPX power cord plug dislodged from AC receptacle.
Check that no one is working on system, shut off source breaker, then reconnect power cord.
Power supply ac LED lit but dc LED not lit.
Power supply defective.
Check DC ok LEDs on ASM. If out, remove and replace power supply. If on, PS LED probably defective.
Card front panel fail LED lit
Card failed self-test.
Check status of card at NMS terminal using dspcds screen. If alarm confirmed, try card reset (resetcd command). Finally, remove and replace the card.
Card stby LED on.
Card is off-line.
Not a problem as long as primary card is active.
ASM major or minor LED on.
Service-affecting (major) or non-service affecting (minor) system fault.
Check NMS event log to identify problem reported.
Failed card in local node.
See remedy for card fail LED indication.
Network trunk failed.
Observe Port LEDs on each BNI.
Use NMS dsptrk to locate failure.
Failure in remote node. May be another BPX or an IPX.
Use NMS dspnw screen to locate node in alarm. Refer to Troubleshooting Commands in the Command Reference for additional information.
Internal temperature is higher than normal resulting from blocked air flow or defective fan.
Check front and back of node cabinet for freedom of air flow. Replace any fan that may have failed or slowed. Use NMS dsppwr screen to check node temperature.
ASM hist LED lit.
If no other alarm indications, a fault occurred in the past but has been cleared.
Press ASM history clear button. Check NMS event log to determine cause.
BNI Port LED is red or orange.
Trunk is in local or remote alarm.
Use NMS dsptrk screen to confirm trouble. Use short BNC loopback cable at LM-BNI connectors for local test of trunk. Loop trunk at DSX-3 crossconnect to check cable.
No BNI card or port LED on.
No trunks on card are upped. Card not necessarily failed.
Up at least one of the three trunks associated with the card.
ASI Port LED is red or orange.
Line is in local or remote alarm.
Use NMS dsplns screen to confirm trouble.
No ASI card or port LED on.
No lines on card are upped. Card not necessarily failed.
Up at least one of the two lines associated with the card.
BCC fail LED flashing
Downloading system software or configuration data.
Wait for download to complete.
BCC LAN LED flashing
Normal for node connected to NMS terminal over Ethernet. If it does not flash, there may be problems with node to NMS data path.
Check that the cabling to the NMS is firmly connected to the LAN port on the LM-BCC back card. An alternate connection is to the control port.
No BCC card LED on.
Preparing to download new software (momentary condition).
Wait for download to begin.
Command issued to run a software rev. that was not available in the network.
Check that proper s/w rev. is available on another node or on NMS.
Card Type
Status1
Description
All card types
Active
Active card
Active - F
Active card with no terminal failure.
Standby
Standby card
Standby - F
Standby card with no terminal failure.
Standby - T
Standby card performing diagnostics.
Standby - F -T
Standby card with no terminal failure performing diagnostics.
Failed
Card with terminal failure.
Unavailable
Card is present but it may be in one of the following states:
a. The node does not recognize the card.
b. The card is running diagnostics.
Down
Downed card.
Empty
No card in that slot.
BCC
Same status as for all card types, plus:
Updating
Standby BCC downloading the network configuration from an active PCC.
Note: Red FAIL LED flashes during updating.
Cleared
BCC is preparing to become active.
Downloading Software
There are downloader commands that appear when the system is down- loading software to the BCC.
Minor
BCC Redundancy alarm indicates node is configured for redundancy but no standby BCC is equipped.
1 Cards with an F status (no terminal failure) are activated only when necessary. Cards with a failed status are never activated.
![]()
![]()
![]()
(Figure 4-2). The top of the grille should pop out.
![]()
Figure 4-3.
![]()
![]()
![]()
![]()
![]()
![]()
![]()
![]()
![]()
![]()
![]()