|
|

This chapter describes how to connect an ISDN or analog telephone to a Cisco 700 series router and how to configure the router to support that telephone. An ISDN telephone can be connected to the ISDN S/T port of any Cisco 700 series router. An analog telephone can be connected to a Cisco 765, Cisco 766, Cisco 775, or Cisco 776 router plain old telephone service (POTS) port.
This chapter contains the following sections:
You can connect an ISDN telephone to any Cisco 700 series router with an S/T port. The ISDN telephone communicates over the same ISDN line the router uses to send and receive data. ISDN telephones are available in two basic models, self-powered (described in this chapter in the section "Connecting a Self-Powered ISDN Telephone") and with an independent power supply (described in this chapter in the section "Connecting an ISDN Telephone with an External Power Supply").
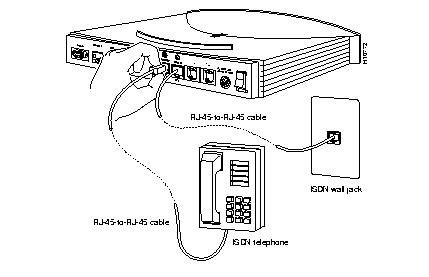
You can connect an ISDN telephone to the Cisco 761, Cisco 765, Cisco 771, or Cisco 775 only through an external NT1 connector. If you are connecting an ISDN telephone directly to the Cisco 762, Cisco 766, Cisco 772, or Cisco 776, connect the ISDN telephone cable (provided with the ISDN telephone) to the RJ-45 port labeled ISDN S/T, on the rear panel of the router. Cable the ISDN wall jack to the port labeled ISDN U. (See Figure 4-1.)
Refer to the instructions provided by the manufacturer of the telephone,
This section describes how to connect an ISDN telephone that requires an external power supply to the router. Depending upon the ISDN telephone model and power supply model you use, the procedure to connect the ISDN telephone and power supply may differ slightly. This example procedure describes how to connect an AT&T ISDN telephone (model ISDN 8510T) and an AT&T external power supply (model MSP-1). Also refer to the instructions provided by the manufacturer of the telephone.
For information on ISDN U port pinouts, refer to the appendix "Cabling Specifications and Common Port Assignments."
Take the following steps to connect the ISDN telephone and external power supply. This procedure assumes you have connected your router's ISDN U port to the ISDN wall jack (see Figure 4-1).
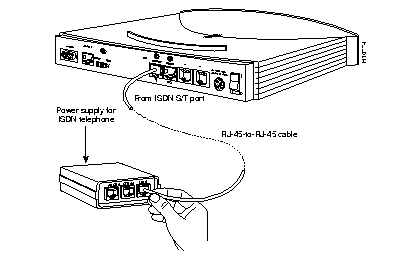
Step 1 Connect an RJ-45-to-RJ-45 cable (included) from the ISDN S/T port (on the rear panel of the router) to the port labeled LINE on the ISDN telephone power supply. (See Figure 4-2.)
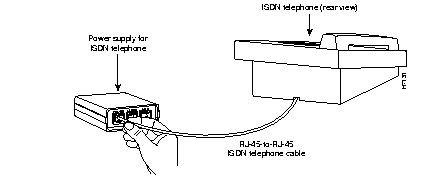
Step 2 Connect the ISDN telephone's RJ-45 cable to the port labeled PHONE on the ISDN telephone power supply. (See Figure 4-3.)
Step 3 Connect the telephone power supply to the power outlet. (See Figure 4-4.)
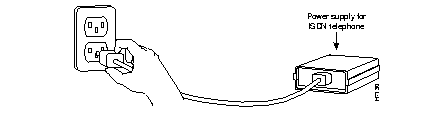
You can now use the ISDN telephone on the same ISDN line as the router.
If you are using a Cisco 765, Cisco 766, Cisco 775, or Cisco 776, you can connect one or two analog devices, such as a telephone, fax machine, or modem, directly to the router. The analog device is connected to basic telephone services through the same ISDN line the router uses.
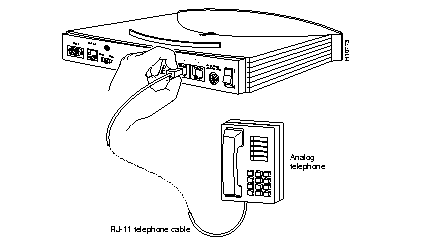
To connect the analog device to the router, connect the telephone cable (provided with the analog device) to the RJ-11 port (labeled with a telephone icon) on the rear panel of the router, as shown in Figure 4-5.
This section describes the association between the ISDN directory numbers, the service profile identification numbers (SPIDs) and the analog telephone port(s) of the router.
SPIDS are in common use only in North America. If you are using ISDN Basic Rate Interface (BRI) service in North America, your telephone service provider may assign zero, one, or two SPIDs to your BRI line, depending on what kind of switch the service provider uses. For 5ESS Custom switches, no SPID is assigned if the service provider is using a Point-to-Point switch, and one SPID is usually assigned for the Multipoint switch. For DMS-100, NI-1 and NI-1-compliant switches, two SPIDs are usually assigned. All other switch types usually do not use SPIDs.
If your BRI line is assigned two SPIDs, it is suggested that you use the first SPID directory number for data calls and the second SPID directory number for the incoming voice calls to reduce the chances a data call will be disconnected when the router receives incoming voice calls.
SPIDs define the services available to the router. SPID numbers are determined by your service provider. For example, a directory number is considered a service and is associated with a SPID. A SPID can have more than one directory number associated with it. Cisco 700 series routers support up to three directory numbers for each SPID and up to two SPIDs, for a total of six directory numbers.
The analog telephone ports are plain old telephone service (POTS) ports, as opposed to an ISDN telephone port, such as the S/T port. The POTS ports are mapped to the directory numbers.
If no directory numbers are associated (mapped) to the POTS ports, the default function of analog telephones is dependent on the number of SPIDs assigned to the BRI line. Table 4-1 describes the default behavior of the POTS ports if your SPIDs and directory numbers are defined and you do not use the set phone command to configure the POTS ports.
| Analog Telephone Port Operation | No SPIDs or One SPID | Two SPIDs | Non-U.S.1 |
|---|---|---|---|
| All incoming calls ring Phone 1. | X2 | X | X |
| Phone 1 can call Phone 2. |
| X | X |
| Two data calls are connected and voice priority is configured to always. If calls on the Phone 1 and Phone 2 ports are at the same time, only one data call is disconnected. |
| X | X |
The set directory number command in the following example (shown in abbreviated form) associates directory number 5551234 with the first SPID and directory number 5551235 with the second SPID.
766>set 1di5551234 766>set 2 di5551235
If your BRI line is assigned zero SPIDs, use the set directory number command without the spid_id argument to configure the router with the directory numbers, for example:
766> set di 5551234
The following example of the set phone command shows the directory numbers being assigned to the analog telephone ports. The directory number 5551234 is associated with phone1 and the directory number 5551235 is associated with phone2:
766>set phone15551234 766>set phone25551235
Cisco 765, Cisco 766, Cisco 775, and Cisco 776 routers have two analog telephone ports; however, if your BRI line is assigned zero or one SPID, only one analog telephone port can be used at one time. If your BRI line is assigned two SPIDs, both analog telephone ports can be used simultaneously.
You can display the configuration for each analog telephone port, including data over voice (DOV), call waiting, voice priority mode, and directory number association. The show voicerouting command confirms the directory numbers are correctly associated with the analog telephone ports. The following example shows the output from the show voicerouting command.
Interface     VoicePriority  VoicePriority   Call    Directory    Ring
                   In             Out       Waiting  Number      Cadence
 PHONE1        ALWAYS         ALWAYS        ON       5551234
 PHONE2        ALWAYS         ALWAYS        ON       5551235
 DOV           N/A            N/A           N/A
 UNSPECIFIED   N/A            N/A           N/A
This section applies only to U.S. analog telephone services.
The router recognizes the difference between a data call and a voice call. In some tariff areas, voice calls are less expensive than data calls. Cisco 700 series routers support incoming and outgoing DOV calls. DOV calls are data calls made over the BRI (voice) line using Voice Bearer Capability (VBC).
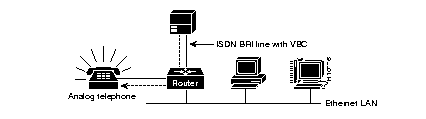
If a directory number has been configured for DOV, incoming data calls with VBC are routed to the LAN through the Ethernet port, as shown in Figure 4-6. Incoming voice calls are forwarded to the analog (voice) device over the analog telephone port, as shown in Figure 4-7.

Before using the set phone command to configure DOV, you must set the directory number with the correct SPID, as described in the section "Configuring Directory Numbers," in this chapter. The set dov command instructs the router to treat incoming calls to a specified directory number as data calls.
Following is an example of the set dov command:
766> set dov 5551234
Any call received on the port that has been associated with this directory number is treated as DOV and is forwarded to the LAN. One or two directory numbers can be configured for DOV with the set phone command.
The set speed command, with the voice keyword, sets VBC on for outgoing DOV calls, enabling the features of VBC and DOV.
Following is an example of the set speed command, configuring outgoing calls:
766> set speed voice
You can automatically disconnect a data call when a voice call is made or received and two data calls are in progress. The set voicepriority command determines if a data call will be disconnected when the router makes or receives a voice call.
If the priority is set to always, data calls are always bumped in favor of voice calls.
If the priority is set to conditional, the data call is disconnected from one channel if the data call can continue over another channel.
If the priority is set to never, data calls are never bumped in favor of voice calls.
If the priority is set to disable, data calls are handled as indicated by the set phone DOV command.
Following is an example of the set voicepriority mode command that sets the option to conditional:
766> set voicepriority conditional
The voice priority mode is dependent on several factors, including the following:
For a complete description of how these factors affect the voice priority mode, refer to the set voicepriority command in the Cisco 700 Series Command Reference publication.
During a voice call, if the remote party hangs up the receiver and your receiver remains off-hook, you will hear a fast busy tone after 30 seconds.
This section describes how to configure the Cisco 765, Cisco 766, Cisco 775, and Cisco 776 routers for supported supplementary services. These are the only models that support the following supplementary services:
Cisco 700 series routers do not support Open Service Intervals or Battery Reversal.
Call waiting sounds a tone if you are already on a call and there is a second incoming call. Your BRI line must be provisioned for the additional call offerings (ACOs) call hold and call retrieve to use call waiting. (For more information on ACOs, refer to the appendix "Provisioning the ISDN BRI Line for Cisco 700 Series Routers.") One analog telephone interface can support two calls; therefore, only one call at a time can be waiting.
To retrieve the new call, perform a flash or short on-hook (quickly press the telephone receiver button once) to place the call in progress on hold and answer the new call. If your analog telephone offers the option, you can press the Flash key instead of the telephone receiver button to put the call on hold and answer the new call.
You can toggle between calls on the same analog telephone interface by performing the short on-hook or by using the Flash key.
If you terminate one call and return the receiver to the hook, the waiting call remains active. The telephone rings, and when you pick up the receiver, you are connected to the waiting call.
The set callwaiting command enables call waiting for the analog port specified. Following is an example of the set callwaiting command that turns on the call waiting feature on the phone1 port:
766> set callwaiting interface phone1 on
Depending upon the devices connected to the analog telephone ports, it might be necessary to disable call waiting, for example, if the tone generated by the call waiting service interrupts data transfer when using an analog fax machine connected to the router. (Consult the instructions provided by the manufacturer of the device to determine if this is necessary.)
The set callwaiting command disables call waiting for the analog port specified. Following is an example of the set callwaiting command that turns off the call waiting feature on the phone1 port:
766> set callwaiting interface phone1 off
When making an outgoing voice call over one of the analog telephone ports, you might want to disable the call waiting feature on a per-call basis. To disable call waiting, use the dual tone multifrequency (DTMF) command, dialed on the keypad of the telephone, as shown in the following example:
**99#
When the voice call is completed, call waiting is restored.
Call hold and retrieve is the ability to place a caller on hold, make a second call, and return to the first call. (Some countries that use the NET3 switch do not support ISDN provisioning for call hold and call retrieve.)
To place a call on hold:
Step 1 Perform a short on-hook (quickly press the telephone receiver button once) to get a dial tone.
If your analog telephone device offers the option, you can press the Flash key instead of the short on-hook to put the call on hold.
Step 2 Dial the hold access number, **95#.
Step 3 Dial the second call.
To retrieve the call placed on hold, perform the short on-hook or press the Flash key again.
If you have a call on hold and you hang up, the telephone rings, indicating a call is on hold. Picking up the telephone receiver connects you to the caller on hold.
Call transfer is the ability to transfer an active call to another number. (Some countries that use the NET3 switch do not support ISDN provisioning for call transfer.)
Take the following steps to transfer an active incoming call to another telephone number:
Step 1 Perform a short on-hook (quickly press the telephone receiver button once) to get a dial tone.
If your analog telephone device offers the option, you can press the Flash key instead of the short on-hook to put the call on hold.
You can also return to the original call by performing another short on-hook.
Step 2 Dial the number to which the call is to be transferred.
Step 3 Hang up the receiver. The call is transferred.
If the transfer fails, the caller remains on hold and the telephone rings to alert you to the call on hold.
Three-way call conferencing adds another party to an active call. (Some countries that use the NET3 switch do not support ISDN provisioning for three-way call conferencing.) Up to three people can be connected using three-way conferencing. (It is a known limitation that only up to two Cisco 700 series routers can be connected.)
Take the following steps to add a third party to an active call:
Step 1 Perform a short on-hook (quickly press the telephone receiver button once) to get a dial tone.
If your analog telephone device offers the option, you can press the Flash key instead of the short on-hook to put the call on hold.
Step 2 Dial the second call.
Step 3 When the second call is answered, perform a short on-hook to connect the original caller.
Cisco 700 series routers with a Distinctive Ring Manager (DRM) can support the following distinctive ringing cadences for up to six external devices. These external devices can be a telephone or fax machine. Each POT interface can support up to three devices.
Ring Type 1--2 seconds on, 4 seconds off
Ring Type 2--0.8 seconds on, 0.4 seconds off, 0.8 seconds on, 4 seconds off
Ring Type 3--0.4 seconds on, 0.2 seconds off, 0.4 seconds on, 0.2 seconds off, 0.8 seconds on, 4 seconds off
The following is an example of a set phone command:
766> set phone15551234ring1
Integrated Network Service (INS) ISDN lines are used in Japan. NET3 lines are used throughout Europe and parts of Asia. 1TR6 ISDN lines are used throughout Europe. This section describes analog telephone dialing instructions specific to these countries.
To make an analog telephone call over INS ISDN lines in Japan from a telephone connected to Cisco 700 series routers, take the following steps:
Step 1 Enter each individual number (called a dialing digit) of the telephone number on the telephone keypad.
You must enter each successive dialing digit within 6 seconds of entering the previous digit. If you wait longer than 6 seconds, an incomplete set of dialing digits is sent to the switch.
Step 2 Send the entire set of dialing digits to the switch in one of the following ways:
If the pound (#) key is one of the dialing digits in a telephone number, you can disable the end-of-call function on a per-call basis. This command applies only to INS router software.
To disable the end-of-call function, use the following DTMF command:
**98#
After entering the **98# command, wait for the dial tone and enter the desired dialing digits, including the pound (#) key. The call is sent 6 seconds after the last dialing digit is entered. When the call is terminated, the end-of-call function is restored for the next call.
Depending on the ISDN service provider, certain internal tones, such as dial, ring back, and busy tones, might not be provided by the telephone switch (the device on the other end of the ISDN line). If this is the case with the ISDN line you are using, you can configure Cisco 700 series routers to provide just the dial tone or all tones. This command applies only to NET3 router software and to 1TR6 router software.
The set internaltones command provides just the dial tone or all internal tones. By default, the router provides all internal tones.
The following is an example of a set internaltones command that enables the dial tone only:
766> set internaltones dialtone
Call Forwarding supplementary service has been added to software Release 4.0(2) and higher for Sweden and Finland (NET3).
The Call Forwarding types supported are as follows:
Call Forwarding Unconditional (CFU)--Enables the network to redirect all incoming calls to another party, regardless of the status of the user.
Call Forwarding No Reply (CFNR)--Enables the network to redirect calls to another party when the call is not established within a predefined period of time.
Call Forwarding Busy (CFB)--Enables the network to redirect to another party calls that meet a busy condition.
In all types of Call Forwarding, the user's ability to originate calls is unaffected by the Call Forwarding supplementary service.
The feature numbers for Call Forwarding are provided here for convenience, but they could be different in your area, depending upon the local telephone service provider.
To activate Call Forwarding:
Step 1 Take the phone off hook.
Step 2 Dial *feature number* phone number to be forwarded to #.
Step 3 Hang up. You may hear a confirmation signal from the network before you hang up.
To deactivate Call Forwarding:
Step 1 Take the phone off hook.
Step 2 Dial #feature number#.
If the wrong feature number is entered, you may hear a signal indicating the wrong feature number was entered or the activation or deactivation failed.
Activation: *21*forwarded-to number#
Deactivation: #21#
Activation: *61*forwarded-to number#
Deactivation: #61#
Activation: *67*forwarded-to number#
Deactivation: #67#
The switch type NET3 supports these features where the country group must be set for Sweden and Finland.
There is no equivalent command-line command to activate or deactivate Call Forwarding. The phone number to which calls are redirected is not displayed.
All types of Call Forwarding supplementary services must be provisioned on the ISDN line for the service to be available.
|
|