|
|
This chapter describes basic maintenance procedures for the Cisco uBR7246. The procedures are presented in the following sections:
For procedures that explain how to replace the main, Flash, and ROM monitor memory, refer to the configuration note Memory Replacement Instructions for the Network Processing Engine and the Input/Output Controller (Document Number 78-3226-xx). The Cisco 7206 router and the Cisco uBR7246 universal broadband router share the same memory component and replacement instructions.
Detailed instructions for configuring the Cisco cable modem cards are contained in the configuration note Cisco uBR7246 Universal Broadband Router Cable Modem Card Installation and Configuration (Document Number 78-4978-xx). This configuration note will accompany every cable line card that is shipped from the factory as an installed item in a Cisco uBR7246 or as a FRU. The configuration note is also available on the Documentation CD-ROM and on Cisco Connection Online (CCO).
You can use a variety of show commands to view information specific to the hardware and cable interface configuration on your Cisco uBR7246 universal broadband router. The following sections describe the available show commands for your Cisco uBR7246.
Use the show c7200 command to display information about the CPU and midplane installed in a Cisco uBR7246. You can you abbreviate the command to sh c7200.
Following is an example of how the show c7200 command displays status information on the Cisco uBR7246.
Router# sh c7200
Network IO Interrupt Throttling:
 throttle count=0, timer count=0
 active=0, configured=0
 netint usec=3999, netint mask usec=200
C7200 Midplane EEPROM:
        Hardware revision 255.255       Board revision UNKNOWN
        Serial number     000000000     Part number    255-65535-255
        Test history      0xFF          RMA number     255-255-255
        MAC=00e0.1e5f.7a00, MAC Size=128
        EEPROM format version 1, Model=0x6
        EEPROM contents (hex):
          0x20: 01 06 FF FF FF FF FF FF FF FF FF FF 00 E0 1E 5F
          0x30: 7A 00 00 80 FF FF FF FF FF FF FF FF FF FF FF FF
C7200 CPU EEPROM:
        Hardware revision 2.1           Board revision A0
        Serial number     0000000       Part number    73-1536-03
        Test history      0x0           RMA number     00-00-00
        EEPROM format version 1
        EEPROM contents (hex):
          0x20: 01 15 02 01 00 38 81 E3 49 06 00 03 00 00 00 00
          0x30: 50 00 00 00 FF FF FF FF FF FF FF FF FF FF FF FF
Use the show cable burst-profile command to display upstream burst profiles. These parameters are used to configure the upstream phy layer.
Following is an example of how the show cable burst-profile command displays status information on the Cisco uBR7246.
Router# sh cable burst-profile
	Burst Type Preamb Diff FEC err FEC   Scr      Max  Guard Last   Scramble
profile    length encode     correct codeword seed burst time   codeword
umber                                length  size size        shortened
1      1    48     2      0     6     152     1     16    1         2
2      1    48     2      0     6     152     1     12    1         2
3      1    48     2      0     2C    152     0     48    1         2
4      1    48     2      0     2C    152     0     48    1         2
5      1    48     2      0     32    152     0     20    1         2
6      1    48     2      0     32    152     0     20    1         2
Use the show cable modem command to display information about all cable modems that can connect to a Cisco uBR7246 universal broadband router via the HFC network. To display information about a single cable modem, use the show cable modem command with the cable modem card mac address or IP address in the format show cable modem [mac-address |ip-address]. If you abbreviate the command (sh cable modem) and do not specify a mac-address or ip-address (or arguments), the system interprets the command as show cable modem and displays information about all cable modems that can connect to the Cisco uBR7246.
Router# sh cable modem
Cable4/0
MAC Address IP Address Port Frequency Tx Power Status
xxxx.yyyy.zzzz 0.0.0.0 U0 12000 KHz +10 dBmV Ranging
xxxx.yyyy.zzzz 10.23.45.23 U0 12000 KHz -1 dBmV Active
xxxx.yyyy.zzzz 10.23.45.26 U0 12000 KHz -1 dBmV Active
xxxx.yyyy.zzzz 0.0.0.0 U0 12000 KHz -1 dBmV Registration
You can also use the mac address or IP address arguments to display information about a specific cable modem only.
The following example shows the display for the cable modem with a specific IP address:
Router# sh cable modem 1.1.1.1
Cable4/0
MAC Address IP Address Port Frequency Tx Power Status
xxxx.yyyy.zzzz 1.1.1.1 U0 12000 KHz +10 dBmV Ranging
To display information about cable modulation profiles on a Cisco uBR7246, use the show cable modulation-profile command.
A cable modulation profile is a collection of six burst profiles which are sent out in a UCD message to configure cable modem transmit parameters for upstream messages. The types of upstream messages displayed are request, request/data, initial maintenance, station maintenance, short grant, and long grant.
Following is an example of how the show cable modulation-profile command displays status information on cable-modulation. In the following example, most of the status information for each interface is omitted.
Router# sh cable modulation-profile
	Modulation profile group   Interval usage code   Burst profile number
	1                          1                     1
	1                          3                     3
	1                          4                     4
	1                          5                     5
	1                          6                     6
	2                          1                     1
	2                          2                     3
	2                          3                     2
	2                          4                     2
	2                          5                     5
	2                          6                     4
To display information about all interface controllers on a Cisco uBR7246, use the show controllers command. You can abbreviate the command to sh cont
Following is an example of how the show controllers command displays status information on all interface controllers on a Cisco uBR7246.
Router# sh controllers
Interface FastEthernet0/0
Hardware is DEC21140
 dec21140_ds=0x608E50AC, registers=0x3C018000, ib=0x4B01D100
 rx ring entries=128, tx ring entries=256
 rxring=0x4B01D200, rxr shadow=0x608E51A8, rx_head=0, rx_tail=0
 txring=0x4B01DA40, txr shadow=0x608E53D0, tx_head=4, tx_tail=4,
(display text omitted)
Interface Ethernet1/0
Hardware is AMD Presidio2
ADDR: 608EA490, FASTSEND: 6007C538, MCI_INDEX: 0
DIST ROUTE ENABLED: 0
Route Cache Flag: 0
HW filtering information:
(display text omitted)
Interface Ethernet1/1
Hardware is AMD Presidio2
ADDR: 608EE0A0, FASTSEND: 6007C538, MCI_INDEX: 0
DIST ROUTE ENABLED: 0
Route Cache Flag: 0
HW filtering information:
(display text omitted)
Interface Ethernet1/2
Hardware is AMD Presidio2
ADDR: 608F16F0, FASTSEND: 6007C538, MCI_INDEX: 0
DIST ROUTE ENABLED: 0
Route Cache Flag: 0
HW filtering information:
(display text omitted)
Interface Ethernet1/3
Hardware is AMD Presidio2
ADDR: 608F4D30, FASTSEND: 6007C538, MCI_INDEX: 0
DIST ROUTE ENABLED: 0
Route Cache Flag: 0
HW filtering information:
(display text omitted)
Interface Ethernet1/4
Hardware is AMD Presidio2
ADDR: 608F8940, FASTSEND: 6007C538, MCI_INDEX: 0
DIST ROUTE ENABLED: 0
Route Cache Flag: 0
HW filtering information:
(display text omitted)
Interface Ethernet1/5
Hardware is AMD Presidio2
ADDR: 608FBF90, FASTSEND: 6007C538, MCI_INDEX: 0
DIST ROUTE ENABLED: 0
Route Cache Flag: 0
HW filtering information:
(display text omitted)
Interface Ethernet1/6
Hardware is AMD Presidio2
ADDR: 608FF5D0, FASTSEND: 6007C538, MCI_INDEX: 0
DIST ROUTE ENABLED: 0
Route Cache Flag: 0
HW filtering information:
(display text omitted)
Interface Ethernet1/7
Hardware is AMD Presidio2
ADDR: 60903CC8, FASTSEND: 6007C538, MCI_INDEX: 0
DIST ROUTE ENABLED: 0
Route Cache Flag: 0
HW filtering information:
Interface Cable6/0
Hardware is CMTS Line Card
 idb 0x60908988 MAC regs 0x3CC80000 PLX regs 0x3CC00000
 rx ring entries 64 tx ring entries 128 MAP tx ring entries 128
 Rx ring 0x4B0607C0 shadow 0x609AEDD8 head 38
 Tx ring 0x4B060A00 shadow 0x609AEF00 head 27 tail 27 count 0
 MAP Tx ring 0x4B060E40 shadow 0x609AF728 head 3 tail 3 count 0
 MAP timer sourced from slot 6
(display text omitted)
To display information about a specific cable modem card slot's interface controllers, use the show controllers cable command with the cable modem card slot number and downstream port number in the format show controllers cable slot/downstream-port downstream. You can you abbreviate the command to sh cont c.
You must use the slot number and downstream port number to display information about a the interface controllers.
The following example shows the display for downstream channel port 0 in cable modem slot 3,:
Router# sh cont c 3/0
Cable6/0: Downstream is up
2422977 packets output, 126650143 bytes, 0 discarded
0 output errors
Hardware is CMTS Line Card
idb 0x6099DFD8 MAC regs 0x3CC80000 PLX regs 0x3CC00000
rx ring entries 64 tx ring entries 128 MAP tx ring entries 128
Rx ring 0x4B0607C0 shadow 0x60A64BF8 head 5
Tx ring 0x4B060A00 shadow 0x60A64D68 head 47 tail 47 count 0
MAP Tx ring 0x4B060E40 shadow 0x60A655D8 head 80 tail 80 count 0
MAP timer sourced from slot 6
throttled 0 enabled 0 disabled 0
Rx: spurious 0 framing_err 0 hcs_err 0 no_buffer 0
no_enqueue 0 no_enp 0 miss_count 2 latency 2
Tx: full 0 drop 0 stuck 0 latency 0
MTx: full 0 drop 0 stuck 0 latency 0
Slots 2134 NoUW 1 Uncorr 0 Corr 0
Req 96524429 ReqColl 0 ReqNoise 0
Rng 494 RngColl 0 RngNoise 1
MAP FIFO overflow 0, Rx FIFO overflow 0
Bandwidth Requests= 0x47B
Piggyback Requests= 0x2
Ranging Requests= 0x1EC
Timing Offset = 0x1
To display information about a specific cable modem card slot's downstream channel only, use the show controllers cable command with the cable modem card slot number and downstream port number in the format show controllers cable slot/downstream-port downstream.
You must use the slot number and downstream port number to display information about a downstream interface.
Router# sh cont c 3/0 downstream
Cable 3/0 Downstream is up
Frequency not set, Channel Width 6 MHz, 64-QAM,
Symbol Rate 5.056941 Msps
FEC ITU-T J.83 Annex A, R/S Interleave I=12, J=17
To display information about a specific cable modem card slot's upstream channel only, use the show controllers cable command with the cable modem card slot number, downstream port number, and upstream port number in the format show controllers cable slot/downstream-port [upstream] upstream-port.
You must use the slot number, downstream port number, and upstream port number to display information about a upstream interface.
The following example shows the display for upstream channel port 0 in cable modem slot 3:
Router# sh cont c 3/0 0
Cable3/0 Upstream 0 is up
Frequency 7.008 MHz, Channel Width 1.6 MHz, QPSK Symbol Rate 1.280 Msps
Nominal Input Power Level 0 dBmV, Tx Timing Offset 0
Ranging Backoff Start 0, Ranging Backoff End 3, Tx Backoff Start 2
Tx Backoff End 8, Modulation Profile Group 1
part_id=0x3136, rev_id=0x02, rev2_id=0x61
nb_agc_thr=0x0100, nb_agc_nom=0x3000
Range Load Reg Size=0x44
Request Load Reg Size=0x0C
DES Reg #580 = E204301, #584 = 3E030303, #588 = 0
#590 = C0C0C0C
Use the show diag command to determine what type of port adapters, cable modem cards, and I/O controller (with or without the Fast Ethernet port) are installed in slot 0 through slot 6 of your Cisco uBR7246. You can also use the show diag slot command to display information about a specific port adapter slot.
The following example shows the output from the show diag command. The I/O controller listed in slot 0 has a Fast Ethernet port.
router> sh diag
Slot 0:
Fast-ethernet on C7200 I/O card port adapter, 1 port
Port adapter is analyzed
Port adapter insertion time 1d18h ago
Hardware revision 2.0 Board revision A0
Serial number 3511336 Part number 73-1537-03
Test history 0x0 RMA number 00-00-00
EEPROM format version 1
EEPROM contents (hex):
0x20: 01 14 02 00 00 35 94 28 49 06 01 03 00 00 00 00
0x30: 50 00 00 00 FF FF FF FF FF FF FF FF FF FF FF FF
Slot 1:
ATM port adapter, 1 port
Port adapter is analyzed
Port adapter insertion time 1d18h ago
Hardware revision 1.1 Board revision B0
Serial number 2825629 Part number 73-1390-04
Test history 0x0 RMA number 00-00-00
EEPROM format version 1
EEPROM contents (hex):
0x20: 01 05 01 01 00 2B 1D 9D 49 05 6E 04 00 00 00 00
0x30: 58 00 00 00 FF FF FF FF FF FF FF FF FF FF FF FF
Slot 2:
Fast-ethernet (TX-ISL) port adapter, 1 port
Port adapter is analyzed
Port adapter insertion time 1d18h ago
Hardware revision 1.0 Board revision A0
Serial number 3536481 Part number 73-1688-03
Test history 0x0 RMA number 00-00-00
EEPROM format version 1
EEPROM contents (hex):
0x20: 01 11 01 00 00 35 F6 61 49 06 98 03 00 00 00 00
0x30: 50 00 00 00 FF FF FF FF FF FF FF FF FF FF FF FF
Slot 3
UNKNOWN port adapter, 1 port
Port adapter is analyzed
Port adapter insertion time 19:20:08 ago
Hardware revision 1.0 Board revision UNKNOWN
Serial number 4500252 Part number 73-2379-02
Test history 0x0 RMA number 00-00-00
EEPROM format version 1
EEPROM contents (hex):
0x20: 01 33 01 00 00 44 AB 1C 49 09 4B 02 00 00 00 00
0x30: 06 02 02 00 97 11 15 00 FF FF FF FF FF FF FF FF
For information on the show interfaces and show interfaces cable command, refer to the section "Port Adapter and Cable Modem Card Slot and Logical Interface Numbering," in the chapter "Product Overview," earlier in this document.
Use the show version command to display the system hardware (the network processing engine and number of interfaces installed), the software version, the names and sources of configuration files, and the boot images. The following example shows the output from the show version command:
router> sh version
Cisco Internetwork Operating System Software
IOS (tm) 7200 Software (C7200-I-M), Released Version 11.3(1)
[kpfrgiu 100]
Copyright (c) 1986-1998 by cisco Systems, Inc.
Compiled Sun nn-xxx-nn 04:10 by dfgaajhsg
Image text-base: 0x60010890, data-base: 0x605F0000
ROM: System Bootstrap, Version 11.3(1) RELEASED SOFTWARE
ROM: 7200 Software (C7200-I-M), Released version 11.3(1) [ajhsgfu 100]
router uptime is 999 minutes
System restarted by reload
System image file is "C7200-i-mz", booted via tftp from 1.1.10
cisco uBR7246 (NPE150) processor with 12288K/4096K bytes of memory.
R4700 processor, Implementation 33, Revision 1.0 (Level 2 Cache)
Last reset from power-on
SuperLAT software copyright 1990 by Meridian Technology Corp).
X.25 software, Version 2.0, NET2, BFE and GOSIP compliant.
TN3270 Emulation software (copyright 1994 by TGV Inc).
4 Ethernet/IEEE 802.3 interfaces.
2 FastEthernet/IEEE 802.3 interfaces.
125K bytes of non-volatile configuration memory.
1024K bytes of packet SRAM memory.
20480K bytes of Flash PCMCIA card at slot 0 (Sector size 128K).
4096K bytes of Flash internal SIMM (Sector size 256K).
Configuration register is 0x0
For specific information on other software commands, refer to the publications listed in the section "If You Need More Information" in the chapter "Performing a Basic Configuration of the Cisco uBR7246."
At some point, you might need to replace a port adapter in your Cisco uBR7246. The following procedures explain how to remove and install a port adapter.
Step 1 Attach an ESD-preventative wrist strap between you and an unfinished chassis surface.
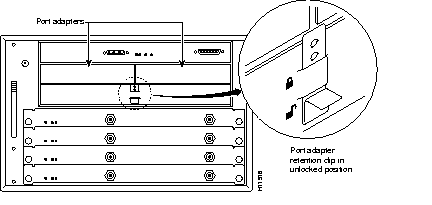
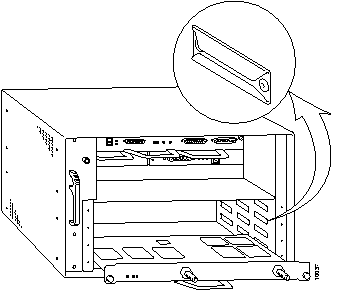
Step 2 Slide the port adapter retention clip down to the unlocked position. The retention clip remains in the unlocked position. (Refer to Figure 7-1.)
Step 3 Grasp the handle on the port adapter and carefully pull the port adapter from the midplane, about half way out of its slot. If you are removing a port adapter blank, pull the port adapter blank all the way out of the chassis slot.
Step 4 With the port adapter half way out of the slot, disconnect all cables from the port adapter.
Step 5 After disconnecting the cables, pull the port adapter from its chassis slot
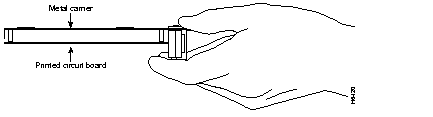
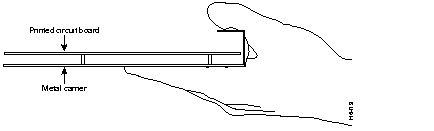
 | Caution Always handle the port adapter by the carrier edges and handle; never touch the port adapter's components or connector pins. (Refer to Figure 7-2.) |
Step 6 Place the port adapter on an antistatic surface with its components facing upward, or in a static shielding bag. If the port adapter will be returned to the factory, immediately place it in a static shielding bag.
This completes the procedure for removing a port adapter from the Cisco uBR7246 universal broadband router.
Complete the following steps to install a port adapter in the Cisco uBR7246 universal broadband router:
Step 1 Attach an ESD-preventative wrist strap between you and an unfinished chassis surface.
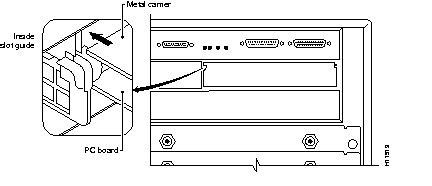
Step 2 Use both hands to grasp the port adapter by its metal carrier edges and position the port adapter so that its components are downward. (Refer to Figure 7-2.)
Step 3 Align the left and right edge of the port adapter metal carrier between the guides in the port adapter slot. (Refer to Figure 7-3.)
Step 4 With the metal carrier aligned in the slot guides, gently slide the port adapter half way into the port adapter slot.
| Caution Do not slide the port adapter all the way into the slot until you have connected all required cables. Trying to do so will disrupt normal operation of the router. |
Step 5 With the port adapter half way in the slot, connect all required cables to the port adapter.
Step 6 After connecting all required port adapter cables, carefully slide the port adapter all the way into the slot until you feel the port adapter's connectors mate with the midplane.
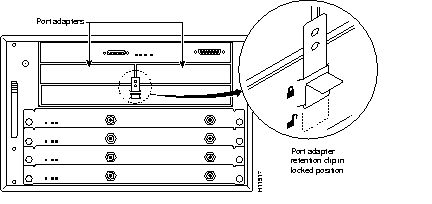
Step 7 Slide the port adapter retention clip up to the locked position. (Refer to
Figure 7-4.)
This completes the procedure for installing a port adapter in the Cisco uBR7246 universal broadband router.
At some point, you might want to replace a cable modem card in your Cisco uBR7246. The following procedures explain how to remove and install a cable modem card.
| Caution The cable modem cards currently available for field trials do not support OIR. You must power down the Cisco uBR7246 before removing any of these early cable modem cards from the universal broadband router. When the released cable modem cards support OIR, you will no longer need to power down the Cisco uBR7246 to replace a cable modem card. |
To power down a Cisco uBR7246 universal broadband router, complete the following steps:
Step 1 Facing the rear of the router, place the power switch (on the power supply) in the OFF (0) position. Repeat this action if a second power supply is installed in the router.
Step 2 Observe the following items:
To disconnect AC-input power to a Cisco uBR7246 universal broadband router, complete the following steps:
Step 1 Unplug the input power cable from the power source.
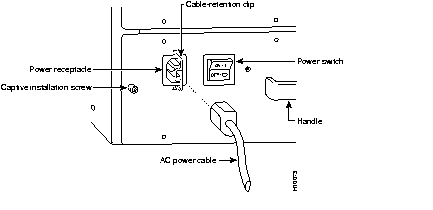
Step 2 Push the cable-retention clip that secures the input power cable to the router's power supply to the left.
Step 3 Unplug the other end of the input power cable from the power supply (refer to Figure 7-5).
Step 4 Repeat Step 1 through Step 3 if a second power supply is installed.
This completes the procedure for powering down the router and disconnecting input power.
Step 1 Attach an ESD-preventative wrist strap between you and an unfinished chassis surface.
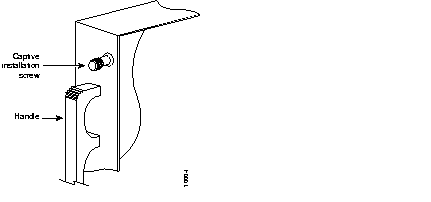
Step 2 Unscrew the captive installation screws on the front of the cable modem card. (Refer to Figure 7-6.)
Step 3 Grasp the handle on the cable modem card and carefully pull the cable modem card from the midplane, about half way out of its slot. If you are removing a blank cable modem card, pull the blank cable modem card all the way out of the chassis slot.
Step 4 With the cable modem card half way out of the slot, disconnect all cables from the cable modem card.
Step 5 After disconnecting the cables, pull the cable modem card from its chassis slot.
| Caution Always handle the cable modem card by the carrier edges and handle; never touch the cable modem card's components or connector pins. (Refer to Figure 7-7.) |
Step 6 Place the cable modem card on an antistatic surface with its components facing upward, or in a static shielding bag. If the cable modem card will be returned to the factory, immediately place it in a static shielding bag.
This completes the procedure for removing a cable modem card from the Cisco uBR7246 universal broadband router.
Complete the following steps to install a cable modem card in the Cisco uBR7246 universal broadband router:
Step 1 Attach an ESD-preventative wrist strap between you and an unfinished chassis surface.
Step 2 Use both hands to grasp the cable modem card by its metal carrier edges and position the cable modem card so that its components are downward. (Refer to Figure 7-7.)
Step 3 Align the left and right edge of the cable modem card metal carrier between the guides in the cable modem card slot. (Refer to Figure 7-8.)
Step 4 With the metal carrier aligned in the slot guides, gently slide the cable modem card half way into the cable modem card slot.
| Caution Do not slide the cable modem card all the way into the slot until you have connected all required cables. Trying to do so will disrupt normal operation of the router. |
Step 5 With the cable modem card half way in the slot, connect all required cables to the cable modem card.
Step 6 After connecting all required cable modem card cables, carefully slide the cable modem card all the way into the slot until you feel the cable modem card's connectors mate with the midplane.
Step 7 Tighten the captive installation screws on the cable modem card. (Refer to Figure 7-6.)
This completes the procedure for installing a cable modem card in the Cisco uBR7246 universal broadband router.
The following procedures explain how to reconnect AC-input power to a Cisco uBR7246 universal broadband router, power up the router, and verify a successful system boot.
| Caution When the released cable modem cards support OIR, you will no longer need to power up the Cisco uBR7246 after you replace a cable modem card. |
To reconnect AC-input power to a Cisco uBR7246 universal broadband router complete the following steps:
Step 1 At the rear of the router, check that the power switch on the power supply is in the OFF (0) position.
Step 2 Push the cable-retention clip to the left, away from the AC receptacle, and plug in the power cable.
Step 3 Secure the cable in the power supply AC receptacle by sliding the cable-retention clip to the right until it snaps around the connector. The cable-retention clip provides strain relief for the AC power cable (refer to Figure 7-9).
Step 4 Plug the AC power supply cable into the AC power source.
Step 5 Repeat Step 1 through Step 4 if a second power supply is installed.
This completes the steps for reconnecting AC-input power to a Cisco uBR7246 universal broadband router.
| Caution When the power switch on a Cisco uBR7246 power supply is turned to the OFF position, the power supply will enter a reset cycle for ninety (90) seconds. Wait at least ninety (90) seconds before turning the power switch back to the ON position. If you do not wait the full ninety (90) seconds, the power supply will not restart. |
To power up a Cisco uBR7246 universal broadband router that has an installed AC-input power supply, complete the following steps:
Step 1 Check for the following:
Step 2 At the rear of the router, place the power switch on the power supply in the ON (|) position. Repeat this step if a second power supply is installed in the router. The green OK LED on the power supply turns on.
Step 3 Listen for the fans; you should immediately hear them operating.
Step 4 During the boot process, observe the system's LEDs. The LEDs on most of the port adapters go on and off in irregular sequence. Some may go on, go out, and go on again for a short time. On the I/O controller, the IO Power OK LED comes on immediately.
Step 5 Observe the initialization process. When the system boot is complete (a few seconds), the network processing engine begins to initialize the port adapters and the I/O controller. During this initialization, the LEDs on each port adapter behave differently (most flash on and off). The enabled LED on each port adapter goes on when initialization is completed, and the console screen displays a script and system banner similar to the following:
This completes the procedures for connecting input power and powering up the router. This also completes the procedures for replacing a cable modem card in a Cisco uBR7246 universal broadband router.
The I/O controller has two PCMCIA slots for Flash memory cards: slot 0 (lower) and slot 1 (upper). Complete the following steps to insert a Flash memory card in either PCMCIA slot:
Step 1 Orient the Flash memory card so that its connector end faces the appropriate slot. (Refer to Figure 7-10a).
Step 2 Carefully guide the card into the slot until it mates with the slot's connector and the eject button for the slot pops out toward you. (Refer to Figure 7-10b.)
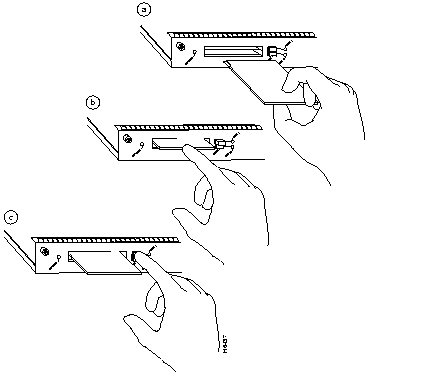
Complete the following steps to remove a Flash memory card from either PCMCIA slot:
Step 1 Press the ejector button on the slot. (Refer to Figure 7-10c.)
Step 2 Grasp the card and pull it from the slot.
Step 3 Place the card in an antistatic bag.
This completes the steps for inserting and removing a Flash memory card.
The Flash memory card that shipped with your Cisco uBR7246 contains the Cisco IOS software image you need to boot your router. In some cases, you might need to insert a new Flash memory card and copy images or backup configuration files onto it. Before you can use a new Flash memory card, you must format it. (Use only Intel Series 2+ Flash memory cards.)
Use the following procedure to format a new Flash memory card:
Step 1 Using the procedure in the section "Installing and Removing a Flash Memory Card," insert the Flash memory card into slot 0. (If slot 0 is not available, use slot 1.)
Step 2 To format the Flash memory card, use the format slot0: (or format slot1:) command as follows.
format slot0:
MyNewCard
The new Flash memory card is now formatted and ready to use.
Once you have formatted a new Flash memory card, you can copy a bootable image onto it. To copy an image, use the following procedure, which assumes the following:
Following is the procedure for copying a bootable file (called new.image in the examples) onto the Flash memory card:
Step 1 Boot the Cisco uBR7246 and allow it to initialize.
Step 2 Insert an unformatted Flash memory card and format it using the procedure in the section "Formatting a New Flash Memory Card" in this chapter. Then proceed to Step 3.
Step 3 Copy the new image (new.image in the following example) to the Flash memory card and make this image the default boot image. Then reboot the router using the following series of commands:
en
copy tftp:new.image slot0:new.image
config terminal
no boot system
boot system flash slot0:new.image
^z
copy running-config startup-config
reload
When the system reloads, it will boot the new.image file from the Flash memory card.
As future releases of Cisco IOS images become available, you will receive these images either as a file booted from a network server, a file on floppy disk, or a file on a Flash memory card.
The following scenario describes how to use a newly released image on a Flash memory card in a system that has an older image on a Flash memory card in slot 0 and a default boot image in the onboard Flash SIMM.
For this scenario, the filenames are as follows:
You will copy the new image from the new Flash memory card onto the Flash memory card that contains the old image.
Step 1 Boot the Cisco uBR7246. By default, the file boot.image is used.
Step 2 Enable the router as follows:
en
Step 3 Insert the new Flash memory card in slot 1.
Step 4 Use the following command to copy the file new.image in slot 1 to the Flash memory card in slot 0, only if there is enough memory space for the two images to coexist. If there is not enough memory space, proceed to Step 5.
copy slot1:new.image slot0:new.image
Step 5 Use the following series of commands to designate the file new.image (which is on the Flash memory card in slot 0) as the default boot image:
config t
no boot system
boot system flash slot0:new.image
^z
copy running-config startup-config
reload
When the system reloads, it will boot the file new.image from the Flash memory card in slot 0.
Depending on the circumstances, you might need to use a Flash memory card from another system to copy images or backup configuration files; however, you cannot boot from a Flash memory card that was formatted on another type of system. You must reformat the card before you can use it as a boot source. (Use only Intel Series 2+ Flash memory cards.)
The reformatting procedure assumes the following:
Use the following procedure to reformat a Flash memory card:
Step 1 Insert the Flash memory card into slot 0. (If slot 0 is not available, use slot 1.) Refer to the earlier section "Installing and Removing a Flash Memory Card."
Step 2 Copy all the files on the Flash memory card to a TFTP server or a secondary Flash memory card. The following example is for copying files to a TFTP server. Refer to the earlier section "Copying a Bootable Image onto a Flash Memory Card" for Flash memory card examples.
en
Router#copy slot0:image.name tftp
Enter destination file name [image.name]: image.name CCCCCCCCCCCCCCCCCCCCCCCCCCCCCCCCCCCCCCCCCCCCCCCCCCCCCCCCCCCCCCCCCCCCCCCCCCCCCCCCCCCCCCCCCCCCCCCCCCCCCC
Address or name of remote host [tftp.server.name]? tftp.server.name !!!!!!!!!!!!!!!!!!!!!!!!!!!!!!!!!!!!!!!!!!!!!!!!!!!!!!!!!!!!!!!!!!!!!!!!!!!!!!!!!!!!!!!!!!!!!!!!!!!!
Router#
Step 3 To reformat the Flash memory card, use the format slot0: (or format slot1:) command as follows.
format slot0:
MyNewCard
Step 4 Copy the files you saved to the TFTP server back to the Flash memory card as follows.
copy tftp slot0
image.name
tftp.server.name
The Flash memory card is now reformatted and ready to use.
This section describes how to recover a lost enable or console login password, and how to replace a lost enable secret password on your Cisco uBR7246 universal broadband router.
Following is an overview of the steps in the password recovery procedure:
Complete the following steps to recover or replace a lost enable, enable secret, or console login password:
Step 1 Attach an ASCII terminal to the console port on your Cisco uBR7246.
Step 2 Configure the terminal to operate at 9600 baud, 8 data bits, no parity, and 2 stop bits.
Step 3 If you can log in to the router as a nonprivileged user, enter the show version command to display the existing configuration register value. Note the value for use later. Proceed to Step 4.
If you cannot log in to the router at all, go to the next step.
Step 4 Press the Break key or send a Break from the console terminal. If Break is enabled, the router enters the ROM monitor, indicated by the ROM monitor prompt (rommon1>). Proceed to Step 6. If Break is disabled, power cycle the router (turn the router off or unplug the power cord, and then restore power). Then proceed to Step 5.
Step 5 Within 60 seconds of restoring the power to the router, press the Break key or send a Break. This action causes the router to enter the ROM monitor and display the ROM monitor prompt (rommon1>).
Step 6 To set the configuration register on a Cisco uBR7246, use the configuration register utility by entering the confreg command at the ROM monitor prompt as follows:
rommon1> confreg
Answer yes to the enable "ignore system config info"? question and note the current configuration register settings.
Step 7 Initialize the router by entering the reset command as follows:
rommon2> reset
The router will initialize, the configuration register will be set to 0x142, and the router will boot the system image from Flash memory and enter the system configuration dialog (setup) as follows:
--- System Configuration Dialog --
Step 8 Enter no in response to the system configuration dialog prompts until the following message is displayed:
Press RETURN to get started!
Step 9 Press Return. The user EXEC prompt is displayed as follows:
Router>
Step 10 Enter the enable command to enter the privileged EXEC mode. Then enter the show startup-config command to display the passwords in the configuration file as follows:
Router# show startup-config
Step 11 Scan the configuration file display looking for the passwords (the enable passwords are usually near the beginning of the file, and the console login or user EXEC password is near the end). The passwords displayed will look something like this:
enable secret 5 $1$ORPP$s9syZt4uKn3SnpuLDrhuei
enable password 23skiddoo
.
.
line con 0
 password onramp
The enable secret password is encrypted and cannot be recovered; it must be replaced. The enable and console passwords may be encrypted or clear text. Proceed to the next step to replace an enable secret, console login, or enable password. If there is no enable secret password, note the enable and console login passwords if they are not encrypted and proceed to Step 16.
| Caution Do not execute the next step unless you have determined you must change or replace the enable, enable secret, or console login passwords. Failure to follow the steps as shown may cause you to erase your router configuration. |
Step 12 Enter the configure memory command to load the startup configuration file into running memory. This action allows you to modify or replace passwords in the configuration.
Router# configure memory
Step 13 Enter the privileged EXEC command configure terminal to enter configuration mode:
Hostname# configure terminal
Step 14 To change all three passwords, enter the following commands:
enable secret newpassword1enable password newpassword2line con 0
password newpassword3
Change only the passwords necessary for your configuration. You can remove individual passwords by using the no form of the above commands. For example, entering the no enable secret command will remove the enable secret password.
Step 15 You must configure all interfaces to be not administratively shutdown as follows:
interface fast ethernet 0/0
no shutdown
Enter the equivalent commands for all interfaces that were originally configured. If you omit this step, all interfaces will be administratively shutdown and unavailable when the router is restarted.
Step 16 Use the config-register command to set the configuration register to the original value noted in Step 3 or Step 7, or to the factory default value 0x2102 as follows:
config-register 0x2102
Step 17 Press Ctrl-Z to exit configuration mode.
| Caution Do not execute the next step unless you have changed or replaced a password. If you skipped Step 12 through Step 15, skip to Step 19. Failure to observe this caution will cause you to erase your router configuration file. |
Step 18 Enter the copy running-config startup-config command to save the new configuration to nonvolatile memory.
Step 19 Enter the reload command to reboot the router.
Step 20 Log in to the router with the new or recovered passwords.
This completes the steps for recovering or replacing a lost enable, enable secret, or console login password.
|
|