This chapter describes the equipment and site requirements for installing the Cisco uBR7246. The chapter contains the following sections:
Before installing your Cisco uBR7246 you should consider the power and cabling requirements that must be in place at your installation site, the equipment you will need to install the router, and the environmental conditions your installation site must meet to maintain normal operation. This chapter guides you through the process of preparing for your router installation.
Note The chapter "
CATV Headend Considerations," describes important configuration information related to the setup of the analog RF signal and digital data. After installing your Cisco uBR7246 universal broadband router, use the instructions found in that chapter to fully configure the upstream and downstream signal alignment.
The following guidelines will help to ensure your safety and protect the equipment. This list does not cover all potentially hazardous situations, so be alert.
- The installation of your Cisco uBR7246 should be in compliance with national and local electrical codes. In the United States, National Fire Protection Association (NFPA) 70, United States National Electrical Code. In Canada, Canadian Electrical Code, part I, CC22.1. In other countries, International Electrotechnical Commission (IEC) 364, part 1 through part 7.
- Review the safety warnings listed in the publication Regulatory Compliance and Safety Information for the Cisco uBR7246 Universal Broadband Router before installing, configuring, or maintaining the Cisco uBR7246.
- Never attempt to lift an object that might be too heavy for you to lift by yourself.
- Always turn all power supplies off (O) and unplug all power cables before opening the chassis.
- Always unplug the power cable before installing or removing a chassis.
- Keep the chassis area clear and dust free during and after installation.
- Keep tools and chassis components away from walk areas.
- Do not wear loose clothing, jewelry (including rings and chains), or other items that could get caught in the chassis. Fasten your tie or scarf and sleeves.
- The Cisco uBR7246 ships with a 3-wire electrical grounding-type plug, which will only fit into a grounding-type power outlet. This is a safety feature. The equipment grounding should be in accordance with local and national electrical codes. The universal broadband router might not operate correctly if it is not properly grounded.
- The Cisco uBR7246 operates safely when it is used in accordance with its marked electrical ratings and product usage instructions.
A fully configured Cisco uBR7246 weighs approximately 100 pounds. The chassis is not intended to be moved frequently. Before you install the router, ensure that your site is properly prepared so you can avoid having to move the chassis later to accommodate power sources and network connections.
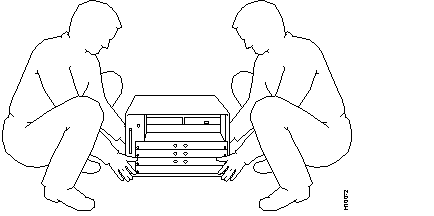
Whenever you lift the chassis or any heavy object, follow these guidelines (see Figure 2-1):
- Always disconnect all external cables before lifting or moving the chassis.
- Do not attempt to lift the chassis by yourself; have someone assist you.
- Ensure that your footing is solid, and balance the weight of the object between your feet.
- Lift the chassis slowly; never move suddenly or twist your body as you lift.
- Keep your back straight and lift with your legs, not your back. If you must bend down to lift the chassis, bend at the knees, not at the waist, to reduce the strain on your lower back muscles.
- Lift the chassis from the bottom; grasp the underside of the chassis exterior with both hands.
Figure 2-1: Lifting the Chassis
The port adapters and power supplies are designed to be removed and replaced while the system is operating without presenting an electrical hazard or damage to the system. However, you must power down the system before removing or replacing the I/O controller and network processing engine.
Follow these basic guidelines when working with any electrical equipment:
In addition, use the guidelines that follow when working with any equipment that is disconnected from a power source, but still connected to telephone wiring or other network cabling.
Electrostatic discharge (ESD) damage, which occurs when electronic cards or components are improperly handled, can result in complete or intermittent system failures. The network processing engine, I/O controller, each cable modem card, and each port adapter consists of a printed circuit board that is fixed in a metal carrier. Electromagnetic interference (EMI) shielding, connectors, and a handle are integral components of the carrier. Although the carrier helps protect the boards, use an antistatic strap whenever handling the network processing engine, I/O controller, cable modem cards, and port adapters. Handle the carriers by the handles and the carrier edges only; never touch the boards or connector pins.
 | Caution Always tighten the captive installation screws on the network processing engine, I/O controller, and cable modem cards. (See Figure 1-4 and Figure 1-6.) These screws prevent accidental removal, provide proper grounding for the system, and help ensure that the bus connectors are properly seated in the midplane. |
Following are guidelines for preventing ESD damage:
- Always use an ESD wrist strap or ankle strap and ensure that it makes good skin contact.
- When handling a removed network processing engine, I/O controller, or port adapter, make sure the equipment end of your ESD strap is attached to an unfinished chassis surface of the router; do not touch the printed circuit board, and avoid contact between the printed circuit board and your clothing. Always place the network processing engine, I/O controller, cable modem card, or port adapter component side up on an antistatic surface or in a static shielding bag. If you are returning the item to the factory, immediately place it in a static shielding bag.
- Ensure the I/O controller and network processing engine are fully inserted in their respective chassis slots and their captive installation screws are tightened. The captive installation screws prevent accidental removal, provide proper grounding for the system, and help ensure that the bus connectors are seated in the midplane.
- Ensure that each port adapter is fully inserted in its chassis slot and the port adapter retention clip is in the locked position.
- Ensure that each cable modem card is fully inserted in its chassis slot and the respective cable modem card captive installation screws are tightened.
| Caution For safety, periodically check the resistance value of the antistatic strap. The measurement should be between 1 and 10 megohms. |
The environmental monitoring functionality in the Cisco uBR7246 protects the system and components from potential damage from overvoltage and overtemperature conditions. To assure normal operation and avoid unnecessary maintenance, plan your site configuration and prepare your site before installation. After installation, make sure the site maintains an ambient temperature of 32°F through 104°F (0°C through 40°C), and keep the area around the chassis as free from dust as is practical.
The following sections address the site environment requirements for the Cisco uBR7246.
The AC-input power supply uses a power factor corrector that allows the Cisco uBR7246 to operate on input voltage and frequency within the ranges of 100 to 240 VAC and
50/60 Hz.
Note We recommend attaching dual power supplies to independent power sources for full redundancy. We also recommend an uninterruptable power source to protect against power failures at your site. Each AC-input power supply operating at 120 VAC requires a minimum of 7A service. We recommend powering the Cisco uBR7246 from a 15A receptacle at the power source.
Refer to Table 1-1 in the chapter "Product Overview" for system power specifications, including input voltage and operating frequency ranges.
Intermediate frequency (IF)-to-RF upconverter hardware must be installed in the downstream data path at your headend site. The upconverter is installed between the Cisco uBR7246 universal broadband router and the combiner (see Figure 2-2).
Note The combiner refers to all cables, amplifiers, and taps on the HFC network.
Figure 2-2: IF-to-RF Upconverter Installation at the Headend
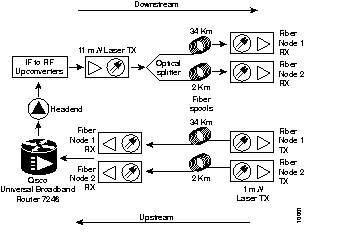
Upconverters are available from a number of manufacturers and can be found in configurations ranging from a fixed number of ports to flexible multi-slot, multi-port models. You must install and configure enough upconverter ports to support the number of upstream cable modem card ports installed in each Cisco uBR7246. The number of upconverter units you will need to purchase will vary by manufacturer.
To configure an upconverter, adjust the IF and RF gain levels so they are approximately in the middle of the spectrum. Adjust the RF channel power on the output of the upconverter to approximately 50 dBmV. (The RF channel power setting is also known as the true QAM RF output power.) Refer to the documentation that ships with your upconverter for detailed instructions on upconverter operation and configuration.
Note You might need to add attenuation to the downstream path between the universal broadband router and the upconverter to configure the Cisco uBR7246.
You must add a minimum of 10 dB of attenuation on each upstream line, before the Cisco uBR7246, and each downstream line, after the upconverter. This attenuation will adjust for a minimum of 10 dB line loss in the upstream and 10 dB to 45 dB loss in the downstream. The downstream loss is caused by different RF tuners used in other cable modems that might be installed in your network, different upconverter settings, and other cabling in the network.
Upconverters and cables are available from the following Cisco-approved vendors: NextLevel, Wavecom, and Barco.
Note The lead times for upconverters can run from 2 to 18 weeks. Contact the upconverter manufacturers listed above for up-to-date information on lead times.
Diplex filters must be installed in the downstream RF path between the cable modems and the cable modem cards in the Cisco uBR7246 universal broadband router.
The input of the diplex filter consists of two ports: the high filter port and the low filter port. The output of the diplex filter consists of a single port that is connected to a splitter. Unused connection ports on the splitter must be terminated.
A Dynamic Host Configuration Protocol (DHCP) server must be installed at the headend site to assign an IP address to each cable modem. The Cisco uBR7246 universal broadband router uses these assigned IP addresses to identify individual cable modems operating on the network.
When a DHCP server is configured in a network, the server assigns an IP address to each cable modem when a connection is made to the network. The DHCP server periodically polls the cable modem to see if network connection is still active. When the connection to the network ends, the IP address is reassigned, as needed, to other cable modems establishing a connection to the network.
DHCP servers are available as combined hardware and software solutions, or as a software package that can run on an existing computer or workstation. In either case, the DHCP server must be dedicated to DHCP services.
Following are guidelines for setting up the headend wiring and cabling at your site. When planning the location of the new system, consider the distance limitations for signaling, electromagnetic interference (EMI), and connector compatibility, as described in the following sections.
When wires are run for any significant distance in an electromagnetic field, interference can occur between the field and the signals on the wires. This fact has two implications for the construction of headend wiring:
If you use twisted-pair cable in your headend wiring with a good distribution of grounding conductors, the wiring is unlikely to emit radio interference. If you exceed the recommended distances, use a high-quality twisted-pair cable with one ground conductor for each data signal when applicable.
If wires exceed recommended distances, or if wires pass between buildings, give special consideration to the effect of a lightning strike in your vicinity. The electromagnetic pulse caused by lightning or other high-energy phenomena can easily couple enough energy into unshielded conductors to destroy electronic devices. If you have had problems of this sort in the past, you may want to consult experts in electrical surge suppression and shielding.
The size of your networks and the distances between connections depend on the type of signal, the signal speed, and the transmission media (the type of cabling used to transmit the signals). For example, standard coaxial cable has a greater channel capacity than twisted-pair cabling. The distance and rate limits in the following descriptions are the IEEE recommended maximum speeds and distances for signaling; however, you can usually get good results at speeds and distances far greater than these. For example, the recommended maximum rate for V.35 is 2 Mbps, but it is commonly used at 4 Mbps without any problems. If you understand the electrical problems that might arise and can compensate for them, you should get good results with rates and distances greater than those shown here; however, do so at your own risk.
Note We recommend that you do not exceed specified transmission rate and distance limits.
When preparing your site for network connections to the Cisco uBR7246, you must consider a number of factors related to each type of interface:
- The type of cabling required for each type (fiber, thick or thin coaxial, shielded
twisted-pair, or unshielded twisted-pair cabling)
- Distance limitations for each signal type
- The specific cables you need to connect each interface
- Any additional interface equipment you need, such as transceivers, hubs, switches, modems, channel service units (CSUs), or data service units (DSUs)
- Cable pinouts if you plan to build your cables
Before installing the Cisco uBR7246, have all additional external equipment and cables on hand. The information listed above is contained in the documentation that is shipped with each port adapter. For example, if you need Ethernet distance limitations and pinouts, refer to the document PA-8E Ethernet 10BASE-T Port Adapter Installation and Configuration (Document Number 78-3141-xx). This configuration note accompanies each 8-port Ethernet port adapter that is shipped from the factory as an installed item in a Cisco uBR7246 and as a FRU.
For ordering information, contact a customer service representative.
The coaxial cable used at the headend to connect the Cisco uBR7246 should be of the highest quality.
We recommend that you use RG-59 headend coaxial cable with the maximum braid available (60% + 40% braid), double foil, and the correct connector for this cable. The center conductor must be straight and extend 1/8 in. (3.2 mm) beyond the end of the connector, and the connector should be securely crimped to the cable.
If you use different types of coaxial cable, the following problems can appear:
- Co-channel interference. If signals at the same frequency are carried on long, parallel runs of coaxial cable, interference can occur between the signals. Higher quality cable helps to prevent this with better shielding.
- Damage to Cisco uBR7246 universal broadband router cable modem card connectors. The modem card connectors are designed for RG-59 cable and connectors. Larger cables can damage the connectors.
- High signal return loss. High quality cable and correct connectors help to ensure an optimal return loss of 16 dB or less.
Note Refer to the chapter "
CATV Headend Considerations" for additional configuration and site requirement information related to the setup of the analog RF signal and digital data.
The rack-mounting hardware included with the Cisco uBR7246 is suitable for most 19-inch equipment racks and telco-type racks. To easily access field replaceable units (FRUs) while the router is installed in a rack, make certain you have access to the front and rear of the router.
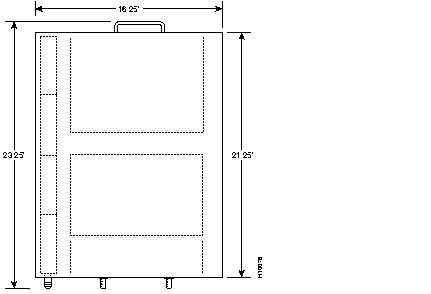
Before using a particular rack, check for obstructions (such as a power strip) that could impair rack-mount installation. If a power strip does impair a rear rack-mount installation, remove the power strip before installing the Cisco uBR7246 in the rack, then replace it after the chassis is installed. As an alternative, you can mount the Cisco uBR7246 on an equipment shelf provided that the rack dimensions allow you to secure the router to the shelf, and the overall configuration permits safe installation and access. However, we recommend rack-mounting the Cisco uBR7246. Figure 2-3 shows the Cisco uBR7246 footprint and outer dimensions.
To use the rack-mounting hardware provided with the Cisco uBR7246, consider the following guidelines:
- To mount the router between two posts or rails using the brackets, the inner clearance (the width between the inner sides of the two posts or rails) must be at least 17.00 inches (43.18 cm).
- The height of the chassis is 10.5 inches (26.67 cm).
- When mounting the router in 4-post or telco-type racks, be sure to use all the screws and the brackets provided to secure the chassis to the rack posts.
Figure 2-3: Cisco uBR7246 Footprint and Outer Dimensions
When planning your rack installation, consider the following guidelines:
- Install the Cisco uBR7246 in an open rack whenever possible. If installation in an enclosed rack is unavoidable, ensure that the rack has adequate ventilation.
- If you plan to use an equipment shelf, ensure that the shelf is constructed to support the weight and dimensions of the chassis. Figure 2-3 shows the chassis footprint, which you will need if you are designing a customized shelf. We recommend that you use the rack-mount kit designed for the Cisco uBR7246 (product number ACS-uBR7200-RMK=).
- Allow sufficient clearance around the rack for maintenance. If the rack is mobile, you can push it back near a wall or cabinet for normal operation and pull it out for maintenance (installing or moving port adapters, connecting cables, or replacing or upgrading components). Otherwise, allow at least 19 inches (48.3 cm) of clearance to remove Cisco uBR7246 FRUs.
- Maintain a minimum clearance of three inches on the right and left of the chassis for the cooling air inlet and exhaust ports, respectively. Avoid placing the Cisco uBR7246 in an overly congested rack or directly next to another equipment rack; otherwise, the heated exhaust air from other equipment can enter the inlet air vents and cause an overtemperature condition inside the router.
- Always install heavier equipment in the lower half of a rack to maintain a low center of gravity and prevent the rack from falling over.
- If you use telco-type racks, be sure that the rack is bolted to the floor and secured because in these types of installations only one end of the chassis mounts to the two rack posts with the brackets. Ensure that the weight of the chassis does not make the rack unstable.
- Install and use the cable-management bracket included with the Cisco uBR7246
rack-mount kit to keep cables organized and out of the way of the port adapters and
I/O controller. Consider the equipment and cabling that is already installed in the rack. Ensure that cables from other equipment will not impair access to the port adapters, or require you to disconnect cables unnecessarily to perform equipment maintenance or upgrades.
- If you are planning to install the cable-management brackets on a Cisco uBR7246 that you are rack-mounting from the front, you must install the cable-management brackets and the rack-mount brackets before you install the chassis in the rack.
In addition to the preceding guidelines, review the precautions for avoiding overtemperature conditions in the following section "Site Environment." To properly install the Cisco uBR7246 chassis in a rack, refer to the instructions in the section "Rack-Mounting Cisco uBR7246" in the chapter "Installing the Cisco uBR7246."
Table 2-1 lists the operating and nonoperating environmental site requirements. The following ranges are those within which the Cisco uBR7246 will continue to operate; however, a measurement that is approaching the minimum or maximum of a range indicates a potential problem. You can maintain normal operation by anticipating and correcting environmental anomalies before they approach a maximum operating range.
To provide airflow though the Cisco uBR7246, cooling air is drawn in through the air intake vent on the right side of the chassis (when viewing the router from the front) and is exhausted through the left side of the chassis. Keep the right and left side of the chassis clear of obstructions and away from the exhaust of other equipment.
Table 2-1: Specifications for Operating and Nonoperating Environments
| Specification
| Minimum
| Maximum
|
|---|
| Temperature, ambient operating
| 32°F (0°C)
| 104°F (40°C)
|
| Temperature, ambient nonoperating and storage
| -4°F (-20°C)
| 149°F (65°C)
|
| Humidity, ambient (noncondensing) operating
| 10%
| 90%
|
| Humidity, ambient (noncondensing) nonoperating and storage
| 5%
| 95%
|
| Altitude, operating and nonoperating
| Sea level
| 10,000 ft (3,050 m)
|
| Vibration, operating
| 5-200 Hz, 0.5 g (1 oct./min.)
| -
|
| Vibration, nonoperating
| 5-200 Hz, 1 g (1 oct./min.) 200-500 Hz, 2 g (1 oct./min.)
| -
|
Planning a proper location for the Cisco uBR7246 and the layout of your equipment rack or wiring closet are essential for successful system operation. Equipment placed too close together or inadequately ventilated can cause system overtemperature conditions. In addition, chassis panels made inaccessible by poor equipment placement can make system maintenance difficult. Following are precautions that can help avoid problems during installation and ongoing operation.
Follow these general precautions when planning your equipment locations and connections:
- Use the show environment command regularly to check the internal system status. The environmental monitor continually checks the interior chassis environment; it provides warnings for high temperature and maximum and minimum voltages and creates reports on any occurrences. If warning messages are displayed, take immediate action to identify the cause and correct the problem.
- We recommend keeping the Cisco uBR7246 off the floor and out of any area that tends to collect dust, excessive condensation, or water.
- Follow ESD prevention procedures to avoid damage to equipment. Damage from static discharge can cause immediate or intermittent equipment failure.
- Ensure that the network processing engine, I/O controller, port adapters, any blank port adapters, modem cards, any blank modem cards, power supplies, and any power supply filler plates are in place and secure. The fans direct cooling air throughout the chassis interior; a loose component or empty slot can redirect the air flow away from active components and cause overheating.
Follow these precautions and recommendations when planning power connections to the Cisco uBR7246:
- Check the power at your site before installation and periodically after installation to ensure that you are receiving clean power. Install a power conditioner if necessary.
- Install proper grounding to avoid damage from lightning and power surges.
Your Cisco uBR7246 chassis is fully assembled at the factory; no assembly is required. However, you will need the following tools and equipment to install the chassis and the rack-mount and cable-management kit:
- Number 2 Phillips screwdriver
- 3/16-inch flat-blade screwdriver
- 7/16-inch flat-blade screwdriver
- Tape measure (optional)
- Level (optional)
The rack-mount and cable-management kit includes the following parts:
- Two rack-mount brackets for mounting the chassis in the rack
- One cable-management bracket to relieve the strain on installed port adapter and cable modem card interface cables
- Eight M4 x 6-mm Phillips flathead screws to secure the rack-mount brackets to the chassis
- Four M4 x 6-mm Phillips panhead screws to secure the cable-management bracket to the chassis
- Four 10-32 x 3/8-inch slotted binderhead screws to secure the rack-mount brackets to the rack rails
Note You must install the cable-management bracket on the right side of the chassis, when viewed from the front. If the cable-management bracket is installed on the left side of the chassis, where the internal fans are located, you will not be able to easily remove or replace the fan tray.
If you install your Cisco uBR7246 universal broadband router with the rack-mount brackets at the front of the chassis you cannot install a cable-management bracket.
For more information on the rack-mount brackets and cable-management bracket, refer to the section "Rack-Mounting Cisco uBR7246" in the chapter "Installing the Cisco uBR7246."
To verify RF and data setup, you need the following equipment:
- An RF spectrum analyzer.
- A coaxial cable crimping tool.
- A Cisco cable modem.
- A personal computer with an Ethernet adapter card installed to connect to the cable modem.
- New coaxial cable. We recommend RG-59 headend coaxial cable with the maximum braid available (60% + 40% braid), double foil, and the correct connector for this cable. The center conductor must be straight and extend 1/8 in. (3.2 mm) beyond the end of the connector, and the connector should be securely crimped to the cable.
- Assorted RF attenuators.
Note For important, detailed information about headend RF and data setup considerations, see the chapter "
CATV Headend Considerations."
In addition, you might need the following external equipment:
- A straight-through Ethernet cable with RJ-45 connectors. If you plan to install a Cisco cable modem for testing, you need this type of cable to connect the cable modem to a computer.
- A crossover Ethernet cable with RJ-45 connectors. If you plan to connect a computer directly to an Ethernet port on a PA-4E port adapter or a PA-8E port adapter installed in the Cisco uBR7246, you need this type of cable.
- Data service unit (DSU) to connect each serial port to an external network.
- One serial port adapter cable for each serial port to connect the port with the remote device or network. (The operating speeds of the port interfaces, and other information specific to each port adapter, can be found in the respective port adapter configuration notes.)
- To connect a serial port to a T1 network, you need a T1 channel service unit/data service unit (CSU/DSU) that converts the High-Level Data Link Control (HDLC) synchronous serial data stream into a T1 data stream with the correct framing and ones density. (Some telephone systems require a minimum number of 1 bits per time unit in a data stream, called ones density.) Several T1 CSU/DSU devices are available as additional equipment, and most provide either a V.35, EIA/TIA-449, or EIA-530 electrical interface.
- A Fast Ethernet transceiver.
After you install the chassis and verify that all the hardware is operating properly, you must configure the system and individual interfaces before you can connect your system to external networks. You can use the setup command facility or standard configuration commands to enter the configuration information.
Before you begin, you should be prepared with global (system-wide) parameters such as host names, passwords, and routing protocols, and with configuration information for each interface such as addresses, rates or speeds of operation, routing protocol specifics, and so on.
Following is some of the information you are likely to need, depending on your configuration:
- Host name for the router.
- Passwords to prevent unauthorized privileged-level access to the EXEC command interpreter and for individual virtual terminal lines.
- Protocols you plan to route.
- Bridging configuration (if you will use bridging and, if so, on which interfaces).
- Internet Protocol (IP) addresses and subnet masks if you are routing IP.
- Zone names, network numbers, or node numbers for the new interfaces if required.
- Operating speeds for specific interfaces--for example, serial interfaces operate at speeds of up to 2 Mbps. The speed of an interface often depends on the speed of the remote device to which it is attached.
For complete configuration instructions, refer to the Configuration Fundamentals Configuration Guide and the Configuration Fundamentals Command Reference, which are available on the Documentation CD-ROM or in print.
To assist you with your installation and to provide a historical record of what was done, by whom, use the Cisco uBR7246 Installation Checklist in Table 2-2. Make a copy of this checklist and indicate when each procedure or verification is completed. When the checklist is completed, place it in your site log (described at the end of this chapter) along with the other records for your new router.
Table 2-2: Cisco uBR7246 Installation Checklist
| Task
| Verified by
| Date
|
|---|
- Date universal broadband router received
|
|
|
- Date IF to RF upconverter(s) and diplex filters received
|
|
|
- Date DHCP server hardware and/or software received
|
|
|
- Router and all accessories unpacked
|
|
|
- Types and numbers of interfaces verified
|
|
|
- Safety recommendations and guidelines reviewed
|
|
|
- Installation Checklist copied
|
|
|
- Site log established and background information entered
|
|
|
- Site power voltages verified
|
|
|
- Site environmental specifications verified
|
|
|
- Required passwords, IP addresses, device names, and so on, available
|
|
|
- Required tools available
|
|
|
- Network connection equipment available
|
|
|
- Router mounted in rack (optional)
|
|
|
- Cable-management brackets installed (optional but recommended)
|
|
|
- AC power cable(s) connected to AC source(s) and router; retention clip secured
|
|
|
- Captive installation screws on I/O controller and network processing engine checked
|
|
|
- Network interface cables and devices connected
|
|
|
- ASCII terminal attached to console port
|
|
|
- Console port set for 9600 baud, 8 data bits, no parity, and 2 stop bits (9600 8N2)
|
|
|
- System power turned on (DC OK LED is on)
|
|
|
- System boot complete (I/O controller enabled LED is on)
|
|
|
- I/O controller, network processing engine, all modem cards, and all port adapters operational (enabled LEDs on the port adapters and the I/O controller are on)
|
|
|
- Console screen displays correct hardware configuration
(displayed after system banner)
|
|
|
- System ready for global and interface-specific configuration
|
|
|
Once you receive your Cisco uBR7246 universal broadband router, use the following procedure to check the contents of the shipping container. Use the Cisco uBR7246 Installation Checklist in Table 2-2 and the Cisco uBR7246 Component List in Table 2-3 to ensure you received all the components you ordered.
Note Do not discard the shipping container. You will need the container if you move or ship the Cisco uBR7246 in the future.
Step 1 Verify that the following are included in the shipping container (the accessories box might be separate):
- One Cisco uBR7246 universal broadband router, fully assembled (except the rack-mount and cable-management kit)
- One or more accessories boxes (some or all may be shipped separately)
Step 2 Check the contents of the accessories box against the Installation Checklist and the packing slip to verify that you received all listed equipment, which should include the following:
Step 3 Verify that the port adapters installed in your Cisco uBR7246 match the port adapter types on the packing list.
Step 4 Proceed to the section "Site Log" in this chapter, then to the chapter "Installing the Cisco uBR7246," to begin the installation.
Table 2-3: Cisco uBR7246 Component List
| Component
| Description
| Received
|
|---|
| Chassis
| Cisco uBR7246 chassis configured with a network processing engine, I/O controller, up to two AC power supplies, up to two port adapters (blank port adapters should be installed in empty port adapter slots), up to four cable modem cards (blank cable modem cards should be installed in empty cable modem card slots), and up to two Flash memory cards
|
|
Accessories:
- Rack-mount and cable-management kit
Power cables
- Documentation
|
The following accessories might arrive in separate shipping containers:
Two rack-mount brackets, one cable-management bracket, eight M4 x 6-mm Phillips flathead screws, four M4 x 6-mm Phillips panhead screws, and four 10-32 x 3/8-inch slotted binderhead screws
Up to two power cables
Router hardware and software documentation set and the Cisco Documentation CD-ROM package1
|
|
1
Titles and quantities of documents will vary. You must order the type and quantity of documentation sets when you order the hardware.
A site log provides a historical record of all actions relevant to the Cisco uBR7246 operation and maintenance. Keep your site log in a common place near the chassis where anyone who performs tasks has access to it. Site log entries might include the following:
- Installation progress--Make a copy of the Cisco uBR7246 Installation Checklist and insert it into the site log. Make entries on the Installation Checklist as each procedure is completed.
- Upgrades and removal/replacement procedures--Use the site log as a record of system maintenance and expansion history. Each time a procedure is performed on the system, update the site log to reflect the following:
- Port adapters installed, removed, or replaced
- Cable modem cards installed, removed, or replaced
- I/O controller removed and replaced
- Network processing engine removed and replaced
- Fan tray removed and replaced
- Power supply removed or replaced
- Chassis replaced
- Configuration changed; port adapters or cable modem cards moved
- Software upgraded
- Corrective maintenance procedures performed
- Intermittent problems
- Related comments
Table 2-4 shows a sample site log page. Make copies of the sample or design your own site log to meet the needs of your site and equipment.
Table 2-4: Site Log Example
| Date
| Description of Action Performed or Symptom Observed
| Initials
|
|---|
-
|
|
|
-
|
|
|
-
|
|
|
-
|
|
|
-
|
|
|
-
|
|
|
-
|
|
|
-
|
|
|
-
|
|
|
-
|
|
|
-
|
|
|
-
|
|
|
-
|
|
|
-
|
|
|
-
|
|
|
-
|
|
|
-
|
|
|
-
|
|
|
-
|
|
|
-
|
|
|
-
|
|
|
-
|
|
|
-
|
|
|
-
|
|
|
-
|
|
|
-
|
|
|