|
|

Cisco 4000 Series Rack-Mount and Wall-Mount Installation
Cisco Product Numbers: ACS-NPRM, ACS-NPWM
This document contains instructions for mounting your Cisco 4000, Cisco 4000-M, Cisco 4500, Cisco 4500-M, Cisco 4700, or Cisco 4700-M router in a standard 19-inch rack, in a 19-inch telco rack, or on a wall.
This document contains the following sections:
![]()
Follow these guidelines to ensure general safety:
Follow these guidelines when working on equipment powered by electricity:
The following tools and parts are required for rack-mount and wall-mount procedures:
For wall-mounting, the following additional equipment is required:
Table 1 lists the parts contained in the standard rack-mount kit.
Table 1 : Standard Rack-Mount Kit Components
Table 2 lists the parts contained in the telco rack-mount and wall-mount kit.
Table 2 : Telco Rack-Mount and Wall-Mount Kit Components
Overview of Rack-Mount and Wall-Mount Procedures
The Cisco 4000 series routers can be mounted in a standard 19-inch rack, a telco 19-inch rack, or on a wall. The procedures for the different mounting options involve removing the front panel and component tray from the chassis shell and then installing the empty shell in position before reinserting the component tray.
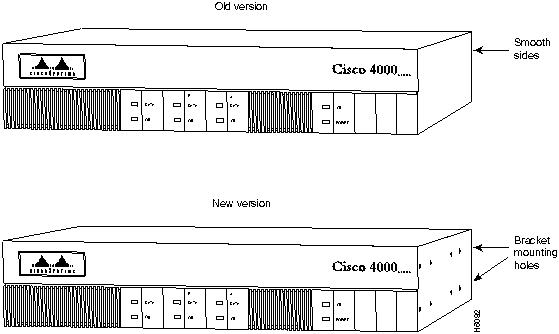
Old and New Versions of Chassis Shell
Cisco 4000 series routers have two chassis versions. (See Figure 1.) In the old version of the chassis, the rack-mount and wall-mount brackets are secured to the chassis with tabs located on the inside of the chassis shell. Newer versions of the chassis use screws to attach the brackets to the side of the chassis shell. The rack-mount and the wall-mount brackets supplied with this kit can be used with both types of chassis.
Figure 1 : Old and New Versions of the Cisco 4000 Series Chassis Shell
Preparing the Chassis for Rack-Mounting or Wall-Mounting
To rack-mount or wall-mount the chassis, you must first remove the front panel and component tray from the chassis shell.
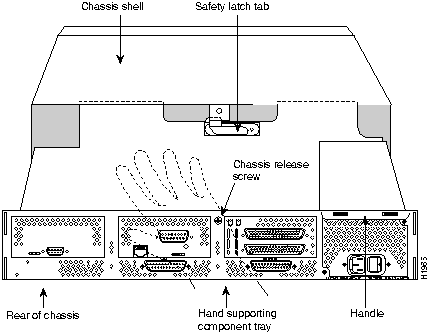
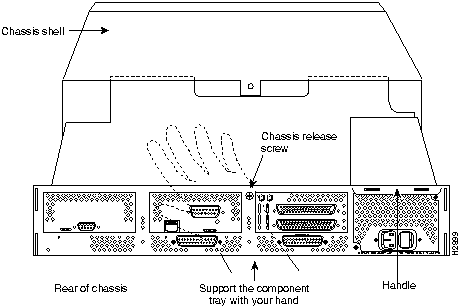
Some Cisco 4000 series routers have a safety latch tab on the chassis that affects removing the component tray. (See Figure 2 and Figure 3.)
If you have a chassis with a safety latch tab, follow the procedure in the following section, "Removing the Component Tray from a Chassis with a Safety Latch."
If you have a chassis without a safety latch tab, follow the procedure in the section "Removing the Component Tray from a Chassis without a Safety Latch," later in this document.
Removing the Component Tray from a Chassis with a Safety Latch
Take the following steps to remove the component tray from a chassis with a safety latch:
Figure 2 : Component Tray Removal for Chassis With a Safety Latch
Removing the Component Tray from a Chassis without a Safety Latch
Take the following steps to remove the component tray from a chassis without a safety latch:
Figure 3 : Component Tray Removal for Chassis Without a Safety Latch
Mounting the Chassis in a Standard Rack
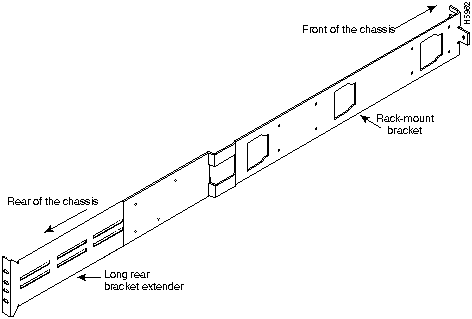
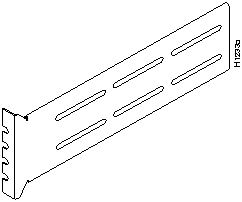
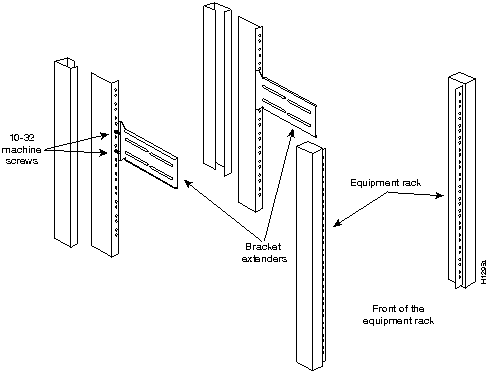
After removing the chassis shell and front panel, you can install the standard rack-mount brackets into the chassis shell. The standard 19-inch rack-mount kit (see Figure 4) consists of two sets of one bracket, one short extender (approximately five inches) (see Figure 5), and one long extender (approximately ten inches) (see Figure 6).
If you have an older version of the chassis, use the first of the following procedures to install the standard rack-mount brackets. If you have a new version of the chassis, use the second procedure to install the standard rack-mount brackets. After installing the brackets, use the third procedure to install the chassis shell into a standard 19-inch rack.
Figure 4 : Standard Rack-Mount Bracket and Extender Figure 5 : Short Rack-Mount Bracket Extender Figure 6 : Long Rack-Mount Bracket Extender Installing Standard Rack-Mount Brackets into an Old Version of the Chassis
Take the following steps to install standard rack-mount brackets into an old version of the chassis shell:
Figure 7 : Rack-Mount Bracket Insertion in an Old Version of the Chassis
Figure 8 : Standard Rack-Mount Bracket Installation in an Old Version of the Chassis
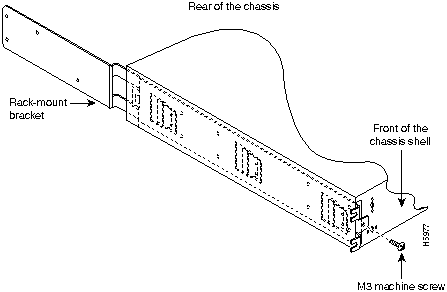
Installing Standard Rack-Mount Brackets into a New Version of the Chassis
Take the following steps to install standard rack-mount brackets into the new version of the chassis shell:
Figure 9 : Standard Rack-Mount Bracket Insertion in a New Version of the Chassis Figure 10 : Standard Rack-Mount Bracket Installation in a New Version of the Chassis
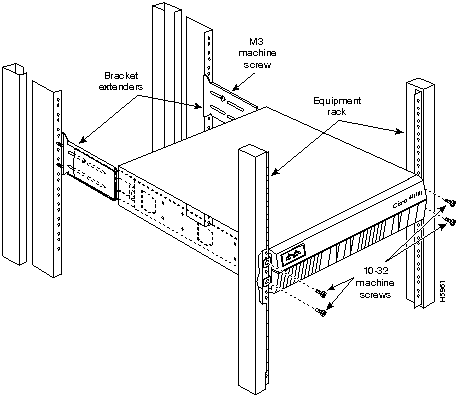
Installing Chassis into a Standard Rack
Take the following steps to install the chassis into a standard rack:
This completes the standard rack-mount procedure.
Figure 11 : Rear Bracket Extenders in a Standard 19-inch Rack Figure 12 : Rack-Mount Bracket Insertion Overview of Telco Rack-Mounting and Wall-Mounting
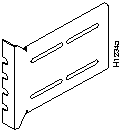
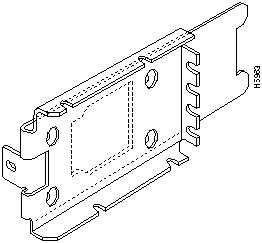
The same brackets are used for both telco rack-mounting and for wall-mounting. (See Figure 13.) After the brackets have been installed into either the old, tab-mount version of the chassis, or the new screw-mount version of the chassis, the chassis is then ready for mounting in either a telco rack or on a wall.
Figure 13 : Telco Rack-Mount or Wall-Mount Bracket If you have an older version of the chassis, use the first of the following procedures to install the telco rack-mount or wall-mount brackets. If you have a new version of the chassis, use the second procedure to install the telco rack-mount or wall-mount brackets. After installing the brackets, use the appropriate procedure to install the chassis in a telco rack or on a wall.
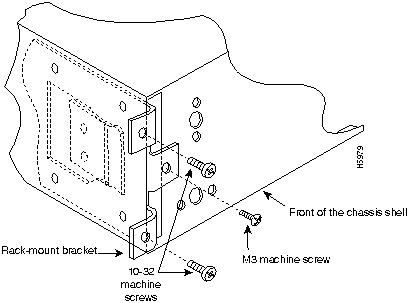
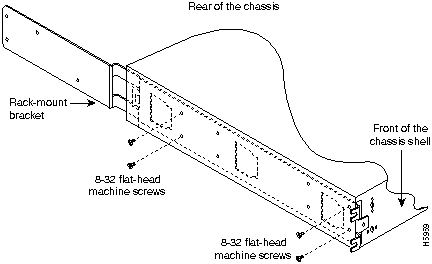
Installing Telco Rack-Mount or Wall-Mount Brackets into an Old Version of the Chassis
Take the following steps to install telco rack-mount or wall-mount brackets into the old version of the chassis:
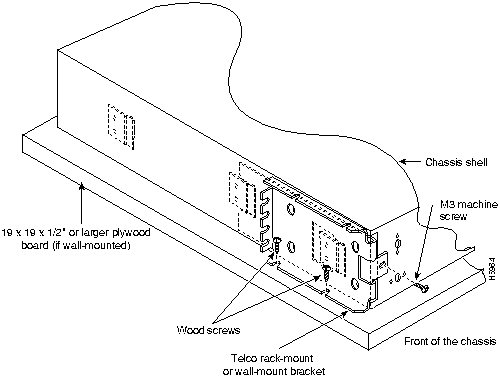
Figure 14 : Screw Locations for Telco Rack-Mount or Wall-Mount Brackets -- Old Version of the Chassis Installing Telco Rack-Mount or Wall-Mount Brackets into a New Version of the Chassis
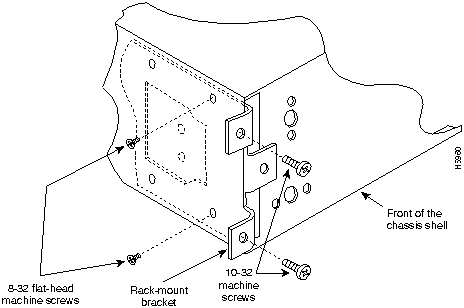
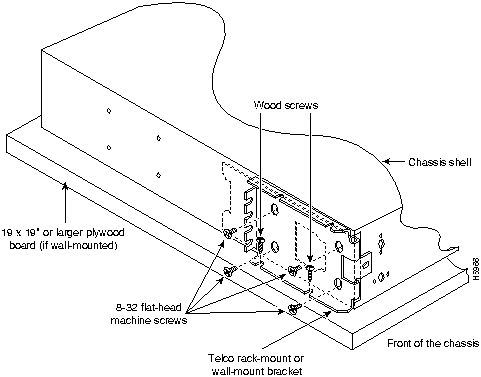
Take the following steps to install telco rack-mount or wall-mount brackets into the new version of the chassis:
Figure 15 : Screw Locations for Telco Rack-Mount or Wall-Mount Brackets -- New Version of the Chassis Mounting the Chassis in a Telco Rack
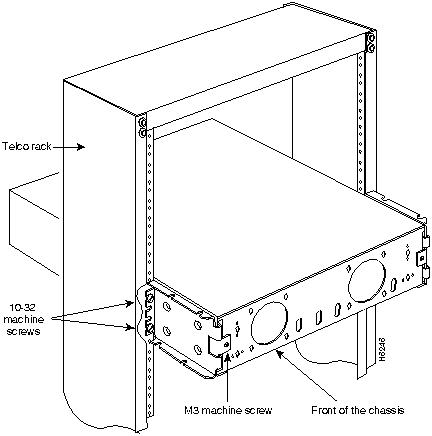
After you have installed the telco rack-mount or wall-mount brackets, take the following steps to mount your system in a telco rack:
This completes the telco rack-mount procedure.
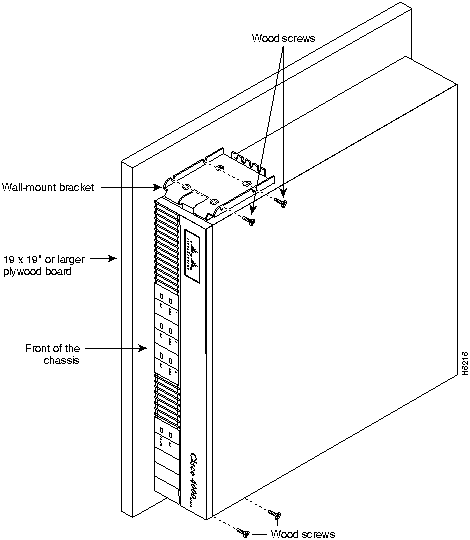
Figure 16 : Telco Rack-Mounted Chassis Mounting the Chassis Shell on a Wall
After you have installed the telco rack-mount or wall-mount brackets, take the following steps to mount your system on a wall:
Figure 17 : Wall-Mounted Chassis This completes the wall-mount procedure.
Cisco Connection Online (CCO), formerly Cisco Information Online (CIO), is Cisco Systems' primary, real-time support channel. Maintenance customers and partners can self-register on CCO to obtain additional content and services.
Available 24 hours a day, 7 days a week, CCO provides a wealth of standard and value-added services to Cisco's customers and business partners. CCO services include product information, software updates, release notes, technical tips, the Bug Navigator, configuration notes, brochures, descriptions of service offerings, and download access to public and authorized files.
CCO serves a wide variety of users through two interfaces that are updated and enhanced simultaneously---a character-based version and a multimedia version that resides on the World Wide Web (WWW). The character-based CCO supports Zmodem, Kermit, Xmodem, FTP, Internet e-mail, and fax download options, and is excellent for quick access to information over lower bandwidths. The WWW version of CCO provides richly formatted documents with photographs, figures, graphics, and video, as well as hyperlinks to related information.
You can access CCO in the following ways:
For a copy of CCO's Frequently Asked Questions (FAQ), contact
Copyright 1988-1996 © Cisco Systems Inc.
![]()
Quantity
Item
2
Rack-mount brackets
2
Short bracket extenders
2
Long bracket extenders
6
M3 machine screws
8
10-32 machine screws
8
8-32 flat-head machine screws
1
Installation diagram
Quantity
Item
2
Telco rack-mount or wall-mount brackets
2
M3 machine screws
4
10-32 machine screws
8
8-32 flat-head machine screws
4
Hex-head wood screws (mounts chassis to plywood board)
1
Installation diagram
![]()
![]()
![]()
![]()
![]()
http://www.cisco.com.
cco.cisco.com.
ccohelp@cisco.com.
For additional information, contact
ccoteam@cisco.com.
tac@cisco.com.
To obtain general information about Cisco Systems, Cisco products, or upgrades, contact 800 553-6387, 408 526-7208, or
csrep@cisco.com.
![]()
![]()
![]()
![]()
![]()
![]()
![]()
![]()