Table of Contents
Installing the Router
Installing the Router
This chapter describes the tasks you must perform to install your system. Sections of this chapter follow:
The router ships with optional rubber "feet." For desktop and wall-mounted chassis, install the feet to provide adequate spacing between the chassis and the supporting surface for proper ventilation. For rack-mounted chassis, do not install the rubber feet if the chassis is to be mounted directly above another chassis in the same rack.
The router system has three mounting options: standard 19-inch rack mount, telco rack mount, or wall mount. The procedures for the different mounting options involve removing the front panel and component tray from the chassis shell and then installing the empty shell in position before reinserting the component tray.
The following tools and parts are required for rack-mount and wall-mount procedures:
- Screwdriver: No. 1 or No. 2 Phillips
- Screwdriver: No. 2 flat-blade
Table 3-1 lists the parts contained in the standard rack-mount kit.
Table 3-1 Standard Rack-Mount Kit Components
| 2 |
Rack-mount brackets |
| 2 |
Short bracket extenders |
| 2 |
Long bracket extenders |
| 6 |
M3 machine screws |
| 8 |
10-32 machine screws |
| 1 |
Installation diagram |
Table 3-2 lists the parts contained in the telco rack-mount/wall-mount kit
Table 3-2 Telco Rack-Mount/Wall-Mount Kit Components
| 2 |
Telco rack-mount/wall-mount brackets |
| 4 |
10-32 machine screws |
| 4 |
Hex-head wood screws for mounting the chassis to a wooden board |
| 4 |
Rubber feet |
| 2 |
M3 machine screws |
| 1 |
Installation diagram |
For wall mounting, the following additional materials are required:
- Plywood board (19" x 19" x 1/2" minimum size)
- Wood fasteners for attaching the board to the wall
Before you can mount the chassis in a rack, you must first remove the front panel and component tray from the chassis shell.
Follow these steps to remove the chassis shell.
- Step 1 Turn OFF the router.
- Step 2 Remove all network and power cables before opening the chassis.
- Step 3 Take ESD precautions as described in the section "Preventing Electrostatic Discharge Damage" in Chapter 2.
- Step 4 To remove the chassis shell, loosen the (nonremovable) screw in the back of the chassis, labeled Chassis release screw in Figure 31.
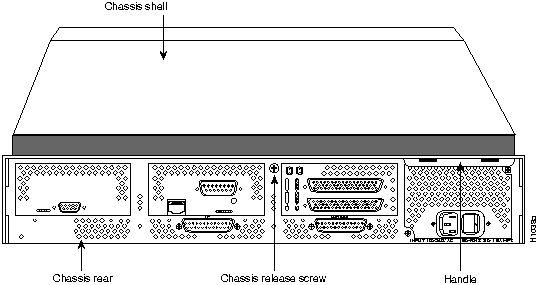
Figure 3-1 Chassis Component Tray Removal
- Step 5 Slide the component tray out of the chassis shell while facing the chassis rear panel, pulling the handle on the right side of the chassis until the safety latch catches. (See Figure 32.)
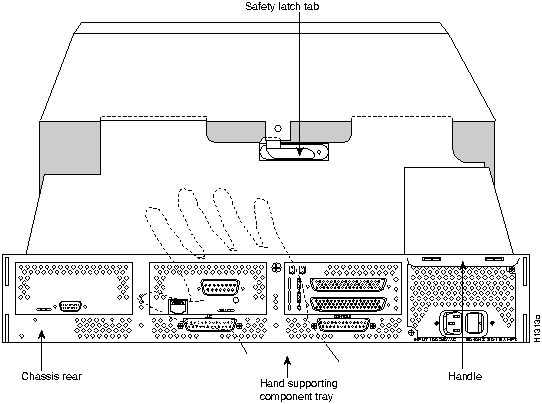
Figure 3-2 Safety Latch Tab Location and Supporting Hand

Warning Before releasing the safety latch, support the component tray from underneath, either on your work surface or with your hand, to prevent it from falling. (See Figure 32.)
- Step 6 While supporting the component tray with one hand, push down on the safety latch tab while pulling out on the component tray.
- Step 7 Set the component tray aside in a safe location.
- Step 8 Proceed to the section "Removing the Chassis Front Panel."
Follow these steps to remove the plastic front panel:
- Step 1 Remove the front panel from the front of the chassis shell by pulling it straight out using both hands. The front panel is held in place by five ball studs.
- Step 2 Set the front panel aside in a safe location.
- Step 3 Proceed to the section "Mounting the Chassis in a Standard Rack" or "Installing the Telco Rack/Wall-Mount Brackets."
After removing the chassis shell and front panel, follow these steps to install the chassis shell into a standard 19-inch rack. The standard 19-inch rack-mount kit (see Figure 33) consists of two sets of one bracket, one short rear bracket extender (approximately 5 inches), and one long rear bracket extender (approximately 10 inches). (See Figure 34 and Figure 35.)
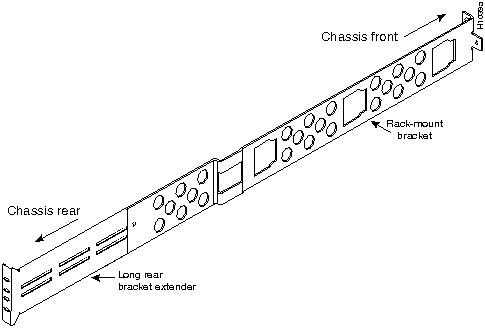
Figure 3-3 Standard Rack-Mount Bracket and Extender
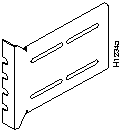
Figure 3-4 Short Rear Rack-Mount Bracket Extender
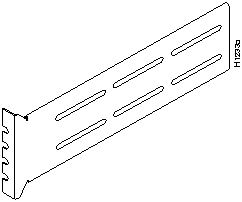
Figure 3-5 Long Rear Rack-Mount Bracket Extender
Follow these steps to install the chassis shell into a standard rack:
- Step 1 On the rear of the rack, insert two 10-32 machine screws through the slots of either the long or the short extenders, appropriate to your equipment rack size, and thread them into the rack-mount threaded holes. (See Figure 36.)
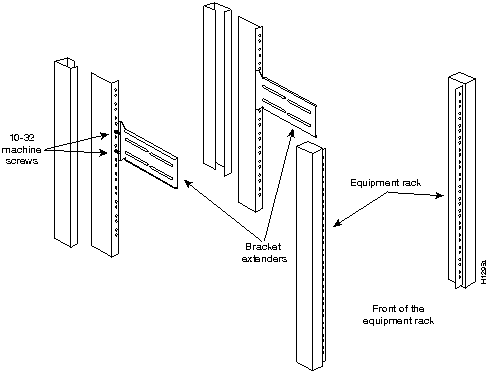
Figure 3-6 Rear Bracket Extenders in a Standard 19-inch Rack
- Step 2 On the chassis shell, insert one rack-mount bracket through the slot on each side of the front and rear of the shell, sliding the rack-mount brackets straight into the shell's inner brackets. (See Figure 37.)
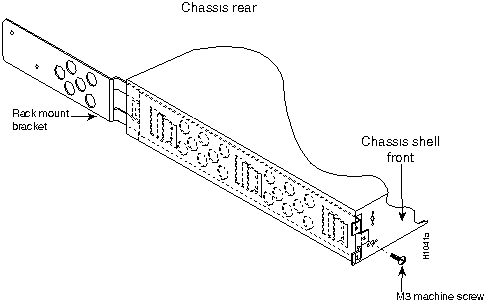
Figure 3-7 Rack-Mount Bracket Insertion (Front View)
- Step 3 Fasten the brackets to each side of the chassis shell with the M3 machine screws provided, one screw per side. (See Figure 38.)
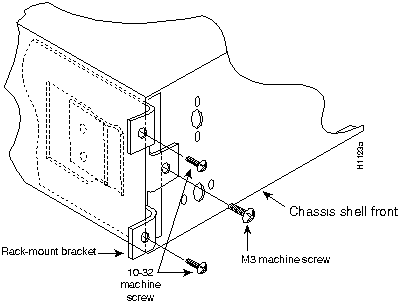
Figure 3-8 Standard Rack-Mount Bracket and Screw
- Step 4 While supporting the chassis shell, slide the rack-mount brackets into the installed rear extenders. The standard rack-mount bracket, extender, and screws fit together as shown in Figure 39.
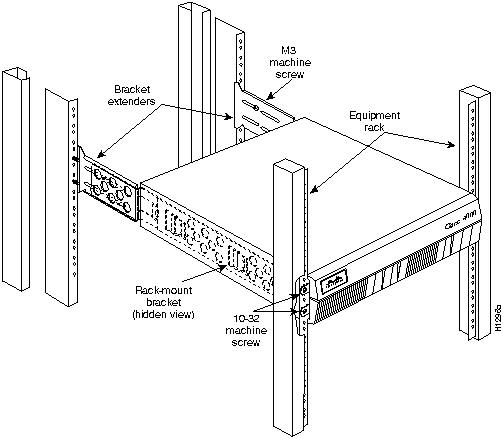
Figure 3-9 Rack-Mount Bracket Insertion
- Step 5 Mount the shell's front to the rack using two 10-32 machine screws on each side of the front brackets.
- Step 6 In the rear of the chassis shell, insert two M3 machine screws on both sides to fasten the brackets and bracket extenders together.
- Step 7 Replace the front panel by inserting the ball studs into their holes.
- Step 8 Proceed to the section "Replacing the Component Tray."
Follow these steps to replace the component tray in the chassis shell:
- Step 1 Reinsert the component tray into the shell.
- Step 2 Push on the back of the tray while at the same time pressing on the chassis release screw (as shown in Figure 31) with the thumb of your right hand.
- Step 3 Retighten the chassis release screw.
This completes the standard rack-mount procedure.
Figure 310 shows the telco rack/wall-mount bracket.

Figure 3-10 Telco/Wall-Mount Bracket
Follow these steps to install the telco/wall-mount bracket into a chassis:
- Step 1 Insert one rack-mount bracket into the slot on each side of the shell, sliding the bracket straight into the shell's inner 2-inch brackets.
- Step 2 Fasten the bracket to the shell on each side with one M3 machine screw (as shown in
Figure 311).
Note Figure 311 shows screw locations for both telco rack and wall-mounting. The wood screw locations apply only to the wall-mount procedures.
- Step 3 Proceed to the section "Mounting the Chassis on a Wall" or "Installing the Chassis in a Telco Rack."
Figure 3-11 Screw Locations for Telco Rack/Wall-Mount Bracket
After removing the chassis shell, removing the front panel, and installing the telco rack/wall-mount brackets, follow these steps to wall mount your system:
- Step 1 Install the wall-mount brackets following the procedures described in the sections "Removing the Chassis Shell and Front Panel" and "Installing the Telco Rack/Wall-Mount Brackets."
- Step 2 Choose the wall on which you will mount the router chassis. When choosing a location, consider cable lengths and limitations, and wall structure. (See Figure 312.)
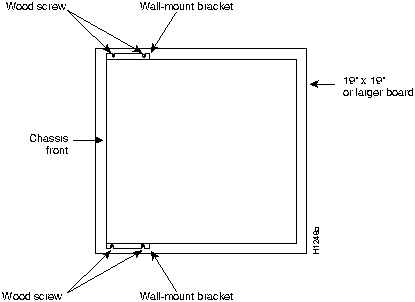
Figure 3-12 Wall-Mounted Router Chassis
- The chassis should be wall mounted with the front and rear of the chassis perpendicular to the floor and at eye level, enabling the reading of the front and rear LED indications. All four mounting screws must be anchored to solid wood.
- Step 3 Attach the four rubber "feet" to the chassis bottom for proper spacing.
- Step 4 Lay the chassis on top of a plywood board (19" x 19" x 1/2" minimum, not supplied). Using the chassis as a pattern, mark or drill the wall-mount screw locations on the board. For the easiest screw insertion, drill the screw locations in preparation for mounting the chassis.
- Step 5 To safely accommodate variations in interior wall construction, locate the wall studs (2" x 4" boards inside a building's walls, commonly spaced 16" apart) and mount the piece of plywood securely to the wall, nailing the board to the studs.
- Step 6 Start the two screws in their places on the bottom of the board, leaving about 1/4" to insert the bracket.
- Step 7 While supporting the chassis shell, insert the lower bracket over the two wood screws in place on the piece of plywood. (See Figure 311.) At the same time, insert one wood screw through the top wall/mount bracket to hold the chassis in place. Follow this by inserting the second top wood screw.
- Step 8 Tighten all wood screws.
- Step 9 Proceed to the section "Replacing the Component Tray."
Follow these steps to replace the component tray in the chassis shell:
- Step 1 Reinsert the component tray into the shell.
- Step 2 Push on the back of the tray while at the same time pressing on the chassis release screw (as shown in Figure 31) with the thumb of your right hand.
- Step 3 Retighten the chassis release screw.
This completes the wall-mount procedure. Proceed to the section "Making External Connections to the Router."
Follow these steps to install the chassis shell in a telco rack, after you install the brackets, removed the front panel, and removed the component tray:
- Step 1 Partially thread two 10-32 machine screws into one side of the telco rack with enough space to allow one side bracket to fit. (See Figure 313.)
- Step 2 While supporting the chassis shell, slip the one side bracket over the two screws in place and thread one screw in on the opposite side's bracket to hold the shell to the telco rack.
- Step 3 Thread the remaining machine screw in and tighten all the screws in place.
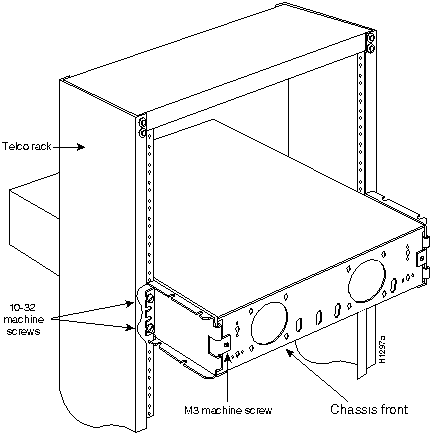
Figure 3-13 Telco Rack-Mounted Chassis
- Step 4 Replace the component tray following the procedure in the section "Replacing the Component Tray." This completes the telco rack-mount procedure.
- Step 5 Proceed to the section "Making External Connections to the Router."

Warning Never operate the router unless the unit is completely closed. This ensures both your safety and adequate cooling.
To prepare for initial startup and configuration, you must attach an RS-232 cable to an ASCII terminal to the system console port, and you must attach the power cord. The console port and auxiliary ports have jackscrews to accommodate cables with thumbscrews. If your cable connection requires it, the jackscrews can be removed.
Follow these steps to connect your system's console port to a terminal:
- Step 1 Ensure that your site meets the site preparation requirements described in the section "Preparing for Installation" in Chapter 2.
- Step 2 If you have not already done so, unpack your system referring to Chapter 2, in the section, "Inspecting the System."
- Step 3 Attach your terminal to the RS-232-C console port with a console cable.
Note Flow control is not possible on the console port; however, you can specify padding for output characters with the EXEC command terminal [no] padding, which sets character padding on the current terminal line. For details on specifying padding, refer to the Router Products Configuration and Reference publication.
Make the network connections by attaching the network interface cables (Token Ring, Ethernet, serial, or FDDI) to the appropriate connector on the network processor modules.
Note If more than one network processor module of a given interface type is used in a system, the lowest unit number of a given interface type is the module closest to the power supply. (See the sections "Slot Numbering" and "Unit Numbering" in Chapter 2.)
- Step 1 Attach the network processor module connector labeled Token Ring to the 9-pin D-type connector of the Token Ring cable. (See Figure 314.)
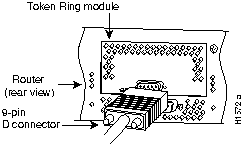
Figure 3-14 Making Token Ring Connections
- Step 2 Attach the IEEE 802.5 connector to your media attachment unit (MAU).
- Step 3 When all the network connections are completed, proceed to the section "Making Final Connections to the Router."
Ethernet network processor modules contain both Ethernet AUI connectors and 10BaseT connectors. Dual Ethernet modules contain two of each type of connector interface.
For single-port Ethernet modules (see Figure 2-6), connect either the Ethernet AUI or the 10BaseT connector, but not both on the same module. For dual-port Ethernet modules (see Figure 2-6), connect either the Ethernet AUI connector or the 10BaseT connector on a given Ethernet port, but not both connectors on the same port.
In Figure 315, the single-port Ethernet module on the left shows an unsupported configuration of two network connections going to two connectors on the same port; the module on the right shows a supported connection with a single 10BaseT cable connecting to a single connector on the port.
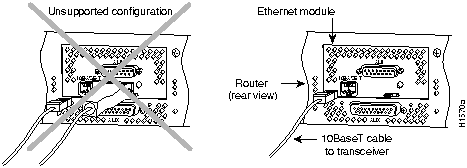
Figure 3-15 Unsupported and Supported Single-Port Ethernet Module Connections
In Figure 316, the configuration on the left, showing two network connections attached to Port 0, is unsupported, while the configuration on the right, which shows two network connections, one to Port 0 and one to Port 1, is supported.
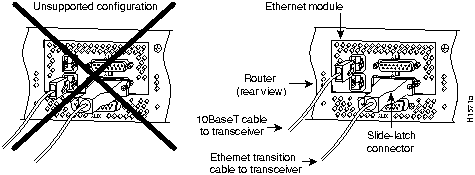
Figure 3-16 Making Dual-Ethernet Module Network Connections
- Step 1 Attach the 15-pin D-type Ethernet port labeled AUI to the Ethernet AUI transition cable. (See Figure 2-7, Figure 2-8, and Figure 2-9 in Chapter 2.)
- Step 2 Attach the slide-latch connector of the same cable to your transceiver or hub.
- Step 3 On a dual-port Ethernet network interface module, repeat for the second port.
- Step 4 The AUI connection is selected by the media command. Use the media command to configure your selection of 10BaseT or AUI. The syntax of the media command follows:
- media--type aui | 10BaseT
- The media command is described in the Router Products Configuration and Reference publication.
- Step 5 When all your network connections are completed, proceed to the section "Making Final Connections to the Router."
Making 10BaseT Connections
- Step 1 Attach the 10BaseT port labeled 10BaseT to the 10BaseT cable. (See Figure 2-7,
Figure 2-8, and Figure 2-9 in Chapter 2.)
- Step 2 Attach the other end of the 10BaseT cable to your network.
- Step 3 On a dual-port Ethernet network interface module, repeat for the second port.
- Step 4 Use the media command to configure your selection of 10BaseT or AUI. (See the section " Making Ethernet AUI Connections.")
- Step 5 When all your network connections are completed, proceed to the section "Making Final Connections to the Router."
The serial connector on all types of the dual serial network interface modules is standard. Use the specific serial transition cable for your modem or channel service unit/digital service unit
(CSU/DSU) connector type. (See Figure 317.)
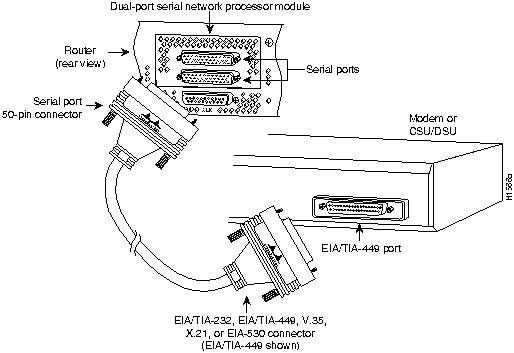
Figure 3-17 Making Serial Connections

Caution For proper router operation, both ends of the RS-232 serial DCE cable, and any cable attached to it, must be connected. If this cable must be detached, detach the router end first. If the end away from the router is disconnected, the line connection will "flap." The interrupts generated from such a condition could cause the router to shut down.
- Step 1 Attach the synchronous serial ports of the serial network interface modules to the 50-pin ends of your serial transition cables. (See Figure 317.)
- Step 2 Attach the RS-232, RS-449, V.35, X.21, or EIA-530 end of the cable to the channel service unit/data service unit (CSU/DSU) or modem.
- Step 3 When all your network connections are completed, proceed to the section "Making Final Connections to the Router."
Follow these procedures to make Fiber Distributed Data Interface (FDDI) connections.
Dual Attachment FDDI Connections
Connect a dual attachment FDDI module as follows:
- Step 1 To connect to a dual attachment station (DAS), connect PHY A on the FDDI module (the bottom port) to PHY B on the other DAS using a multimode fiber-optic cable. (See Figure 318.)
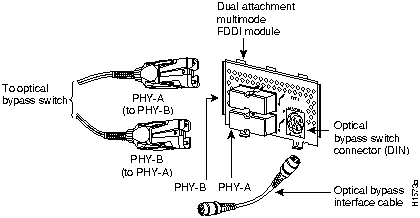
Figure 3-18 Dual Attachment FDDI Connections
- Step 2 Connect PHY-B on the FDDI module (the top port) to PHY-A on the other DAS.
- Step 3 When all your network connections are complete, proceed to the section "Connecting to an Optical Bypass Switch."
Single Attachment FDDI Connections
- Step 1 Using a multimode fiber-optic cable, connect the single attachment module's PHY-S port through a concentrator to a single attachment ring, or connect it point-to-point directly to another device. (See Figure 319.)
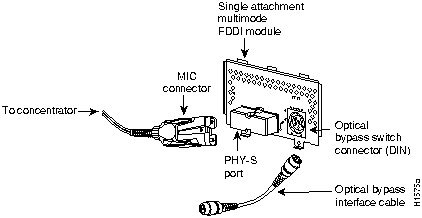
Figure 3-19 Making Single Attachment Multimode FDDI Connections
- Step 2 When all your network connections are complete, proceed to the section "Connecting to an Optical Bypass Switch."
To connect the FDDI module to an external optical bypass switch (not included), use the optical bypass interface cable included with the module.
- Step 1 Connect one end of the optical bypass interface cable to the six-pin circular Deutsche Industrie-Norm (DIN) connector on the FDDI module panel. (See Figure 318 and Figure 319).
- Step 2 Connect the other end of the optical bypass interface cable to the optical bypass switch.
- Step 3 Proceed to the section "Making Final Connections to the Router."

Warning Before conducting any of the following procedures, ensure that power is removed from the DC circuit. To ensure that all power is OFF, locate the circuit breaker on the panel board that services the DC circuit, switch the circuit breaker to the OFF position, and tape the switch handle of the circuit breaker in the OFF position.
Note The installation must comply with the 1993 National Electric Code (NEC).
If you ordered a Cisco 4000 series router with a DC-input power supply, follow the directions in this section for proper wiring.
For identification purposes,Figure 320 shows a Cisco 4000 series router with a DC-input power supply; Figure 321 shows a Cisco 4000 series router with an AC-input power supply.
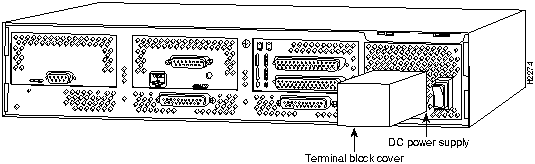
Figure 3-20 Cisco 4000 DC-Input Power Supply---Rear View
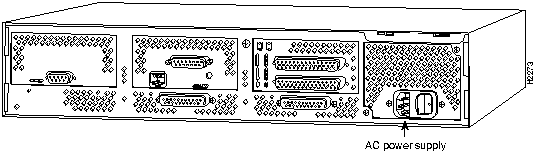
Figure 3-21 Cisco 4000 AC-Input Power Supply---Rear View
Figure 322 shows the Cisco 4000 DC-input power supply terminal block. Follow these procedures for wiring the terminal block.
- Step 1 Feed the wires through the rubber grommet in the terminal block cover.
- Step 2 Attach the appropriate lugs at the wire end of the power supply cord.
- Step 3 Wire the DC-input power supply to the terminal block as shown in Figure 322. The proper wiring sequence is ground to ground, positive to positive, and negative to negative.
 Caution Do not overtorque the terminal block captive thumbscrew or terminal block contact screws. The recommended torque is 8.2 ± 0.4 inch-lb.
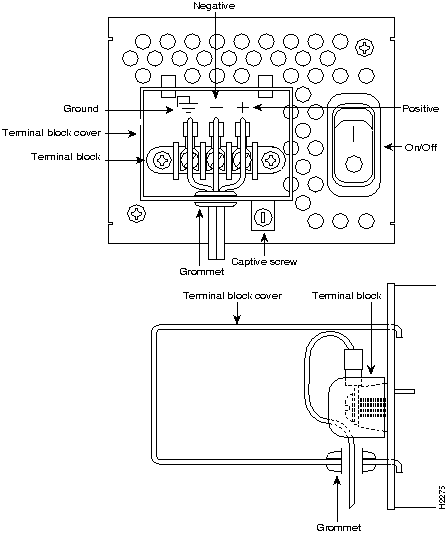
Figure 3-22 DC-Input Power Supply Connections

Warning After wiring the DC-input power supply, replace the terminal block cover and screw to ensure user safety.
- Step 4 Remove the tape from the circuit breaker switch handle and restore power by moving the circuit breaker handle to the ON position.
 Caution To avoid damaging the power supply when returning the chassis to the manufacturer (for example, if a failure occurs), remove the power supply terminal block cover so that it will fit in the shipping container.
This completes the procedure for wiring the DC-input power supply.
Follow this procedure to make the final connections to the router:
- Step 1 Plug the system power cord into a 3-terminal, single-phase power source that provides power within the acceptable range (200W, 85 to 264 VAC, 50 to 60 Hz or 40 to 72 VDC).
- Step 2 Turn ON the system power switch. The LED on the front marked Power should light. (See Figure 11.)
- Step 3 Verify that the OK light located on the right side of the front panel (see Figure 11) goes ON after a few seconds delay.
Your configuration can be designated with either the setup command facility or with the configuration command. For more information on software commands, refer to the appropriate software publications.
Copyright 1988-1995
©
Cisco Systems Inc.