|
|

Configuring and Testing PIX Firewall
You can configure PIX Firewall by entering commands on your console computer or terminal that are similar in context to those you use with Cisco routers.
Help information is available by entering a question mark by itself for a listing of all commands, or with a command for command syntax. For example:
pixfirewall> int ?
usage: interface ethernet inside|outside 10baseT|100baseTX|auto
You can abbreviate most commands down to the fewest unique characters for a command; for example, you can enter write t to view the configuration instead of entering the full command write terminal, or you can enter en to start privileged mode and conf t to start configuration mode.
Configuring PIX Firewall consists of the following steps:
The configuration is now complete.
Connecting to the PIX Firewall
You can configure the PIX Firewall from the console or across the network with either Telnet or from a network browser such as Netscape Navigator. Before entering commands on the console, you need to have connected a workstation to the console port and started a modem program so that you can enter the initial configuration commands.
Before you can use Telnet, you need to enter the telnet command. Before you use a network browser, enter the http command. After you add these commands to the configuration, you can perform configuration remotely across the network.
To start a console session, connect the console cable and start a terminal program such as Procomm. Set the baud rate to 9600, use 8 data bits, and no parity. Set the initialization string as follows so that the terminal program will communicate directly to the PIX Firewall instead of another modem:
Initially Configuring the PIX Firewall
Access configuration mode and enter the following commands to initially configure the firewall:
Alternatively, you can enter lines 1 through 4 and then complete your configuration with a network browser and the HTTP configuration feature of PIX Firewall. Refer to the next section "Configuring with HTTP." The use of the HTTP configuration feature also requires you to enter the http command as explained in "Configuring with HTTP."
Line 1 indicates that you are using an Intel 10/100 automatic speed sensing network interface card. This statement and that in line 2 set the interface speed. If your system contains 3Com Ethernet boards, replace auto with 10baseT. If your system contains Token-Ring cards, replace ethernet with token and auto with either 4mbps or 16mbps.
Lines 3 and 4 assign the IP addresses to the inside and outside network interface cards.
Line 5 disables network address translation until you can configure the system as required.
Line 6 assigns a pool of NIC-registered IP addresses for use by outbound connections. Enter a class address such as this example address of 192.168.42.0 to assign IP addresses 192.168.42.1 through 192.168.42.254.
Lines 7 and 8 let you assign default routes to the inside and outside network interfaces. If your system lets routers advertise default routes, these lines can be omitted.
Line 9 exits configuration mode and line 10 writes the current configuration to flash memory.
PIX Firewall provides a graphical user interface to help simplify configuration tasks. Once you have specified the network interface speed and IP addresses (as described in the last section), you need to enter two additional commands and you can then use a network browser, such as Netscape, to complete the configuration.
To access PIX Firewall from a network browser, enter these commands to specify an access password and your workstation's IP address and network mask:
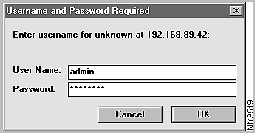
At your workstation, start a network browser. Then open a URL and specify the IP address of the PIX Firewall's inside IP address.
The network browser then prompts you for a user name and password as shown in Figure 3-1.
Figure 3-1 : HTML Management Interface User Name and Password Prompt
Always use admin for the user name and enter the password you specified with the passwd command.
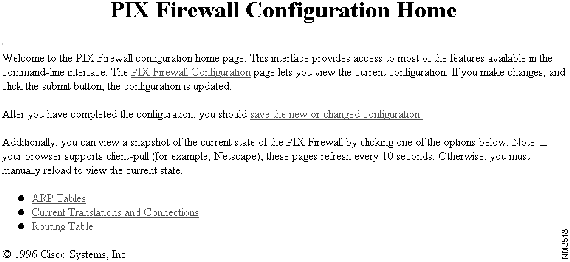
The main configuration screen then appears as shown in Figure 3-2.
Figure 3-2 : HTML Management Interface Configuration Screen
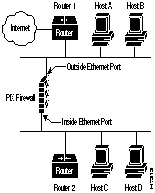
The troubleshooting information in this section is based on Figure 3-3.
Figure 3-3 : Example Network Setup
Use the steps that follow to determine that your PIX Firewall is ready for use.
Once your initial configuration is complete and tested, you should add commands to tailor the configuration for your site.
Table 3-1 lists configuration commands by PIX Firewall features.
Table 3-1 : Configuration Commands by PIX Firewall Feature
Observe the following guidelines during configuration:
Copyright 1988-1996 © Cisco Systems Inc.
ATE1V1X4Q0&C1&D2 S7=255 S0=0^M
pixfirewall(config)# passwd access_password
pixfirewall(config)# http ip_address network_mask
Feature
Command
Access Mode
ARP cache:
arp
clear arp-cache
Configuration
Privileged
Configuration:
conf floppy
write floppy
write term
Privileged
Privileged
Privileged
Ethernet, configure
interface ethernet 10baseT
Configuration
Failover cable (optional):
failover
failover active
no failover active
show failover
Configuration
Configuration
Configuration
Unprivileged
Fast Ethernet, configure
interface ethernet auto
Configuration
Flash memory access:
write erase
show configuration
reload
write memory
Privileged
Privileged
Privileged
Privileged
Floppy disk access:
configure floppy
write floppy
Privileged
Privileged
IP address, set
ip address
Configuration
Private Link
age
link and linkpath
lnko and lnkopath
Configuration
Configuration
Configuration
Processes, show thread information
show processes
Unprivileged
Prompt host name, change
hostname
Configuration
RIP listening, enable or disable
rip
Configuration
Routing table:
ip route
show ip route
Configuration
Unprivileged
Syslog:
show ip address
syslog console
show syslog
syslog output
syslog host
Unprivileged
Configuration
Unprivileged
Configuration
Configuration
Token Ring interface, configure
interface token
![]()
![]()
![]()
![]()
![]()
![]()
![]()
![]()