
Table of Contents
Installing and Configuring CiscoWorks
Installing and Configuring CiscoWorks
You use the System Management Interface Tool (SMIT), an IBM AIX system administration facility, to install and configure CiscoWorks from a local or remote CD-ROM drive. The example installation and configuration process described in this chapter uses the graphical user interface (GUI) version of SMIT; you can use the ASCII version called SMITTY, if you prefer. Refer to your IBM documentation for more information about SMIT and SMITTY.
Note SMIT and this guide refer to the software product as CiscoWorks 3.0.
In the process of installing and configuring CiscoWorks for NetView for AIX, you do the following:
- Use SMIT to mount the CiscoWorks CD-ROM on the local file system from a local or remote CD-ROM drive
- If you are upgrading from CiscoWorks 2.1, de-install the old product but save the network management data in the Sybase database for use with CiscoWorks 3.0.
- Use SMIT to install CiscoWorks 3.0 for AIX from CD-ROM
- Use SMIT to configure CiscoWorks and its underlying Sybase database
- Clean up (unmount the CD-ROM, de-install the old Sybase database management system, and remove log files)
After completing these procedures, go to the next chapter, "Validating CiscoWorks Installation," to test and configure the newly installed software.
Note The figures in this chapter are taken from SMIT on AIX 3.2.5. If your system is running AIX 4.1, the SMIT screens corresponding to Figures 3-1, 3-2, and 3-3 are slightly different. Refer to CiscoWorks on AIX Release Note for other cautionary statements about the installation and configuration process.
You can install CiscoWorks from a CD-ROM drive attached to your system or from a drive connected to a remote system. You must first use SMIT to mount the local or remote device on the local AIX system.

Caution Avoid exposing the CiscoWorks CD-ROM to direct sunlight because it might harm the contents.
To mount the CD-ROM on the filesystem from a local CD-ROM drive, use SMIT to perform the following steps:
- Step 1 Place the CD-ROM into its caddy and insert it into the CD-ROM drive.
- Step 2 Log in as the root user.
- For details, see "Becoming the Root User" in the chapter "Preparing to Install CiscoWorks."
- Step 3 Start SMIT by entering the following at the command prompt:
hostname# smit
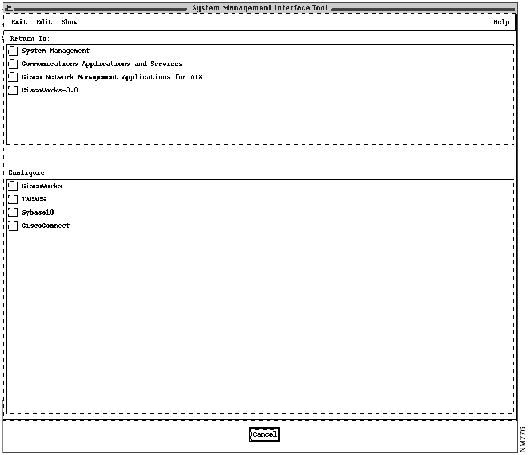
- The main SMIT menu appears, as shown in Figure 3-1.
Figure 3-1 Main SMIT Menu
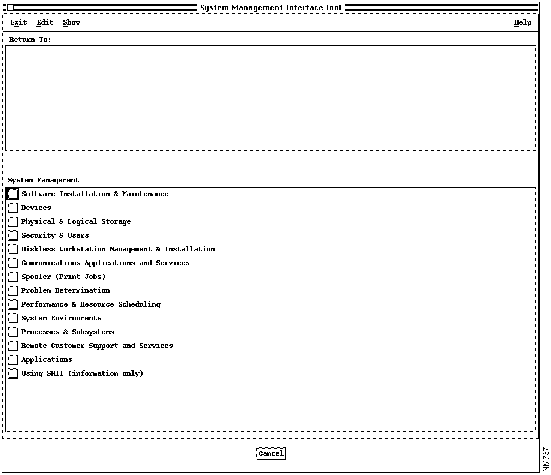
- Step 4 From the System Management menu, select Physical & Logical Storage.
- Step 5 Select File Systems.
- Step 6 Select Add/Change/Show Delete File Systems.
- Step 7 Select CDROM File Systems.
- Step 8 Select Add a CDROM File System.
- Step 9 Click the "DEVICE name" List button and select the device name (such as /dev/cd0) from the list that appears.
- Step 10 Enter the name of a mount point directory (such as /cdrom) in the "Mount point" field.
- Step 11 Click Do and read the output.
- If you have already performed this procedure, or if another device is already mounted on the mount point, the process will fail.
- Step 12 Click Done.
- Step 13 Terminate SMIT by pressing F12 or by clicking Exit SMIT on the Exit menu.
- Step 14 Enter the following at the command prompt:
hostname# smit mountfs
- Step 15 Click the "FILE SYSTEM name" List button and select a device name (such as /dev/cd0) from the list that appears.
- Step 16 In the "DIRECTORY over which to mount" field, enter the name of a mount point directory (such as /cdrom).
- Step 17 Click the "TYPE of file system" List button and select cdrfs as the file system type.
- Step 18 Set the Mount as Read-Only System field to yes.
- Step 19 Click Do and read the output, and then click Done.
- Step 20 Terminate SMIT by pressing F12 or by clicking Exit SMIT on the Exit menu.
To install software from a device on a remote system, you must have remote access rights to that system. Specifically, the .rhosts file (in the root directory) on the remote system must contain the local host name and your username to access the remote system. For more information, refer to the manual (man) page for .rhosts..
Installation of CiscoWorks does not require any disk space on the remote system. The software is copied across the network to the local workstation.
To mount the CD-ROM on the local file system from a remote CD-ROM drive, perform the following steps on the remote system:
- Step 1 Place the CD-ROM into its caddy and insert it into the CD-ROM drive.
- Step 2 Log in as the root user.
- For details, see "Becoming the Root User" in the chapter "Preparing to Install CiscoWorks."
- Step 3 Start SMIT by entering the following at the command prompt:
hostname# smit
- The main SMIT menu appears, as shown in Figure 3-1.
- Step 4 From the System Management list, select Physical & Logical Storage.
- Step 5 Select File Systems.
- Step 6 Select Add/Change/Show Delete File Systems.
- Step 7 Select CDROM File Systems.
- Step 8 Select Add a CDROM File System.
- Step 9 Click the "DEVICE name" List button and select the device name (such as /dev/cd0) from the list that appears.
- Step 10 Enter the name of a mount point directory (such as/cdrom) in the "Mount point" field.
- Step 11 Click Do and read the output.
- If you have already performed this procedure, or if another device is already mounted on the mount point, the process will fail.
- Step 12 Click Done.
- Step 13 Terminate SMIT by pressing F12 or by clicking Exit SMIT on the Exit menu.
- Step 14 Enter the following at the command prompt:
hostname# smit mountfs
- Step 15 Click the "FILE SYSTEM name" List button and select a device name (such as /dev/cd0) from the list that appears.
- Step 16 In the "DIRECTORY over which to mount" field, enter the name of a mount point directory (such as /cdrom).
- Step 17 Click the "TYPE of file system" List button and select cdrfs as the file system type.
- Step 18 Set the Mount as Read-Only System field to yes.
- Step 19 Click Do and read the output, and then click Done.
- Step 20 Terminate SMIT by pressing F12 or by clicking Exit SMIT on the Exit menu.
- Step 21 Enter smit mknfsexp at the command prompt.
- Step 22 Enter the "PATHNAME of directory to export" (such as /cdrom).
- Step 23 Use the arrow keys to change the Mode to Export Directory field to read-only.
- Step 24 Enter the appropriate information, if necessary, into any of the other fields.
- Step 25 Click Do, read the output, then click Done.
- Step 26 Terminate SMIT by pressing F12 or by clicking Exit SMIT on the Exit menu.
Perform the following steps on the local system:
- Step 1 Log in as the root user.
- For details, see "Becoming the Root User" in the chapter "Preparing to Install CiscoWorks."
- Step 2 Enter the following at the command prompt:
hostname# mount remote_hostname:remote_exported_filesystem_name local_mount_point
- For example, to mount a remote filesystem named zen, enter the following at the prompt:
hostname# mount zen:/cdrom /cdrom
- The CD-ROM is ready for installation of software.
Before installing CiscoWorks 3.0, you must first de-install CiscoWorks 2.1. When upgrading, however, you typically want to preserve the Sybase data from CiscoWorks 2.1 rather than enter it again into CiscoWorks 3.0. After performing one of the following de-installation procedures, go to "Installing CiscoWorks."
Note The following de-installation procedures describe SMIT's behavior during de-installation of CiscoWorks 2.1. SMIT's de-installation procedure after installation of CiscoWorks 3.0 is different, and is covered under "De-Installing CiscoWorks 3.0" in the chapter "Periodic Maintenance of CiscoWorks."
Even when upgrading to CiscoWorks 3.0 (which includes Sybase 10, a new version of the database management system), you typically want to preserve the older network management data stored by Sybase 4.9. If upgrading, perform these steps to de-install the base CiscoWorks product and preserve the Sybase 4.9 data.
- Step 1 Log in as the root user.
- For details, see "Becoming the Root User" in the chapter "Preparing to Install CiscoWorks."
- Step 2 Start SMIT by entering the following at the command prompt:
hostname# smit
- Step 3 On the System Management menu, select Communications Applications and Services.
- Step 4 On the next menu, select CiscoWorks for AIX.
- Step 5 On the next menu, select Maintain.
- Step 6 In the Maintain dialog, select Remove CiscoWorks Base Product.
- Step 7 In response to the "ARE YOU SURE?" prompt, click OK.
- This series of steps causes de-installation of the base CiscoWorks 2.1 product, but not Sybase 4.9 data.
- During a subsequent installation procedure, you are instructed how to upgrade the Sybase 4.9 data to be compatible with the Sybase 10 software that will be installed.
- Step 8 Read the output, then click Done.
- Step 9 Terminate SMIT by pressing F12 or by clicking Exit SMIT on the Exit menu.

Caution Under unusual circumstances only, you upgrade CiscoWorks 2.1 to CiscoWorks 3.0 without retaining the old network management data maintained by Sybase 4.9. The following procedure de-installs the entire CiscoWorks 2.1 product, including all network management data stored by Sybase 4.9.
- Step 1 Log in as the root user.
- For details, see "Becoming the Root User" in the chapter "Preparing to Install CiscoWorks."
- Step 2 Start SMIT by entering the following at the command prompt:
hostname# smit
- Step 3 On the System Management menu, select Communications Applications and Services.
- Step 4 On the next menu, select CiscoWorks for AIX.
- Step 5 On the next menu, select Maintain.
- Step 6 In the Maintain dialog, select Remove CiscoWorks for AIX program.
- Step 7 In response to the "ARE YOU SURE?" prompt, click OK.
- This series of steps causes de-installation of the entire product, including the Sybase 4.9 data.
- Step 8 Read the output, then click Done.
- Step 9 Terminate SMIT by pressing F12 or by clicking Exit SMIT on the Exit menu.
Installation is the transfer of software from the distribution medium to the AIX system.
Note Before performing these procedures, you must have mounted a local or remote CD-ROM as described earlier.
 Caution CiscoWorks can be installed only in the /usr/nms directory. If you create a filesystem, its mount point must be /usr/nms. If /usr/nms already exists on your system, you must back up all the data in that directory before installing CiscoWorks. Installation of CiscoWorks overwrites any existing data.
To install CiscoWorks from a mounted CD-ROM drive, perform the following steps:
- Step 1 Place the CD-ROM into its caddy and insert it into the local or remote CD-ROM drive.
- Step 2 Log in as the root user.
- For details, see "Becoming the Root User" in the chapter "Preparing to Install CiscoWorks."
- Step 3 Start SMIT by entering the following at the command prompt:
hostname# smit
- Step 4 On the System Management menu, select Software Installation & Maintenance.
- Step 5 On the next menu, select Install / Update Software.
- Step 6 On the next menu, select Install / Update Selectable Software (Custom Install)
- Step 7 On the next menu, select Install Software Products at Latest Available Level.
- Step 8 On the next menu (AIX 4.1 only), select Install New Software Products at Latest Level.
- Step 9 In the Install Software Products at Latest Available Level dialog (shown in Figure 3-2), enter the source of CiscoWorks 3.0 software.
Figure 3-2 Install Software Products at Latest Available Level Dialog
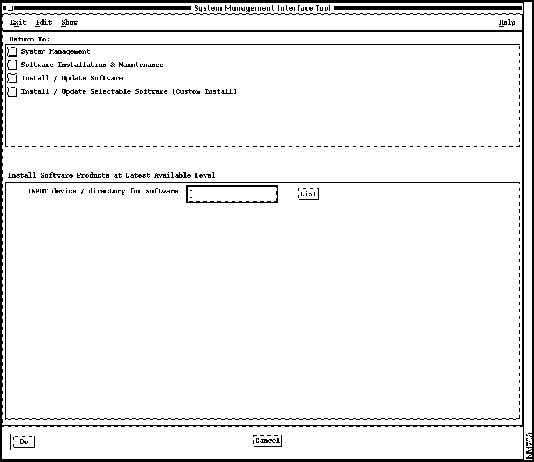
- Click the List button, then click the name of the CD-ROM device on which you loaded the CD-ROM in Step 1.
- Step 10 Click Do.
- The Install Software Products at Latest Available Level dialog displays additional fields as shown in Figure 3-3.
Figure 3-3 Install Software Products at Latest Available Level Dialog
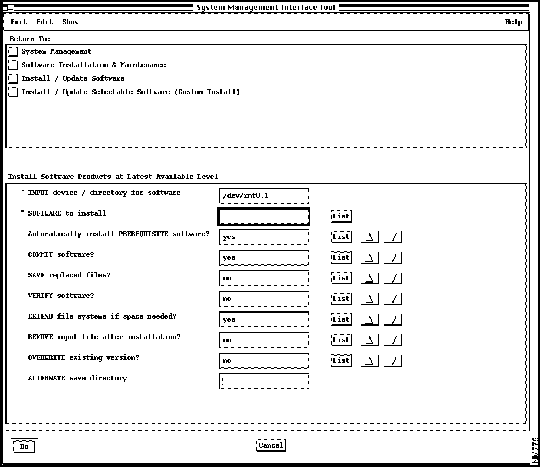
- Step 11 Click the List button next to the "SOFTWARE to install" field. After a brief delay, the Multi-Select List dialog appears, as shown in Figure 3-4.
Figure 3-4 Multi-Select List Dialog
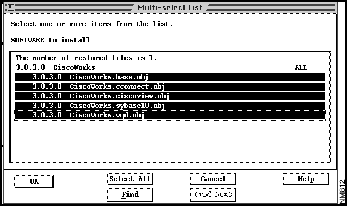
- Step 12 Click all CiscoWorks modules in the list so that all are simultaneously highlighted:
- CiscoWorks.base.obj
- CiscoWorks.ciscoconnect.obj
- CiscoWorks.ciscoview.obj
- CiscoWorks.sybase10.obj (Omit this module only if your AIX system already has the Sybase database management system.)
- CiscoWorks.wgd.obj

Timesaver Clicking on the CiscoWorks All line accomplishes the same task as Step 12.
- Step 13 Click OK and then click Do.
- Step 14 In response to the "ARE YOU SURE?" prompt, click OK when you are sure you want to install the modules you just highlighted.
- While the animated man is running, SMIT installs the selected modules in the /usr/nms directory, and CiscoWorks modifies SMIT to allow subsequent configuration and de-installation of CiscoWorks.
- If the man raises his hands and SMIT displays OK, the process has succeeded.
- If the man falls on his face, installation has failed. If the reason is not apparent, read the installation log file $HOME/smit.log or /usr/nms/install/cw_install.log and supply it to a Cisco Technical Assistance Center (TAC) representative.
- Step 15 Click Done.
- Step 16 If Step 14 indicated success, click the Return to System Management button and go to the following section, "Configuring CiscoWorks."
- In the event of failure, terminate SMIT by pressing F12 or by clicking Exit SMIT on the Exit menu.
Configuring CiscoWorks 3.0 for AIX is a four-part process:
- Configuring the CiscoWorks product---a set of network management applications.
- Configuring the TACACS server---(optional). The Terminal Access Controller Access System is a security tool that examines user ID and password pairs and can limit login attempts. As a TACACS server, this system can serve as a logging facility for TACACS-enabled Cisco devices.
- Configuring Sybase for CiscoWorks---the database management system used by CiscoWorks.
- Configuring CiscoConnect---(optional). CiscoConnect is a Mosaic interface between CiscoWorks and Cisco Connection Online (CCO) that enables automatic submission of e-mail to the Cisco Technical Assistance Center (TAC).
Note Before performing these procedures, you must have completed the installation process.
To configure the CiscoWorks product, perform the following steps:
- Step 1 Start SMIT if you have not already done so:
hostname# smit
- Step 2 On the initial SMIT menu, click Communications Applications and Services.
- Step 3 On the next menu, click Cisco Network Management Applications for AIX.
- Step 4 On the next menu, click CiscoWorks 3.0.
- Step 5 On the CiscoWorks 3.0 menu, click Configure.
- The Configure menu appears, as shown in Figure 3-5.
Figure 3-5 Configure Menu
- Step 6 Select CiscoWorks.
- The Configure CiscoWorks Product dialog appears, as shown in Figure 3-6.
Figure 3-6 Configure CiscoWorks Product Dialog
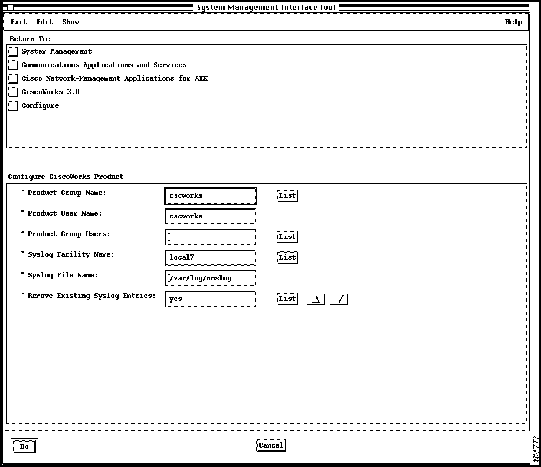
- Step 7 Accept the defaults, or type values into each of the following fields.
- Product Group Name---Name of the AIX group of which users must be members to use CiscoWorks. Click the List button to select one or more names from a list.
- Product User Name---AIX username assigned to the CiscoWorks application itself.
- Product Group Users---Set of users who belong to the product group in the previous item. Click the List button to select one or more names from a list.
- Syslog Facility Name---Facility to be used for logging messages. The default facility, local7, logs messages from CiscoWorks and from managed Cisco devices. Any other facility named in this field logs only CiscoWorks messages.
- Syslog File Name---File in which messages are logged.
- Remove Existing Syslog Entries---Specifies whether you want to prevent other applications from using the facility named in the Syslog Facility Name field (such as local7). If you do not prevent other applications from using the named facility, messages from other applications might appear in the log file. Click the List button or arrow buttons to select yes or no.
- Step 8 Click Do, wait for the process to complete, and read the output.
- Step 9 Click Done, and then Cancel.
If TACACS is enabled on the devices to be managed by CiscoWorks, or if this AIX host will serve as a TACACS server, configure the TACACS server now.
- Step 1 On the Configure menu, click TACACS.
- The Configure TACACS Server dialog appears, as shown in Figure 3-7.
Figure 3-7 Configure TACACS Server Dialog

- Step 2 Accept the defaults, or type values into each of the following fields.
- TACACS login name---Username to be used by CiscoWorks for logging in to managed Cisco devices when TACACS is enabled on those devices.
- Password for the above TACACS login---Password to be used with the username.
- Enable Password for Extended TACACS---If set to NONE (the default), CiscoWorks does not access Cisco devices in extended TACACS mode. If set to anything other than NONE, CiscoWorks accesses Cisco devices in extended mode and uses the fixed login name $enable$ plus the password specified here.
- Is your system going to be a TACACS server---Specifies whether this AIX host is a TACACS server. Click the List button or arrow buttons to specify yes or no.
- Step 3 Click Do and read the output.
- Step 4 Click Done, and then Cancel.
To configure the Sybase database management system for use with CiscoWorks, perform the following steps:
- Step 1 On the Configure menu, click Sybase10.
- The Sybase10 menu appears, as shown in Figure 3-8.
Figure 3-8 Sybase10 Menu
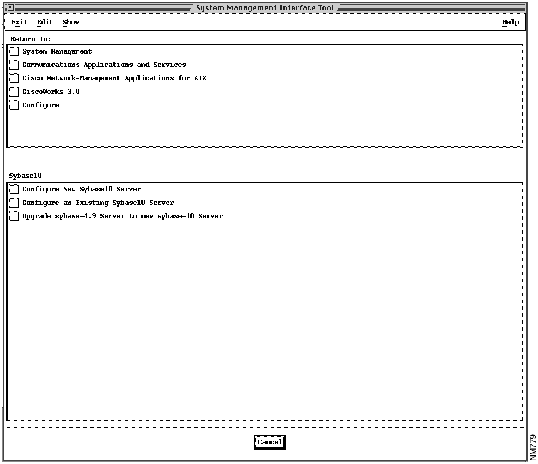
- Step 2 Click the configuration method appropriate for your situation.
- Configure New Sybase10 Server. Click this button if this is a first-time installation and configuration process (not an upgrade from CiscoWorks 2.1) and if you have not configured Sybase 10 for the first time.
- Configure an Existing Sybase10 Server. Click this button if this installation of CiscoWorks will utilize an existing Sybase 10 server (and you did not install Sybase 10 from the distribution medium).
- Update sybase-4.9 Server to new sybase-10 Server. Click this button if this is an upgrade from CiscoWorks 2.1 to CiscoWorks 3.0 and you have chosen to preserve Sybase 4.9 data for use with the new Sybase 10 software. During a CiscoWorks upgrade, this is the typical selection.
- Step 3 Accept the defaults or enter new values into the fields of the dialog that appears. The dialogs and their fields are:
- Configure New Sybase10 Server fields:
- Sybase 10 Home Directory---Path name of the Sybase 10 database management system
- Polldb data device size---Size of the polling database in megabytes
- polldb data device location---Path of the polldb data device
- polldb log device location---Path name of the polldb log device
- This configuration method automatically assigns the Sybase system administrator's password to be sybasesa.
- Configure an Existing Sybase10 Server fields:
- Sybase 10 Home Directory---Path name of the Sybase 10 database management system
- Sybase10 Server-name---Name of the Sybase 10 server program
- Sybase10 Server SA password---Sybase 10 system administrator's password for access to the server
- CiscoWorks `nms' database name---Name of the database in which CiscoWorks stores network management information
- CiscoWorks `polldb' database name---Name of the database in which CiscoWorks stores polling data
- Polldb data device size---Size of the polling database
- polldb log device location---Path name of the polldb log device
- polldb data device location---Path name of the polldb data device
- Update sybase-4.9 Server to sybase-10 Server fields:
- Sybase4.9 Home Directory---Path name of the Sybase 4.9 database management software.
- Sybase4.9 Server name---Name of the Sybase 4.9 server program.
- Sybase4.9 Server SA password---Sybase 4.9 system administrator's password for access to the server. The default NONE means nonexistent.
- Sybase4.9 nms database name---Name of the CiscoWorks network management database that was used under Sybase 4.9.
- Sybase10 Home Directory---Path name of the Sybase 10 database management software.
- Polldb data device size---Size of the polling database.
- Polldb data device location---Path name of CiscoWorks polldb database.
- polldb log device location---Path name of the polldb log device.
- Step 4 After selecting and completing the fields of one category above, click Do and read the output.
- Step 5 Click Done, and then click Cancel twice.
To configure CiscoConnect, perform the following steps:
- Step 1 On the Configure menu, click CiscoConnect.
- The CiscoConnect dialog appears, as shown in Figure 3-9.
Figure 3-9 CiscoConnect Configuration Dialog
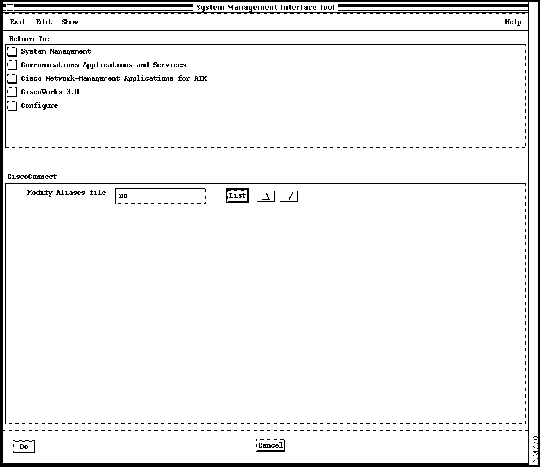
- Step 2 Set the "Modify Aliases file" field to yes if you want to do either of the following in the next dialog:
- Specify that your system uses an e-mail aliases file other than the default /etc/aliases
- Override the default e-mail name ciscoconnect-client for communication with the Cisco TAC.
- Click the List button or arrow buttons to select yes or no.
- Step 3 Click Do.
- The CiscoConnect characteristics dialog appears, as shown in Figure 3-10.
Figure 3-10 CiscoConnect Characteristics Dialog
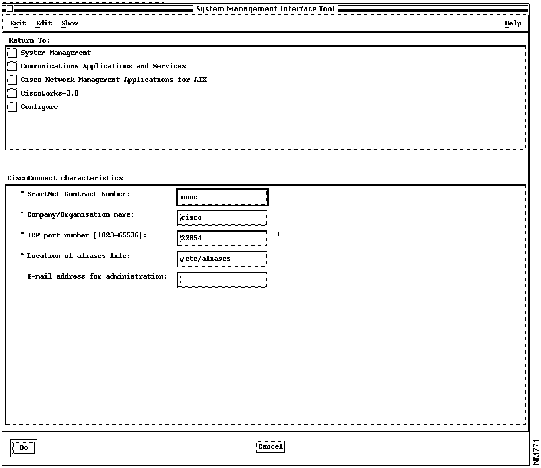
- Step 4 On the CiscoConnect characteristics dialog, accept the defaults, or type values into each of the following fields:
- SmartNet Contract Number---Contract number issued by Cisco Systems, Inc., to authorize communications with CiscoConnect. Obtain this number from your contract paperwork.
- Company/Organisation name---Your company name, to be transmitted with each connection to the Cisco TAC.
- TCP port number [1023-65536]---Number in the range 1023 to 65536 that specifies the port on which to communicate.
- Location of aliases file---(Appears only if "Modify Aliases file" was yes in the previous dialog.) Path name of an alternate e-mail aliases file. Change this field if /etc/aliases is not the alias file your system uses.
- E-mail address for administration---(Appears only if "Modify Aliases file" was yes in the previous dialog.) Your e-mail address for exchanging messages with the Cisco TAC. The default is ciscoconnect-client.
- Step 5 Click Do and read the Output.
- Step 6 Click Done, and then Cancel.
- Step 7 Terminate SMIT by pressing F12 or by clicking Exit SMIT on the Exit menu.
Perform these steps after installation and configuration of CiscoWorks 3.0.
- Update Network Information Service (NIS) data.
- Unmount the CD-ROM.
- After an upgrade, de-install Sybase 4.9 (optional).
- Remove the log files created during installation.
If you are using the Network Information Service (NIS), the NIS-related information obtained during the configuration is saved to the following files after SMIT terminates:
- /usr/tmp/CW.group
- /usr/tmp/CW.prod
- /usr/tmp/CW.sybase
After completing the CiscoWorks configuration, refer your NIS administrator to the information in these files to update your NIS server. Your NIS administrator can add these files to the NIS database and transfer this information to the NIS server as an update.
Note Make sure you validate the CiscoWorks installation and configuration process by following the instructions in the chapter "Validating CiscoWorks Installation." You should now be able to access CiscoWorks applications through NetView for AIX menus.
Unmount the CD by logging in as the root user and entering the following at the local or remote workstation where it is mounted:
hostname# cd /
hostname# umount /cdrom
AIX unmounts the CD-ROM device from the /cdrom directory. Remove the CD-ROM caddy from the drive.
If this installation has been an upgrade from CiscoWorks 2.1 to CiscoWorks 3.0, you can optionally remove the Sybase 4.9 database management system from the system because Sybase 10 is installed for use by CiscoWorks 3.0. To de-install Sybase 4.9, perform the following:

Caution Do not perform this task until you are sure the CiscoWorks 3.0 installation has been successful.
- Step 1 Log in as the root user.
- For details, see "Becoming the Root User" in the chapter "Preparing to Install CiscoWorks."
- Step 2 Run the de-installation script by entering the following at the command prompt:
hostname# $NMSROOT/install/bin/sybase49.deinstal
- Unless an error message appears, Sybase 4.9 is de-installed.
During installation and configuration, log files are created to track the installation process and provide diagnostic information if a problem arises. When you are satisfied that CiscoWorks is properly installed and operating, you can remove these files. To remove these files from your system, log in as the root user and enter the following command:
hostname# rm /usr/nms/install/log/cwinstall.log cwconfig.log
Unless an error message appears, the log files are removed.
After installing and configuring CiscoWorks, proceed to the chapter "Validating CiscoWorks Installation."
Copyright 1988-1995
©
Cisco Systems Inc.