
Table of Contents
Installing CiscoRemote
Installing CiscoRemote
The CiscoRemote Install program provides a simple means of installing all of the CiscoRemote protocol software and applications. Install offers several options to customize the installation to meet your specific needs. Unless your Network Administrator has advised you otherwise, you should accept the standard defaults recommended by the installation program.
You should install all of the applications that you think you will need. The installation program does not permit you to selectively install applications later without uninstalling all of the CiscoRemote software.
Close all running applications before installation to avoid conflicts between new versions of dynamic link library (DLL) files being installed and older versions which might be in use during the installation.
Warning Microsoft Office "toolbar" must not be running during the installation.
Use the following steps to install CiscoRemote.
Step 1 Insert Disk 1 of the CiscoRemote program into a floppy disk drive.
Step 2 Click the File menu item from the Windows Program Manager.
Step 3 Click Run to display the Windows Run program pop-up screen.
Step 4 Type x:install in the Command Line
where x is the drive letter of your floppy disk drive.
Step 5 Click OK to start the installation.
- Once the installation starts, the screen displays the CiscoRemote logo as shown in Figure 2-1.
Figure 2-1 : CiscoRemote Logo Screen

- This logo displays while the system is reading the installation disk. The logo screen is then replaced by the CiscoRemote License Agreement screen as shown in Figure 2-2.
Figure 2-2 : CiscoRemote License Agreement Screen

Step 6 Read this agreement and click Accept if you agree to the terms.
- The License Agreement screen is replaced by the install protocols screen. The choices you make on this screen depend on the tasks you want to perform.
Figure 2-3 : CiscoRemote Protocols Installation Screen
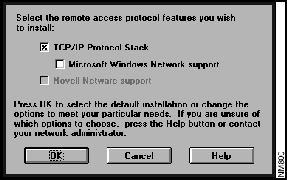
- Use this screen, shown in Figure 2-3, to select the protocol and network operating system(s) support that you intend to install. The default selection, shown in Figure 2-3, is to install the TCP/IP protocol stack without enabling support of network file sharing. With the default selection you will be able to use all of the Internet applications. Refer to Chapter 3, "Accessing Remote File Servers" and Appendix A, "Network Operating System Configuration" for information about file sharing.
Step 7 Click the box(s) beside the selection(s) you wish to install.
- If no selections are made on this screen, no protocols will be installed and you can proceed to install the CiscoRemote applications.
Note If you are unsure about which items to select check with your Network Administrator or refer to Appendix A, "Network Operating System Configuration" for details on these choices.
Step 8 Click OK.
- If Novell Netware support is selected and a LAN connection is already installed you will receive a message asking if you want to disable the LAN operation. This is required if remote node access for Novell is installed. If Novell Netware is not yet installed additional messages will be displayed requesting information regarding how you plan to setup your Netware software.
Warning If Netware is already configured for a direct LAN connection, selecting access to Netware servers will disable your LAN connection. See Appendix A for information on how to switch between LAN and remote Netware connections.
- The CiscoRemote logo screen is displayed again until it is replaced by the select applications screen shown in Figure 2-4.
Figure 2-4 : CiscoRemote Applications Choices

- You have two installation choices on this screen:
- select the full set of applications, or
- select one or more individual applications.
Step 9 If you choose to install individual applications, use the vertical scroll to the right of this window to view all of the available applications and make your selections.
Step 10 Click Continue.
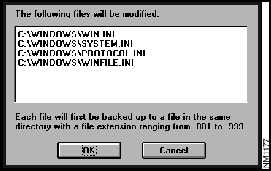
- The screen displays an information message that the program will modify certain files as shown in Figure 2-5. These files will vary depending on the choices which you have made during the installation process. Make a list of these files so that you can restore your computer to its previous state if a problem occurs later.
Figure 2-5 : Modifying Files Screen
Step 11 Click OK.
- The CiscoRemote logo screen displays and a progress box that shows the percentage of the completed installation.
- You are prompted to insert Disk 2.
Step 12 Remove Disk 1, insert Disk 2, and click OK.
- The screen prompts you for the remaining disks to complete installation.
You have now completed the first part of the installation. Go to the next section to set up your modem information. The Modem Port Setup screen will be displayed (see Figure 2-6).
Setting Up the Modem
Use the procedure in this section to configure your modem. You will need the information you noted in "About the CiscoRemote Package" to complete this screen.
Figure 2-6 : Modem Port Setup Screen
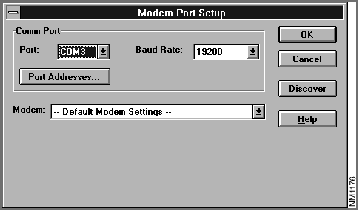
Step 1 Click Discover to allow the install program to attempt to identify and set up your modem.
- This may take up to a minute or two. If the install program can identify your modem, it completes the modem name, communication port number, and comm port Baud Rate fields. You can skip steps 2 and 3 if the modem is correctly identified.
- If your modem is not identified, then you can either select your modem from the drop down box of Modem listings or select the Default Modem Settings and complete the remainder of the fields using the information you have gathered and noted in "About the CiscoRemote Package." Complete steps 2 and 3 if your modem is not listed.
Warning In some cases the Default Modem Settings may not work and you will not be able to establish a remote connection. In this case contact your Network Administrator for assistance.
Step 2 Choose the Communication (Com) port to which your modem is connected from the drop-down selections to the right of Port:.
Step 3 Set the Baud Rate (speed) for your Com port.
- The speed set here is a "port" speed. This is not the same as the modem connect speed. A 14400 baud modem has a PORT speed of at least 38.8K baud and can have a port speed up to four times higher than the modem speed. Set the port baud rate to at least twice your modem speed. Later you can change this to even higher speeds (using the Connect application). If you set the port speed too high the modem will not initialize. If you set the port speed too low you will lose performance over your remote connections.
Step 4 Click OK to continue.
- Your modem is now configured and the Reboot screen, shown in Figure 2-7, will be displaying on your monitor.
Figure 2-7 : CiscoRemote Reboot Screen
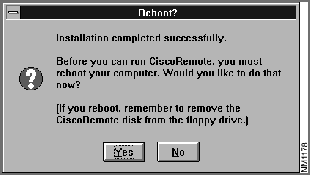
Step 5 Remove the diskette from your drive.
Step 6 Click Yes to allow the system to reboot automatically.
You are now ready to set up your CiscoRemote session.
Note If you selected Microsoft Windows Network Support during installation and the Windows Network is not running, you must now run Microsoft Network Setup (from the Networking program group) to add the CiscoRemote PPP/SLIP drivers as the "adapter" and the TCP/IP protocol stack to your network configuration.
Setting Up a CiscoRemote Session
Before you can connect to your company's network or to the Internet you need to provide some information about how to reach that remote site. CiscoRemote has already included some standard information about different "sites" that you might be connecting to and has filled in the technical information about those sites. What you will provide is some basic information about how to reach that site (its phone number(s), how to dial from your location, and some security information). The CiscoRemote PPP/SLIP Connect application is used to setup this data and to make the phone connection with a remote site.
The information that you will provide is saved in a "Session." A Session is like an auto-dial entry on a telephone, it contains all of the information required by PPP/SLIP Connect to place a phone call and establish the remote connection.
Use the following procedure to create a Session.
Step 1 Double-click the CiscoRemote icon to open the CiscoRemote program group as shown in Figure 2-8.
Figure 2-8 : Icons in the CiscoRemote Program Group.

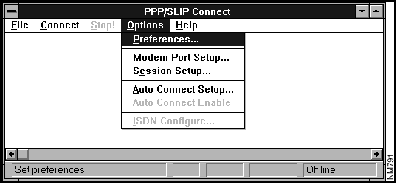
Step 2 Double-click the Connect icon to run the PPP/SLIP Connect application and click Options to display the screen shown in Figure 2-9.
Figure 2-9 : Select From Options Menu

Step 3 Select Session Setup from the Options menu.
- The Session Setup dialog box, shown in Figure 2-10, will be shown.
Figure 2-10 : Session Setup Display
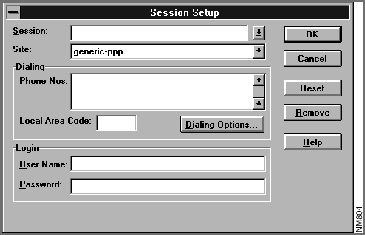
Step 4 Click Reset to clear all of the settings in preparation for a new Session. This should be done each time a new Session is created. It will not erase existing Sessions.
Step 5 In the Session field, type a meaningful name of up to 40 characters for this user Session; for example, Cisco Connection.
- Press Tab to advance to the next field.
Step 6 In the Site field, select the remote site name given to you by your Network Administrator from the Site drop-down list.
- Press Tab to advance to the next field.
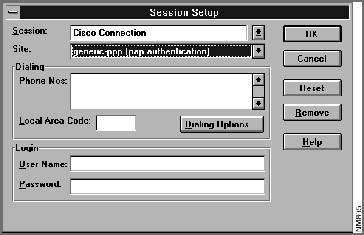
Figure 2-11 : Setting the Remote Site Name
Step 7 In the Phone Nos: field, type the phone number(s), with area code, for the CiscoRemote access server.
- If you have more than one area code and phone number, press Enter after each phone number you type. You may use hyphens, parentheses, or slashes to improve readability. A comma adds a three second pause. For example, you would use this after dialing a "9" to get an outside line from an office phone system.
- When you have typed the last phone number, press Tab to move to the next field.
Step 8 In the Local Area Code field type your local area code
- Press Tab to move to the next field.
Note If the site you chose is an interactive site, you will not see the login portion of this screen shown in Figure 2-11. Skip steps 9 and 10. Interactive sites require that you enter your name and password when the connection is made to the remote server.
Step 9 In the User Name field type your name and press Tab.
Step 10 In the Password field type your password.
Step 11 Click the Dialing Options button to display the Session dialing options pop-up screen shown in Figure 2-12.
Figure 2-12 : Session Dialing Options
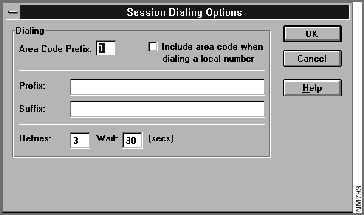
Step 12 Type the area code prefix and press Tab.
Step 13 Type any special digits or character sequences you need to dial to get an outside line or turn off call-waiting tones in the Prefix field and press Tab. This field is optional and needs to be filled in only if some special sequences are needed.
Step 14 Type your calling card number or credit card number in the Suffix field, if you choose. This field, Suffix, is optional. You can use it to send your calling card or credit card information automatically.
Note The Prefix and Suffix fields are optional. If they are used then the same punctuation rules apply as in the Phone Nos field.
Step 15 Click OK to redisplay the Session Setup screen.
Step 16 Click OK to redisplay the PPP/SLIP Connect screen.
Setting an Auto Connection
You can also set the Connect program to dial and connect automatically to a CiscoRemote access server when an application is started and attempts to contact a remote host. Use the following steps to set this option. If your screen is not displaying the PPP/SLIP Connect screen, repeat steps 1 and 2 of the previous procedure.
Note Auto Connect works only with applications that use the Windows Sockets interface. It does not work with Netware or NetBIOS applications.
Step 1 Click Options to display its menu commands, as shown in Figure 2-13.
Figure 2-13 : Options Menu of PPP/SLIP Connect
Step 2 Select Auto Connect Setup.
- The screen displays a pop-up dialog box, Figure 2-14, that lets you select the Session name to which you want to connect automatically.
Figure 2-14 : Auto Connect Setup Dialog Box

- Click the name of the Session that you want to use to make your automatic connection to your remote site.
Step 3 Click OK.
Step 4 Select Auto Connect Enable from the Options menu.
The Session name you selected will be automatically dialed each time you run a Windows Sockets application.
Establishing a Connection
Once the PPP/SLIP Connect information has been completed, you should attempt to connect to your remote site. Use the following steps to make the connection.
Step 1 Select Connect from the PPP/SLIP Connect application as shown in Figure 2-15.
Step 2 Click Connect to display the drop-down list of Sessions.
Figure 2-15 : PPP/SLIP Connect Screen
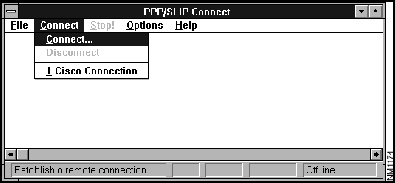
Step 3 Click the session name you just created.
Connect will dial your remote server and connect to the network. Depending on the protocols and settings for the network that you are calling, you may be prompted to enter additional information to complete the connection.
When the screen displays "Connected to session_name," you know that you have made a successful connection.
You can either leave the Connect window open or minimize it.
Note If you are using a FAX or other communication program on your PC you may have to disable the automatic receive option in that program to make the modem available to PPP/SLIP Connect.
The CiscoRemote Connect application has many more features and can be customized to match your preferences. Use the on-line help to find additional information about these features.
Now you are ready to use the applications to connect to your office network and the Internet.
Ending a Connection
Once you finish working with the remote system, use the CiscoRemote PPP/SLIP Connect application to disconnect from that site to free up your telephone line.
Step 1 Return to the PPP/SLIP Connect application as shown in Figure 2-16.
Figure 2-16 : Disconnect Selection
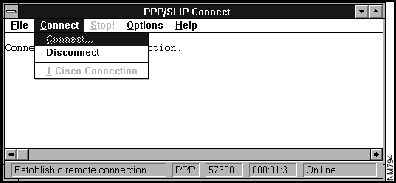
Step 2 Select the Connect menu item.
Step 3 Select the Disconnect option.
Connect will terminate the remote connection, but the PPP/SLIP Connect application will remain active. You can then close the Connect application or minimize it for future use. If you have set the Auto Connect Enable option of Connect, the remote connection will automatically be reestablished as soon as a Winsock application attempts to contact a remote service or server.
Note Auto Connect works only with applications that use the Windows Sockets interface. It does not work with Netware or NetBIOS applications.
Copyright 1988-1996 © Cisco Systems Inc.