|
|
Maintaining the LightStream 1010 ATM Switch
This chapter describes maintenance procedures for the LightStream 1010 asynchronous transfer mode (ATM) switch and its field-replaceable units (FRUs). Your switch is configured as specified in your order and is ready for installation and startup when it leaves the factory. As your communication requirements change, you might want to upgrade your system, add components, or change the initial configuration. This chapter describes the procedures for installing, replacing, and reconfiguring port adapter modules (PAMs), and for adding and replacing internal system components such as the system fan assembly and power supplies. Software and component upgrades require specific document part numbers and other frequently updated information; therefore, only basic replacement guidelines are included in this publication. Detailed, up-to-date instructions (called configuration notes) are shipped with the replacement part upgrade kits.
There are two kinds of replaceable system components: those that support hot-swapping and those that require you to shut down the system power before you replace them. Redundant power supplies, carrier modules (CAMs), PAMs, and the fan assembly can be replaced while the system is operating.
This chapter contains the following information:
Installing and Replacing the ASP, CAMs, and PAMs
All CAMs and PAMs support hot swapping, which allows you to install, remove, replace, and rearrange the CAMs or PAMs without turning off the system power. When the system detects that a CAM or PAM has been installed or removed, it automatically runs diagnostic and discovery routines, acknowledges the presence or absence of the PAM, and resumes system operation without any operator intervention.
The hot-swap feature allows you to remove and replace modules while the system is operating; you do not need to notify the software or shut down the system power. All CAMs and PAMs (except for the ASP) support hot-swapping.
Each CAM contains a bus-type connector that mates with the system backplane. Each card connector consists of a set of tiered pins, in three lengths. The pins send specific signals to the system as they make contact with the backplane. The system assesses the signals it receives and the order in which it receives them to determine what event is occurring and what task it needs to perform, such as reinitializing new interfaces or shutting down removed ones.
For example, when inserting a CAM, the longest pins make contact with the backplane first, and the shortest pins make contact last. The system recognizes the signals and the sequence in which it receives them. The system expects to receive signals from the individual pins in this logical sequence, and the ejector levers help to ensure that the pins mate in this sequence.
When you remove or insert a PAM, the backplane pins send signals to notify the system, which then performs as follows:
Hot-swap functionality enables you to add, remove, or replace CAMs or PAMs with the system online, which provides a seamless method to users on the network, maintains all routing information, and ensures session preservation.
When you insert a new CAM or PAM, the system runs a diagnostic test on the new interfaces and compares them to the existing configuration. If this initial diagnostic fails, the system remains offline for another 15 seconds while it performs a second set of diagnostic tests to determine whether or not the PAM is faulty and if normal system operation is possible.
If the second diagnostic test passes, which indicates that the system is operating normally and the new PAM is faulty, the system resumes normal operation but leaves the new interfaces disabled.
If the second diagnostic test fails, the system crashes, which usually indicates that the new PAM has created a problem in the bus and should be removed.
Incorrect ASP, CAM, or PAM Insertion and Removal
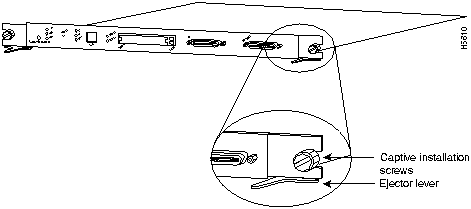
The ejector levers and installation screws (Figure 9-1) align and seat the card connectors in the backplane. Follow the installation and removal instructions carefully, and review the following examples of incorrect insertion practices and results:
It is also important to use the ejector levers and installation screws when removing an ASP, CAM, or PAM to ensure that the card connector pins disconnect from the backplane in the logical sequence expected by the system. Any ASP, CAM, or PAM that is only partially connected to the backplane can hang the bus. Detailed steps for correctly performing hot-swapping are included in the following procedures for installing and removing CAMs or PAMs. For more information, see the section "What is Hot-Swapping?".
Following are detailed steps for removing and replacing CAMs or PAMs and successfully performing hot-swap. Figure 9-1 shows the ejector levers, which you must use when inserting or removing the ASP or CAMs.
Figure 9-1 : Ejector Levers and Captive Installation Screws (ASP Shown)
You need a 3/16-inch flat-blade screwdriver to remove any filler (blank) PAMs and to tighten the captive installation screws that secure the ASP, CAMs, and PAMs in their slots. Whenever you handle ASP, CAMs, or PAMs, you should use a wrist strap or other grounding device to prevent electrostatic discharge (ESD) damage. See the section "Preventing Electrostatic Discharge Damage" in the chapter "Preparing for Installation."
Removing the ASP, CAMs, or PAMs
ASP and CAM removal instructions are the same, except only CAMs and PAMs support hot-swapping. The ASP is a required system component. Removing an ASP while the system is operating will cause the system to shut down.
Take the following steps to remove an ASP or CAM:
Installing the ASP, CAMs, or PAMs
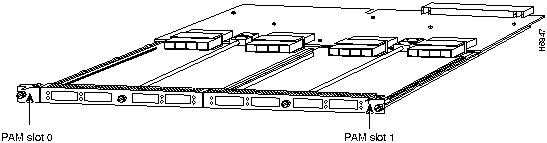
You can install CAMs in any of the four CAM slots numbered 0 through 4 from top to bottom when viewing the chassis from the front. (See Figure 9-2.) The middle slot
ASP and CAM installation instructions are essentially the same, except the ASP does not support hot-swapping. The ASP is a required system component. Removing an ASP while the system is operating will cause the system to shut down. For more information, see the section "What is Hot-Swapping?"
Take the following steps to install an ASP or CAM:
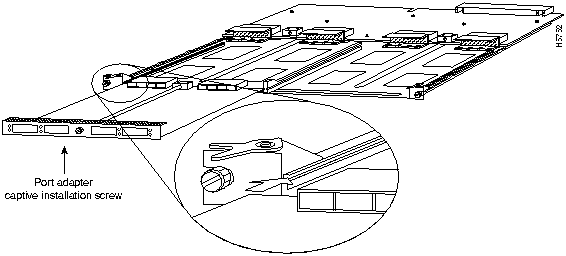
Figure 9-3 : Carrier Module Installation
Port Adapter Module Installation
Following are installation steps for the PAMs, which support hot-swapping and can be removed and installed while the system is operating.
Figure 9-5 : PAM Carrier Installation
Sample Screen Display for Hot-Swapping Procedure
When you remove and replace CAMs and PAMs, the system provides status messages on the console screen. The messages are for information only. In the following sample display, you can follow the events logged by the system when a PAM was removed from slot 3/0. When the PAM is reinserted, the system marks the module as ready again.
Port Adapter Module Configurations
The PAMs support different media and interface types. The configuration commands used with these different PAMs vary according to PAM type. For complete PAM configuration information, refer to the publications LightStream 1010 ATM Switch Software Configuration Guide and LightStream 1010 ATM Switch Command Reference.
This section describes how to update the software on the LightStream 1010 ATM switch. New software to implement enhancements and maintenance releases will be provided periodically. To update software is to initiate the network download to the switch using a Trivial File Transfer Protocol (TFTP) download server.
The following examples discuss updating the LightStream 1010 ATM switch flashcode with the version number displayed as xx.
Verifying the Flashcode Memory Version
When you restart the system, the system loads the system image from Flash memory. You can use the show version command to display the current system image version.
The show version command displays the current Flashcode version on the first line of the display for the ASP:
If the display shows that the system image loading from Flash memory is the wrong version, see the chapter, "Loading System Images, Software Images, and Configuration Files" in the LightStream 1010 ATM Switch Software Configuration Guide.
Take the following steps to verify that the new microcode version is loaded:
The installation procedure is complete. If the status LED fails to go on after a second installation attempt, or if any of the interfaces fail to return to their previous state, refer to the troubleshooting procedures in the section "Troubleshooting" in the chapter "Confirming the Installation."
You may want to replace the LightStream 1010 ATM switch system software from a network server to the onboard Flash memory. This replacement may be needed if the software image on your switch has been updated or been corrupted.
The following example shows how to use the copy tftp flash command to copy a system image named ls1010-wi-m_1.083.bin.Z from Flash memory to a TFTP server. The filename ls1010-wi-m_1.083.bin.Z must be entered in lowercase to match the file name in the example; the system is case sensitive. If more than one file of the same name is copied to Flash, regardless of case, the last file copied becomes the valid file.
A series of Cs indicates that a checksum verification of the image is occurring after the image is written to Flash memory.
The following example shows how to copy a system image named ls1010-wi-m_1.083.bin.Z into the current Flash configuration in which a file named ls1010-wi-m_1.083.bin.Z already exists:
A series of Cs characters indicates that a checksum verification of the image is occurring after the image is written to Flash memory.
The following example copies the switch-config file from a TFTP server to the Flash memory card inserted in PCMCIA slot 0 of the ASP card. The copied file has the name new-config.
The system is now ready to be configured to boot from the new image you copied to Flash memory. For more information on the copy tftp flash command and other related commands, refer to the publications LightStream 1010 ATM Switch Software Configuration Guide and LightStream 1010 ATM Switch Command Reference.
Replacing SIMMs (Upgrading DRAM)
The system DRAM resides on a Single In-Line Memory Module (SIMM) on the ASP. The default DRAM configuration is 16 MB. This section provides the steps for increasing the amount of DRAM from 16 MB to 32 or 64 MB by adding two 16- or 32-MB SIMMs.
The amount of DRAM required on the ASP module is determined by the number of active physical and logical ports (virtual path tunnels) and the expected number of active switched virtual channels (SVCs) through the switch. Table 9-1 is an approximate guide that should be used when determining the amount of DRAM required for a switch with 32 physical ports.
Table 9-1 : DRAM Required Determined by SVCs
Although the SIMM specifications are defined in the manufacturers' part numbers, the SIMMs must meet the following requirements:
Parts and Tools Required
You need the following parts and tools to replace SIMMs. If you need additional equipment, contact a customer service representative for ordering information.
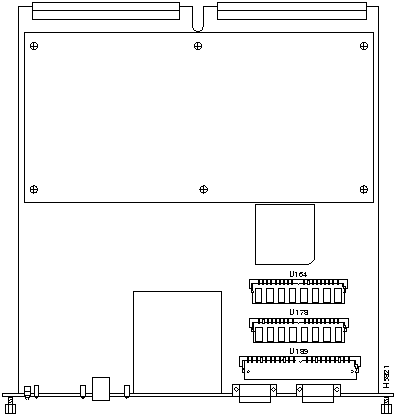
The system DRAM resides in two SIMMs on the ASP. The DRAM SIMM sockets are U164 and U178. The default DRAM configuration is 16 MB (two 8-MB SIMMs). (See Figure 9-6.)
Figure 9-6 : ATM Switch Processor SIMM Sockets
Before proceeding, ensure that you have met the following prerequisites:
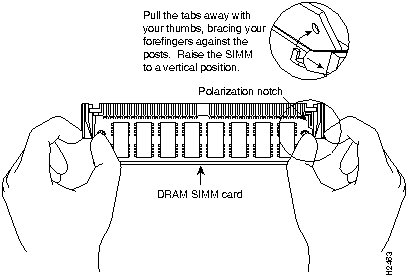
Removing SIMMs
Place removed SIMMs on an antistatic mat and store them in an antistatic bag. You can use the SIMMs that you remove in compatible equipment. To prevent ESD damage, handle SIMMs by the card edges only.
Follow these steps to remove the existing SIMMs:
Figure 9-7 : Releasing the SIMM Spring Clips
This completes the SIMM removal procedure. Proceed to the next section to install the new SIMMs.
Installing SIMMs
SIMMs are sensitive components that are susceptible to ESD damage. Handle SIMMs by the edges only; avoid touching the memory modules, pins, or traces (the metal fingers along the connector edge of the SIMM). (See Figure 9-8.)
Follow these steps to install the new SIMMs:
The SIMM replacement procedure is now complete.
To replace the ASP in the chassis, see the section "Installing and Replacing the ASP, CAMs, and PAMs" earlier in this chapter. After the rasp has been replaced, restart the system for an installation check.
If the system fails to boot properly, or if the console terminal displays a checksum or memory error, check the following:
If after several attempts the system fails to restart properly, contact a service representative for assistance. Before you call, make note of any error messages, unusual LED states, or any other indications that might help solve the problem.
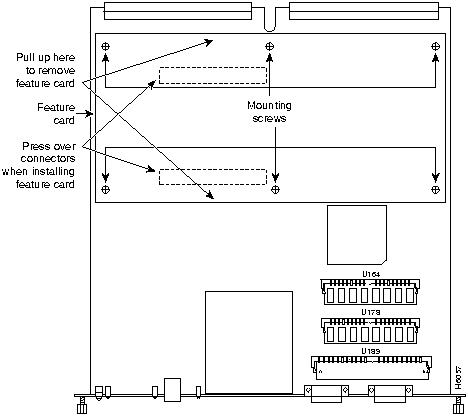
The feature card is a daughter card of the ASP module, and it implements numerous value-add capabilities over and above the base switch mechanisms such as the following:
Supporting such capabilities on the field replaceable feature card allows the LightStream 1010 to be upgraded in the field as and when such standards evolve and more advanced mechanisms are required. Upgrading the feature card will require that the switch be powered down and the ASP module removed.
Removing the Feature Card from the ASP
Perform the following steps to remove the feature card from the ASP:
Figure 9-9 : Feature Card Mounting Screws
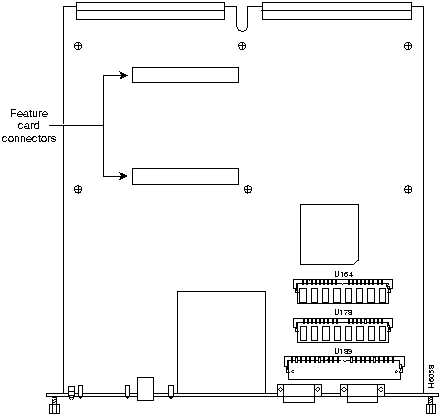
Figure 9-10 : Feature Card Connectors
Replacing the Feature Card on the ASP
Perform the following steps to replace the feature card on the ASP:
ensure that your pulling pressure on the feature card is applied as close as possible to the ASP feature card connectors underneath.
The feature card removal and replacement procedure is now complete. Refer to the section "Starting the System."
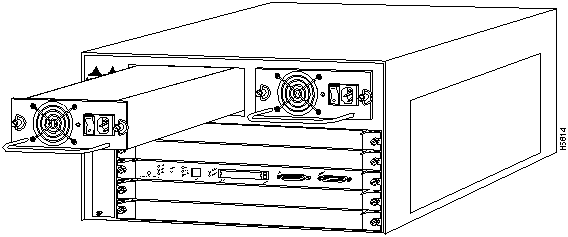
Installing and Replacing Power Supplies
The switch is configured to your order and is ready for installation and startup when it leaves the factory. As your communication requirements change, you may want to upgrade your system and add or replace a power supply. This section describes the procedures for installing, replacing, and reconfiguring power supplies.
The 376W power supplies (AC-input) are used in the switch support redundant hot swapping. When two power supplies are installed, you can install, remove, or replace one of the supplies without affecting system operation. When power is removed from one supply, the redundant power feature causes the second supply to ramp up to full power and maintain uninterrupted system operation. In systems with dual power supplies, connect each power supply to separate input lines so that, in case of a line failure, the second source will most likely still be available and can maintain maximum overcurrent protection for each power connection.
A modular power cord connects each power supply to the separate site power sources.
You will need a 1/4-inch flat-blade screwdriver to remove and install filler plates and to loosen or tighten the captive installation screws on the power-supply.
Always install a filler plate over an empty power supply bay to protect the connectors from contamination.
Take the following steps to remove a power supply:
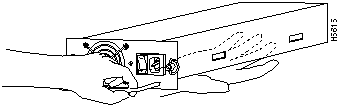
Figure 9-11 : Power-Supply Switch and AC Connection
Figure 9-12 : Power-Supply Installation
Figure 9-13 : Handling a Power Supply
Replacing the Chassis Fan Assembly
This section describes how to replace the fan assembly (the chassis fans in a single unit that draw in cooling air and distribute it across the ASP, CAMS, and PAMs).
The fan assembly is located at the left of the chassis card cage. (See Figure 9-14.) The fan assembly is secured to the backpanel with two captive installation screws.
Figure 9-14 : Chassis Fan Assembly (front view)
You need a 3/16-inch flat-blade screwdriver to remove the fan assembly.
Take the following steps to remove the existing chassis fan assembly:
If the power has not been turn off, quickly proceed to the following section to reinstall a fan assembly.
Take the following steps to install the new fan assembly:
Perform the following steps to verify that the new fan assembly is installed correctly:
The fan assembly replacement is now complete.
Copyright 1988-1996 © Cisco Systems Inc.
![]()
![]()
![]()
Unconfigured PAMs installed for the first time start up in the shutdown state. The system identifies them as present but unconfigured. Each must be manually configured from the command line.1
![]()
![]()
![]()
![]()
![]()
(number 2) contains the ASP, which is a required system component. Blank CAM and PAM fillers are installed in CAM or PAM slots without CAMs or PAMs to maintain consistent airflow through the module compartment.

![]()
![]()
![]()
![]()

![]()
![]()
Switch#
%OIR-6-REMCARD: Card removed from slot 3/0, interfaces disabled
%LINK-5-CHANGED: Interface 155UTP 3/0, changed state to administratively
down
%LINK-5-CHANGED: Interface 155UTP 3/0, changed state to administratively
down

Switch#

%OIR-6-INSCARD: Card inserted in slot 3/0, interfaces administratively
shut down
%LINK-5-CHANGED: Interface 155UTP 3/0, changed state to up
%LINK-5-CHANGED: Interface 155UTP 3/0, changed state to up
Switch#
Switch#show version
Cisco Internetwork Operating System Software
IOS (tm) GS Software (LS1010-I-M), Version 11.0(6510) [cyadaval 124]
Copyright (c) 1986-1995 by cisco Systems, Inc.
Compiled Fri 12-Jan-96 10:34 by cyadaval
Image text-base: 0x600087F0, data-base: 0x60282000


ROM: System Bootstrap, Version 11.0(4825), INTERIM SOFTWARE
ROM: GS Software (LS1010-I-M), Experimental Version 11.0(6510) [cyadaval
108]

Switch uptime is 6 hours, 22 minutes
System restarted by reload
System image file is "/home/cyadaval/ls1010-i-m.bin.Z", booted via tftp
from 171
.69.197.2

cisco RSP1 (R4600) processor with 16384K bytes of memory.
R4600 processor, Implementation 32, Revision 2.0
Last reset from power-on
1 Ethernet/IEEE 802.3 interface.
4 ATM network interfaces.
125K bytes of non-volatile configuration memory.

8192K bytes of Flash internal SIMM (Sector size 256K).
Configuration register is 0x0

Switch#
Switch#copy flash tftp
Enter source file name: ls1010-wi-m_1.083.bin.Z
Enter destination file name [ls1010-wi-m_1.083.bin.Z]:
CCCCCCCCCCCCCCCCCCCCCCCCCCCCCCCCCCCCCCCCCCCCCCCCCCCCCCCCCCCCCCCCCCCC
Address or name of remote host [172.69.1.129]? 171.69.1.129
!
Switch#
Switch#copy tftp flash
Enter source file name: ls1010-wi-m_1.083.bin.Z
Enter destination file name [ls1010-wi-m_1.083.bin.Z]:
5746016 bytes available on device slot0, proceed? [confirm]y
Address or name of remote host [dirt.cisco.com]? 171.69.1.129
Accessing file "ls1010-wi-m_1.083.bin.Z" on dirt.cisco.com ...FOUND
Loading ls1010-wi-m_1.083.bin.Z from 171.69.1.129 (via Ethernet2/0/0): !!!!!!!!!
!!!!!!!!!!!!!!!!!!!!!!!!!!!!!!!!!!!!!!!!!!!!!!!!!!!!!!!!!!!!!!!!!!!!!!!!!!!!!!!!
!!!!!!!!!!!!!!!!!!!!!!!!!!!!!!!!!!!!!!!!!!!!!!!!!!!!!!!!!!!!!!!!!!!!!!!!!!!!!!!!
!!!!!!!!!!!!!!!!!!!!!!!!!!!!!!!!!!!!!!!!!!!!!!!!!!!!!!!!!!!!!!!!!!!!!!!!!!!!!!!!
!!!!!!!!!!!!!!!!!!!!!!!!!!!!!!!!!!!!!!!!!!!!!!!!!!!!!!!!!!!!!!!!!!!!!!!!!!!!!!!!
!!!!!!!!!!!!!!!!!!!!!!!!!!!!!!!!!!!!!!!!!!!!!!!!!!!!!!!!!!!!!!!!!!!!!!!!!!!!!!!!
!!!!!!!!!!!!!!!!!!!!!!!!!!!!!!
[OK - 2247751/4495360 bytes]
CCCCCCCCCCCCCCCCCCCCCCCCCCCCCCCCCCCCCCCCCCCCCCCCCCCCCCCCCCCCCCCCCCCC
Switch#
Switch# copy tftp:switch-config slot0:new-config
SVCs Required
DRAM Required
Less than 4000 active SVCs
16 MBytes DRAM
Between 4000 and 16000 active SVCs
32 MBytes DRAM
Between 16000 and 32000 active SVCs
64 MBytes DRAM
![]()
![]()

![]()
![]()
![]()
![]()
![]()
![]()
![]()
![]()
![]()

![]()
![]()
![]()
![]()

![]()
Footnotes
![]()
![]()
![]()
![]()
![]()
![]()
![]()
![]()