|
|

Planning for Configuration and Management
Read this chapter before using the Catalyst 2600 in your network. This chapter contains information and instructions that are useful in preparation for using the Catalyst 2600 in your network. This chapter provides the following information:
Considerations for Using the Catalyst 2600
This section discusses topics you should consider prior to implementing the Catalyst 2600 in your network.
Required Network Preparation---Frame Length Limit
The maximum frame length supported by the Catalyst 2600 is 4540 bytes (including the Frame Control [FC] and the Frame Check Sequence [FCS] characters). Be sure to configure all network software, interconnecting products, workstations, and user applications to send frames no larger than 4540 bytes.
In cut-through mode, the Catalyst 2600 truncates frames larger than 4540 bytes and adds an abort sequence at the end. Typically, if frames larger than 4540 bytes are sent, a network manager will detect the abort sequences from the Catalyst 2600.
In store-and-forward mode, switch ports will drop larger frames and generate a soft error on that port's LAN segment. The Catalyst 2600 provides statistics regarding frames that are too long. For more information, refer to "Viewing Statistics for a Specific Port" in "Managing Your Catalyst 2600."
With source-route switching, your network can contain duplicate MAC addresses. If there are duplicate MAC addresses in your network, they must be separated from the Catalyst 2600 by a source-route bridge. Otherwise, the Catalyst 2600 will learn the MAC address on more than one port and will not be able to accurately forward frames for that address.
If you are using the Catalyst 2600 in an SNMP-managed network, you must configure an initial IP address and the SNMP parameters from the console panels. You can then use either the console panels or an SNMP managing entity to view or change all parameters and management information, except the spanning tree parameters. You can view, but not change, the spanning-tree parameters from an SNMP manager.
The Catalyst 2600 provides five MIBs for use with SNMP-based management systems. There are four standard MIBs, which are defined by RFCs and are included with most SNMP management applications. The fifth is a proprietary MIB created specifically for the Catalyst 2600. The standard MIBs used are:
Each Catalyst 2600 kit has a disk containing these MIBs. If your network is SNMP managed, give this disk to the network management operator so that it can be compiled into the SNMP-based network manager. If you are not currently using an SNMP manager, store the disk for future use.
Universal Feature Card Configuration
The Catalyst 2600 contains two Universal Feature Card slots that will accommodate optional, field-installable, Universal Feature Cards (UFCs), which provide additional connections. If you are installing a UFC with your Catalyst 2600, configure the UFC per the instructions shipped with it before you customize your Catalyst 2600.
Recording Your Configuration Information
Prepare a Configuration Parameters worksheet for each Catalyst 2600 you plan to install. The items on the worksheet follow the same order as the fields that appear on the console panels.
Using a Serial Link Connection
The front of the Catalyst 2600 contains an EIA 232 port. This port allows you to establish a serial link connection with the Catalyst 2600. Using this connection, you can access the Catalyst 2600 console panels, which you can use to configure, monitor, and manage the Catalyst 2600.
You can establish either a local or remote connection to the Catalyst 2600. For a local connection, you directly connect a PC, or other DTE, to the EIA 232 port on the Catalyst 2600. For a remote connection, connect a modem to the EIA 232 port then dial in from your remote workstation.
To connect a local terminal to the Catalyst 2600, perform the following steps:
Table 4-1 : Terminal Emulation Settings
Connecting a Modem to Allow Remote Terminal Access
You can monitor the Catalyst 2600 remotely by using a connection established through any Hayes-compatible modem. To connect a modem to the Catalyst 2600, perform the following steps:
Troubleshooting the Serial Link Connection
There are three types of communications problems that you might encounter: no communication, corrupted communication, and dropped characters. This section suggests steps to resolve such problems. In some cases, you are instructed to alter the configuration of the connection at the terminal or at the Catalyst 2600. For information about altering the configuration of your terminal emulator, refer to the documentation that accompanied your emulation program. For information about altering the configuration of the connection at the Catalyst 2600, refer to the section "Customizing the Console Session."
If no communication is established:
If communication is established but the data displayed is corrupted:
If communication is established but some of the characters appear to be dropped or lost:
As an alternative to a serial link connection, you can use a Telnet session to access the Catalyst 2600 console panels. Using a Telnet session to configure, monitor, and manage the Catalyst 2600 can be more convenient. There are some limitations, however, that you might encounter if using a Telnet session to access the console panels. These limitations are also discussed in this section.
To establish a Telnet session to the Catalyst 2600:
To terminate the Telnet session, press Ctrl-B, or use the method provided by the Telnet application.
Troubleshooting a Telnet Session
If you experience difficulty opening a Telnet session with the Catalyst 2600, verify the settings for your Telnet client. Ensure that the terminal type is set to VT100, VT102, or VT220.
Limitations of Telnet Sessions
If you choose to use a Telnet session to access the console panels of the Catalyst 2600, you should be aware of the following limitations:
If you attempt to access a console panel that is already accessed by another telnet or serial link session, "Console is currently in use" is displayed.
If you are using Telnet to access the console panels, be aware that:
Involuntary Termination of the Telnet Session
A Telnet session can be terminated involuntarily from the console or as a result of certain configuration changes.
When the console is idle and Telnet is active, a user at the console can terminate the Telnet session without warning (refer to the section "Customizing and Managing the Telnet Sessions"). When the Telnet sessions ends, the Telnet session panel displays the message: "Your session has been terminated due to system maintenance work."
The Telnet session also ends if a user changes any of the following:
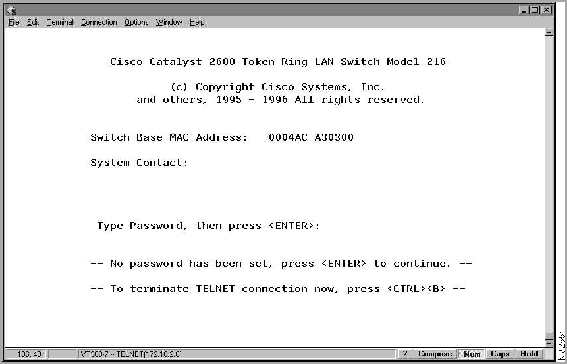
After you have established a connection to the Catalyst 2600 via either a serial link or a Telnet session, the Copyright Panel (Figure 4-1) is displayed.
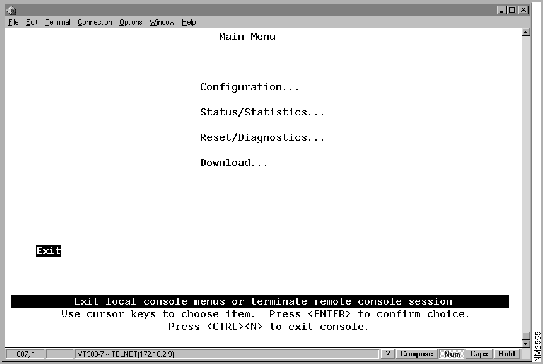
To access the console panels:
From this menu you can:
Guidelines for Using the Console Panels
As you move through the console panels, follow these guidelines:
Where to Find More Information
The panels associated with each Main Menu selection are described in the following chapters:
Customizing the Console Session
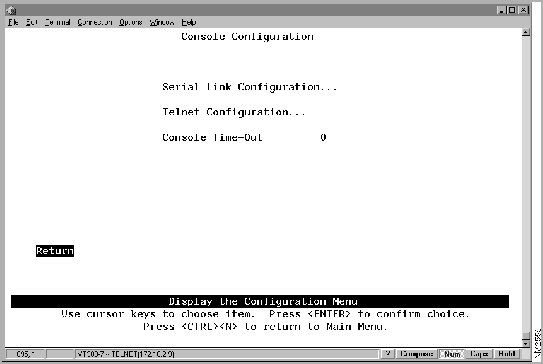
To customize your console session, select Configuration>Console Configuration. The Console Configuration panel (Figure 4-3) is displayed.
Figure 4-3 : Console Configuration Panel The following information is displayed on this panel:
To view and change the parameters for a serial link console session, select Serial link Configuration on the Console Configuration panel. The Serial Link Configuration panel is displayed.
The following information is displayed on this panel:
Customizing and Managing the Telnet Sessions
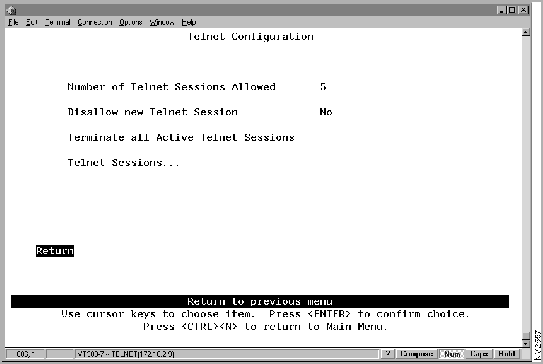
To view and change the parameters for a Telnet console session, select Telnet Configuration on the Console Configuration panel. The Telnet Configuration panel (Figure 4-4) is displayed.
Figure 4-4 : Telnet Configuration Panel The following information is displayed on this panel:
Managing Individual Telnet Sessions
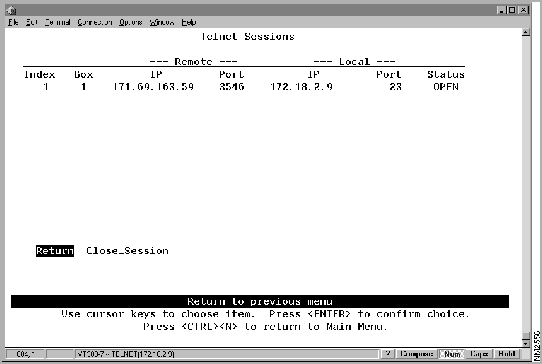
To display information about or close any active Telnet session, select Telnet Sessions from the Telnet Configuration panel. The Telnet Sessions panel (Figure 4-5) is displayed.
Figure 4-5 : Telnet Sessions Panel The following information is displayed on this panel:
Copyright 1988-1996 © Cisco Systems Inc.
Baud rate
1200, 2400, 4800, 9600, 19,200, 38,400, or 57,600 (9600 is the default)
Parity
None
Data bits
8
Stop bits
1
Handshaking
None
Terminal emulation
VT100
Duplex
Full
Software flow control (XON/XOFF)
Off
Hardware flow control (RTS/CTS)
Off
Line wrap
Off
Screen scroll
On
CR translation
CR
Backspace (BS) translation
Destructive
Break length (milliseconds)
350
Enquiry (ENQ)
Off
EGA/VGA true underline
Off
Terminal width
890
ANSI 7- or 8-bit commands
7
Echo
Off
Result codes
Off
Wait for connection
45 seconds
Pause between calls
6 seconds
Drop DTR between calls
Yes
Send CR between calls
Yes
Auto baud detect
On
Send init if CD high
Yes
Maximum dial attempts
999
![]()
![]()
![]()
![]()
To
Select
Then
Change the console time-out
Console Time-Out
Specify the new value.
Specify parameters for a console session via a serial link
Serial Link Configuration
Refer to "Customizing the Serial Link."
Specify parameters for a console session via Telnet
Telnet Configuration
Refer to "Customizing and Managing the Telnet Sessions."
Save your changes
Return
To
Select
Then
Change the current settings...
The appropriate parameter...
Specify the new value.
Save your changes...
Return
To
Select
Then
Change the current settings...
The appropriate parameter...
Specify the new value.
Stop all active Telnet sessions...
Terminate All Active Telnet Sessions
Display information about a specific Telnet session...
Telnet Sessions
Refer to "Managing Individual Telnet Sessions."
Save your changes...
Return
To
Select
Then
Stop a specific Telnet session...
Close_Session
Specify the index number of the session to close
Save your changes...
Return
![]()
![]()
![]()
![]()
![]()
![]()
![]()
![]()